NinjaPipe is managed by a global team scattered around the world 🌍
Docly Documentation
Organization & Accounts
Create an account
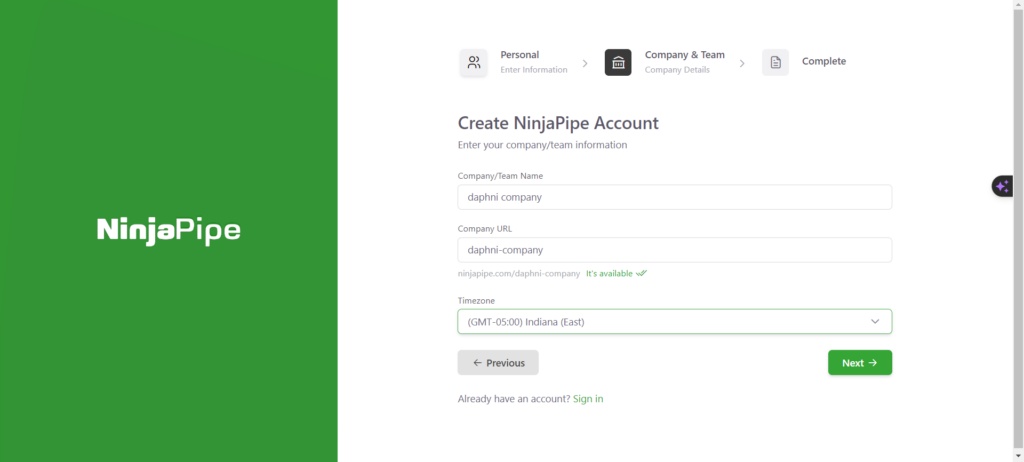
To get started on NinjaPipe, you’ll need to first create an organization and enter your company details. You will need to enter your company or team name and choose a company URL that’s unique on the platform. This will be the company’s unique name which you and your team members will be prompted with when logging in. You will not be able to select a URL that another company has already taken.
Select Tier & Start Free Trial
NinjaPipe is made for Coaches and Agencies and therefore provides 2 packages to suit these two groups. Each package has 3 tiers which you can choose from. Select the package and tier that suits you, your company or your team and get started.
We collect your card details when signing up to make sure that we only welcome real humans with valid payment details, while combatting spam. We do not charge you during the free trial and you can cancel anytime with no conditions. You can also modify or remove your details anytime through the billing settings after signing in.
We partner with Stripe to manage our payments securely.
Signing in
Apparently we had reached a great height in the atmosphere, for the sky was a dead black, and the stars had ceased to twinkle. By the same illusion which lifts the horizon of the sea to the level of the spectator on a hillside, the sable cloud beneath was dished out, and the car seemed to float in the middle of an immense dark sphere, whose upper half was strewn with silver. Looking down into the dark gulf below, I could see a ruddy light streaming through a rift in the clouds.
Lorem ipsum [1]
dolor sit amet consectetur adipisicing elit. Quod labore suscipit animi consequatur. Accusantium quibusdam dolorum at a, numquam deserunt.
Lorem ipsum dolor [2]
sit amet consectetur, adipisicing elit. Quia quos autem veniam libero! Deleniti nemo quas optio voluptas voluptatibus sint ratione. Id vel error quia ipsam sit saepe [3]
hic at amet excepturi ea. Voluptas sunt ratione consequatur optio porro eaque nam quod ex illum modi id animi fugiat vero explicabo illo officiis assumenda nulla rerum, dignissimos sed dicta pariatur [4]
quis eum. Beatae ea cumque alias ducimus quos maxime sed, modi illum at repellendus, ex deleniti nesciunt tempore placeat in accusantium!
Lorem, ipsum dolor sit amet consectetur adipisicing elit. Necessitatibus voluptas molestias expedita, ad dolorem inventore dolorum ipsum deleniti illum tempore veritatis iure nam numquam maxime [5]
eaque magnam, similique quo dolore vero optio ex reprehenderit! Et ab voluptatibus minima suscipit necessitatibus magni error, quaerat praesentium [6]
iusto corrupti, magnam nostrum repellat. Eligendi ipsam, voluptatibus quidem quos quasi totam aperiam voluptates illum quibusdam similique, sapiente necessitatibus. Dolore in est dolores [7]
debitis voluptas, sunt et ullam. Voluptates similique incidunt numquam porro, veniam totam dolore error, iste consequuntur quibusdam quod dignissimos in laborum deserunt impedit cum fugit quisquam ex quo, quidem voluptatum minima velit! Nisi accusantium ullam suscipit sapiente, harum quvelit animi laborum veritatis, ipsam eius, natus facere. Natus voluptates, et deleniti eum odio eligendi dolores cupiditate. Consequuntur hic adipisci quisquam praesentium commodi laudantium sed et modi reprehenderit. Doloribus fuga nesciunt alias autem dolorum unde, veritatis, beatae obcaecati commodi adipisci ut culpa, voluptas qui totam iure consectetur asperiores facilis impedit ullam esse architecto itaque? Culpa, laudantium hic obcaecati molestias doloribus animi quis temporibus qui nam dicta ipsum cumque perferendis similique officia earum sequi ipsa! Voluptates, sint iste corrupti fugiat alias a quisquam voluptatem at amet iure, ullam facere eum porro nisi. Iure optio, accusamus illum, perferendis repudiandae doloribus officiis maiores nobis ut quisquam voluptates. Ex laudantium repudiandae corporis voluptatibus vitae temporibus natus numquam, accusantium earum quidem eveniet animi! Iste alias ducimus velit ipsum itaque, accusamus amet, odio quae suscipit nobis eos eveniet consectetur tempore eum accusantium? Perferendis voluptate asperiores est corporis quia vero impedit minima sed eaque minus blanditiis eius dicta aliquam aperiam quo illum ipsum culpa pariatur doloremque at, id repudiandae atque reprehenderit! Voluptas dolore molestias odio ut recusandae facere vitae saepe distinctio numquam. Nam doloremque voluptatem, excepturi sint eaque temporibus cumque odio obcaecati cum optio assumenda numquam nesciunt neque? Iste ipsum esse modi iusto impedit odio vel neque. Voluptatem.
To get started on NinjaPipe, you’ll need to first create an organization and enter your company details. You will need to enter your company or team name and choose a company URL that’s unique on the platform. This will be the company’s unique name which you and your team members will be prompted with when logging in. You will not be able to select a URL that another company has already taken.
Select Tier & Start Free Trial
NinjaPipe is made for Coaches and Agencies and therefore provides 2 packages to suit these two groups. Each package has 3 tiers which you can choose from. Select the package and tier that suits you, your company or your team and get started.
We collect your card details when signing up to make sure that we only welcome real humans with valid payment details, while combatting spam. We do not charge you during the free trial and you can cancel anytime with no conditions. You can also modify or remove your details anytime through the billing settings after signing in.
We partner with Stripe to manage our payments securely.
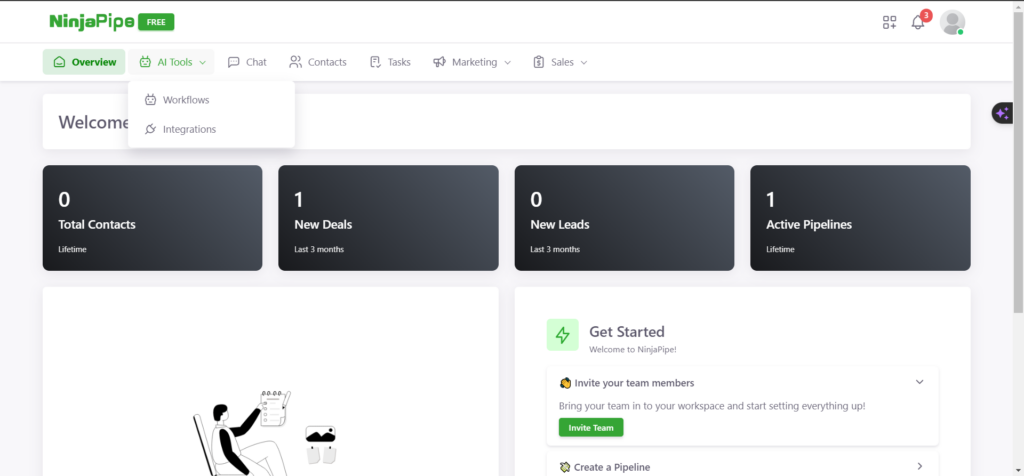
Navigating NinjaPipe Web
Navigating
Browse through the following features by clicking on any of the tabs in the navigation bar:
Overview - Overview of your entire workspace
AI Tools - Use features like Workflow designer to automate tasks
Chat - Chat with your contacts and team members
Contacts - Manage your clients, team members and other contacts
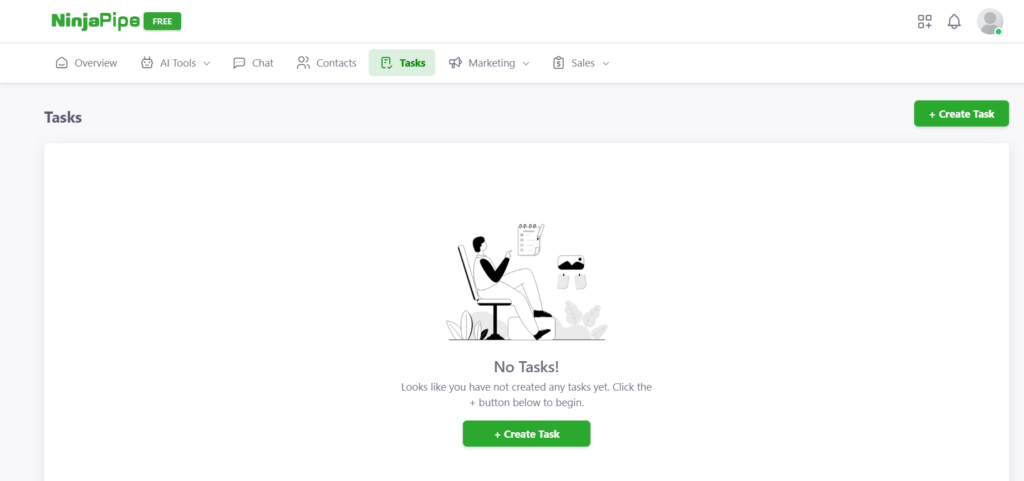
Tasks - Create tasks, set dead lines and assign to contacts
Calendar - Manage your schedule by syncing your Google Calendar
Marketing - Manage marketing features like Forms
Sales - Manage sales related features like products, pipelines, deals and create quotes and invoices
Data - Create data bins for other applications to send data to your NinjaPipe
Chats
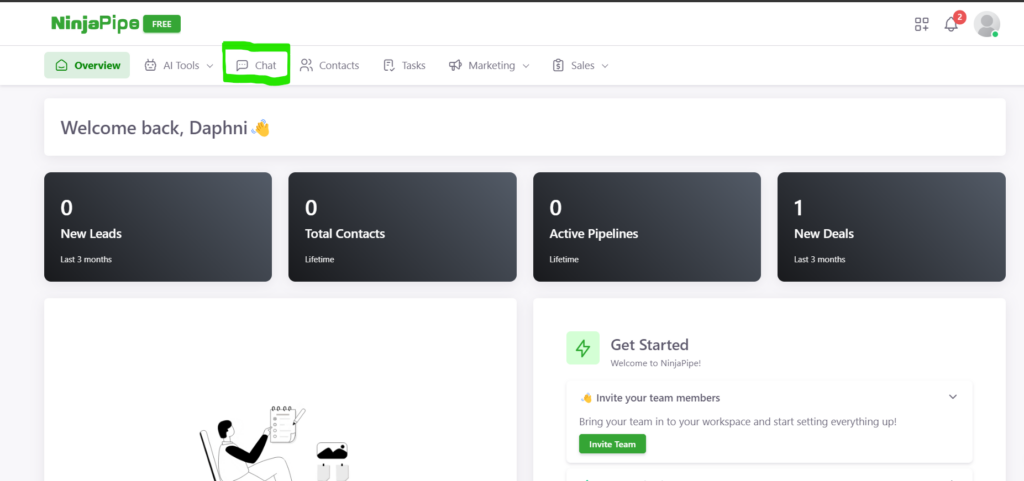
Effortlessly connect and communicate with your team members using NinjaPipe’s intuitive “Chat” feature. Designed for seamless and real-time communication, the chat functionality ensures that collaboration is at your fingertips. Here’s a step-by-step guide to help you navigate and make the most of the Chat feature within the NinjaPipe platform:
1. Accessing the Chat Section:
On the top of the dashboard, click on “Chat.” This action will direct you to the Chat page, where you can initiate and engage in conversations with your team members.
2. Chat Interface:
Upon entering the Chat page, your ongoing chats will appear on the right side of the page. This interface provides a clear and convenient view of your active conversations.
3. Initiating a New Chat:
To start a new chat, use the search function to find contacts. Simply enter the name of the person you want to chat with, and a list of matching contacts will appear. Click on the contact’s name to start a new chat with them.
4. Searching Contacts and Chats:
The search functionality extends beyond initiating new chats. You can also search for old chats by team member names. This ensures that you can easily retrieve and reference previous conversations for seamless collaboration.
NinjaPipe’s “Chat” feature serves as a dynamic and user-friendly communication tool. By providing a clear interface for ongoing chats, an efficient search function for initiating new conversations, and the ability to search for past interactions, NinjaPipe’s Chat feature facilitates effective team communication within the platform. Whether you’re starting new discussions or referring to past conversations, the Chat feature ensures that communication remains fluid and accessible for enhanced collaboration.
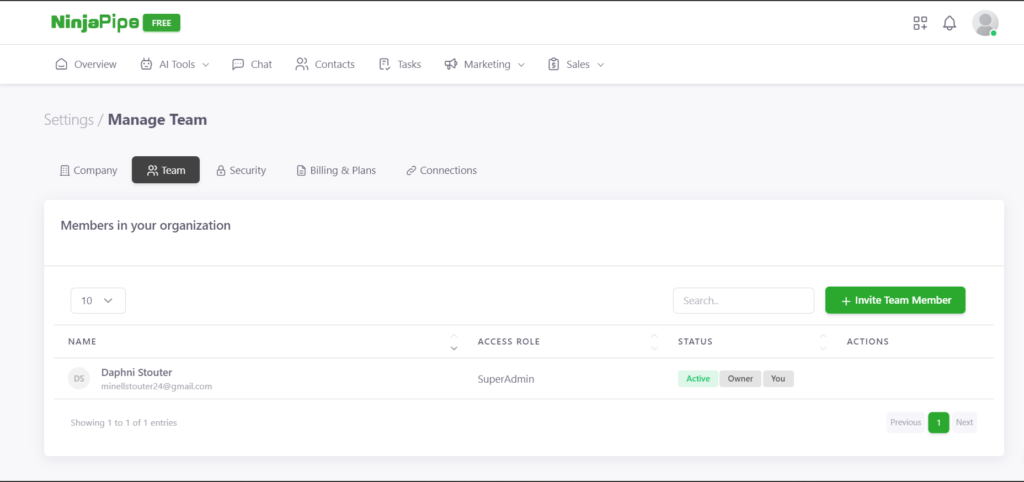
Invite Team Members
Effectively collaborate and build your team within NinjaPipe by utilizing the “Invite Team Members” feature. This streamlined process ensures that you can easily bring your team on board, fostering a collaborative environment. Here’s a step-by-step guide to help you invite team members within the NinjaPipe platform:
1. Accessing the Invite Team Members Section:
From the dashboard, navigate to the “Get Started” section. Click on “Invite Team Members” to initiate the team invitation process.
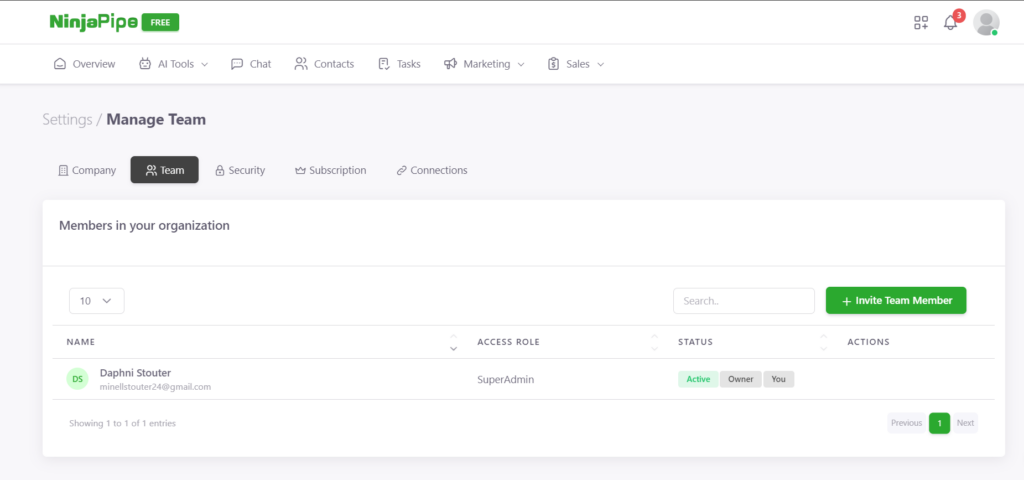
2. Navigating to the Manage Team Page:
Upon clicking, you will be directed to the “Manage Team” page. Here, you can view the existing members in your organization, providing an overview of your team structure.
3. Searching for Team Members:
Utilize the search function to find specific team members or navigate through the list to locate individuals within your organization.
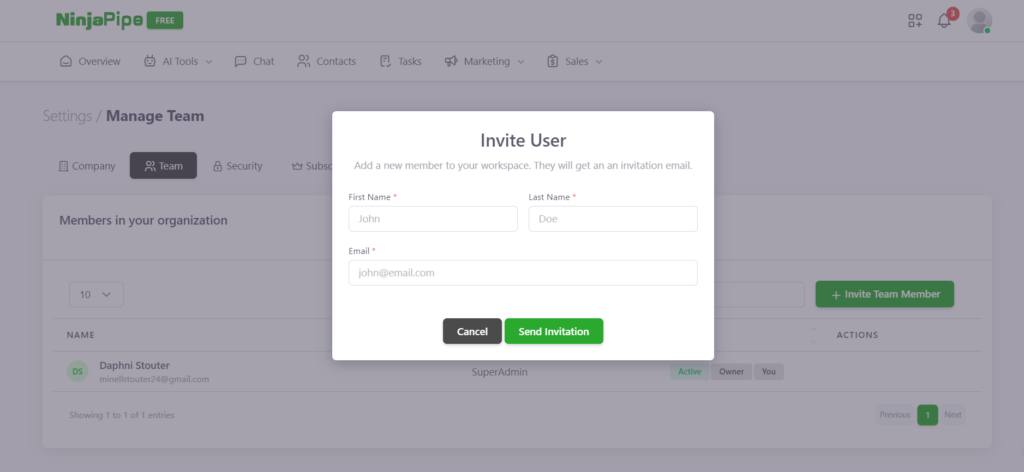
4. Inviting Team Members:
To invite new team members, click on “Invite Team Members.” This action will prompt a form where you can add the first name, last name, and email address of the team members you wish to invite.
5. Adding Team Member Details:
Fill in the required information for the team members, including their first name, last name, and email address.
6. Sending Invitations:
Once the details are added, click on “Send Invitation” to dispatch the invitations to the specified team members.
NinjaPipe’s “Invite Team Members” feature offers a straightforward and efficient method for expanding and managing your team within the platform. By providing a user-friendly interface to add and invite team members, NinjaPipe ensures that the onboarding process is seamless, enabling teams to collaborate and communicate effectively within the collaborative environment of the platform.
Download NinjaPipe Mobile App – Android
Downloading NinjaPipe on your Android device is a simple and quick process, allowing you to stay connected and manage your tasks on the go. Here’s a step-by-step guide to help you download NinjaPipe from the Play Store:
1. Accessing the Play Store:
Open the Play Store on your Android device.
2. Searching for NinjaPipe:
Type “NinjaPipe” in the search bar and initiate the search.
3. Selecting NinjaPipe:
Once you find the NinjaPipe app, click on it to access the app’s page.
4. Installing the App:
On the NinjaPipe app page, click on the “Install” button to start the installation process.
5. Opening the App:
After the installation is complete, click on “Open” to launch the NinjaPipe app.
6. Creating an Account or Signing In:
If you are new to NinjaPipe, you can create an account by providing the necessary details. If you already have an account, simply sign in using your company ID and password.
7. Exploring the Mobile App:
Once signed in, you can explore the features of the NinjaPipe mobile app, allowing you to manage tasks, collaborate with your team, and stay updated on the go.
8. Video Guide:
For a visual guide on downloading, installing, and setting up the NinjaPipe mobile app, you can refer to the accompanying video tutorial.
The NinjaPipe Android app provides a convenient way to access and manage your tasks from your mobile device. By following these simple steps, you can quickly download the app, whether you’re new to NinjaPipe or an existing user looking to extend your workflow to your Android device.
Features- NinjaPipe Mobile App
Navigating and managing your tasks on the go has never been easier with the NinjaPipe Mobile App. This user-friendly application mirrors the functionality of the website, ensuring a seamless experience whether you’re in the office or on the move. Let’s explore the key features of the NinjaPipe Mobile App:
1.Sign-In or Account Creation: Upon completing the installation, users can effortlessly sign in using their company ID and password. Alternatively, new users have the option to create an account directly from the mobile app.
2. Dashboard Overview: The Dashboard on the mobile app provides a quick overview of essential information, allowing users to stay informed about key metrics and updates at a glance.
3. Contact Management: Users can easily access and manage their contacts through the Contact feature. This functionality ensures that your important connections are just a tap away.
4. Real-time Chats: The Chats feature enables real-time communication, allowing team members to collaborate seamlessly through instant messaging.
5.Instant Notifications: Stay on top of your tasks and updates with the Notifications feature. Receive instant alerts and keep track of important changes within your projects.
6.More Options:
Explore additional features under the “More” section, including:
Deals: Manage and track your deals efficiently.
Tasks: Access and manage your tasks on the go.
Settings: Customize your app preferences.
Forms: Utilize forms for specific data collection.
Data Policy: Review and manage data policies.
Manage Profile: Update and customize your user profile.
Privacy Policy: Access and review the privacy policy.
The NinjaPipe Mobile App brings the power of project management and collaboration to your fingertips. With a focus on simplicity and functionality, this app ensures that users can seamlessly access, update, and manage their tasks and projects while on the move. Whether you’re checking notifications, engaging in real-time chats, or managing contacts, the NinjaPipe Mobile App is designed to enhance your mobile project management experience.
Organizing your data
Create Tasks
Navigate your daily workflow seamlessly with NinjaPipe’s intuitive “Create Tasks” feature. Designed for efficient task management, this tool allows you to organize and track your tasks effortlessly. Here’s a step-by-step guide to help you create tasks and stay on top of your work:
1. Accessing the Task Section:
you can see a section called “Task” on top of your NinjaPipe dashboard. This is your entry to creating and managing tasks within the NinjaPipe platform.
2. Initiating Task Creation:
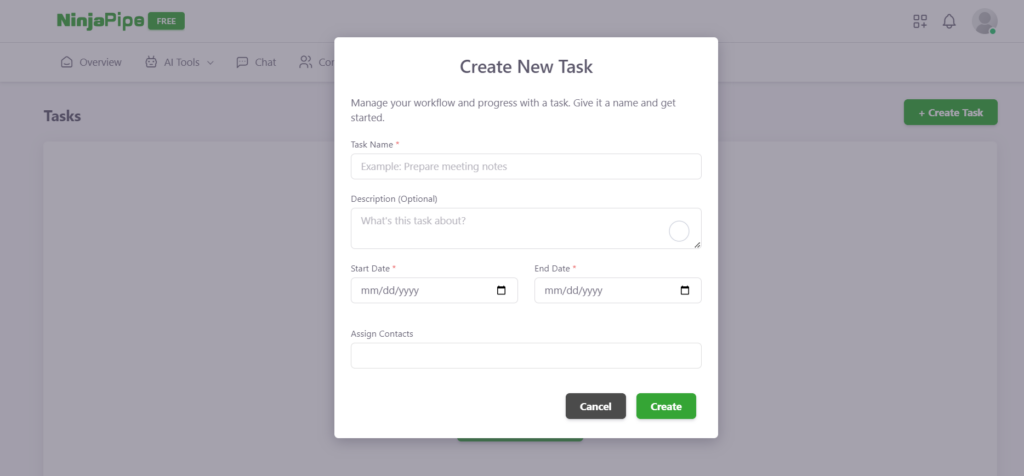
Click on the “Task” section to enter the task management interface. Here, you can initiate the creation of a new task to streamline your workflow.
3. Adding Task Details:
Provide essential details to define your task:
Task Name: Give your task a descriptive name, ensuring clarity and easy identification.
Description (Optional): Add additional context or details to the task if needed.
Start Date: Specify when the task should commence.
End Date: Set the deadline or completion date for the task.
Assign Contacts: Allocate the task to specific contacts or team members.
4. Completing the Task Creation:
Once you’ve filled in the necessary details, click on “Create.” Congratulations! You have successfully created your task, and it is now integrated into the NinjaPipe task management system.
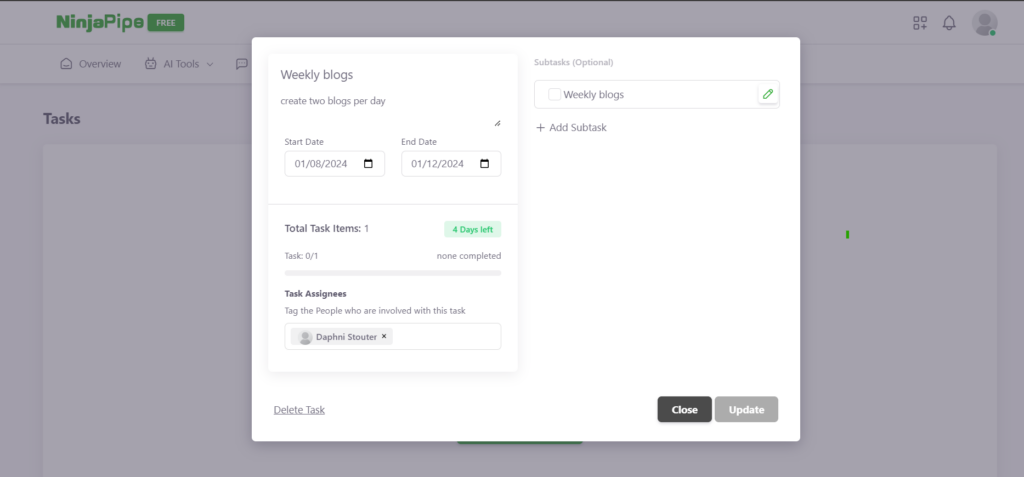
5. Viewing Your Tasks:
Your newly created task will be displayed in the “Tasks” section, providing a clear overview of your ongoing tasks and their respective details.
NinjaPipe’s “Create Tasks” feature offers a user-friendly and efficient way to manage your workflow. By providing a structured approach to task creation and organization, users can stay organized and focused on their priorities. Whether you’re working individually or collaboratively, NinjaPipe’s task management functionality ensures that you can easily create, track, and complete tasks, contributing to a more productive and streamlined work experience.
Create Tasks Mobile Version – Android
Account settings
Signing in
Apparently we had reached a great height in the atmosphere, for the sky was a dead black, and the stars had ceased to twinkle. By the same illusion which lifts the horizon of the sea to the level of the spectator on a hillside, the sable cloud beneath was dished out, and the car seemed to float in the middle of an immense dark sphere, whose upper half was strewn with silver. Looking down into the dark gulf below, I could see a ruddy light streaming through a rift in the clouds.
Lorem ipsum [1]
dolor sit amet consectetur adipisicing elit. Quod labore suscipit animi consequatur. Accusantium quibusdam dolorum at a, numquam deserunt.
Lorem ipsum dolor [2]
sit amet consectetur, adipisicing elit. Quia quos autem veniam libero! Deleniti nemo quas optio voluptas voluptatibus sint ratione. Id vel error quia ipsam sit saepe [3]
hic at amet excepturi ea. Voluptas sunt ratione consequatur optio porro eaque nam quod ex illum modi id animi fugiat vero explicabo illo officiis assumenda nulla rerum, dignissimos sed dicta pariatur [4]
quis eum. Beatae ea cumque alias ducimus quos maxime sed, modi illum at repellendus, ex deleniti nesciunt tempore placeat in accusantium!
Lorem, ipsum dolor sit amet consectetur adipisicing elit. Necessitatibus voluptas molestias expedita, ad dolorem inventore dolorum ipsum deleniti illum tempore veritatis iure nam numquam maxime [5]
eaque magnam, similique quo dolore vero optio ex reprehenderit! Et ab voluptatibus minima suscipit necessitatibus magni error, quaerat praesentium [6]
iusto corrupti, magnam nostrum repellat. Eligendi ipsam, voluptatibus quidem quos quasi totam aperiam voluptates illum quibusdam similique, sapiente necessitatibus. Dolore in est dolores [7]
debitis voluptas, sunt et ullam. Voluptates similique incidunt numquam porro, veniam totam dolore error, iste consequuntur quibusdam quod dignissimos in laborum deserunt impedit cum fugit quisquam ex quo, quidem voluptatum minima velit! Nisi accusantium ullam suscipit sapiente, harum quvelit animi laborum veritatis, ipsam eius, natus facere. Natus voluptates, et deleniti eum odio eligendi dolores cupiditate. Consequuntur hic adipisci quisquam praesentium commodi laudantium sed et modi reprehenderit. Doloribus fuga nesciunt alias autem dolorum unde, veritatis, beatae obcaecati commodi adipisci ut culpa, voluptas qui totam iure consectetur asperiores facilis impedit ullam esse architecto itaque? Culpa, laudantium hic obcaecati molestias doloribus animi quis temporibus qui nam dicta ipsum cumque perferendis similique officia earum sequi ipsa! Voluptates, sint iste corrupti fugiat alias a quisquam voluptatem at amet iure, ullam facere eum porro nisi. Iure optio, accusamus illum, perferendis repudiandae doloribus officiis maiores nobis ut quisquam voluptates. Ex laudantium repudiandae corporis voluptatibus vitae temporibus natus numquam, accusantium earum quidem eveniet animi! Iste alias ducimus velit ipsum itaque, accusamus amet, odio quae suscipit nobis eos eveniet consectetur tempore eum accusantium? Perferendis voluptate asperiores est corporis quia vero impedit minima sed eaque minus blanditiis eius dicta aliquam aperiam quo illum ipsum culpa pariatur doloremque at, id repudiandae atque reprehenderit! Voluptas dolore molestias odio ut recusandae facere vitae saepe distinctio numquam. Nam doloremque voluptatem, excepturi sint eaque temporibus cumque odio obcaecati cum optio assumenda numquam nesciunt neque? Iste ipsum esse modi iusto impedit odio vel neque. Voluptatem.
Footnotes
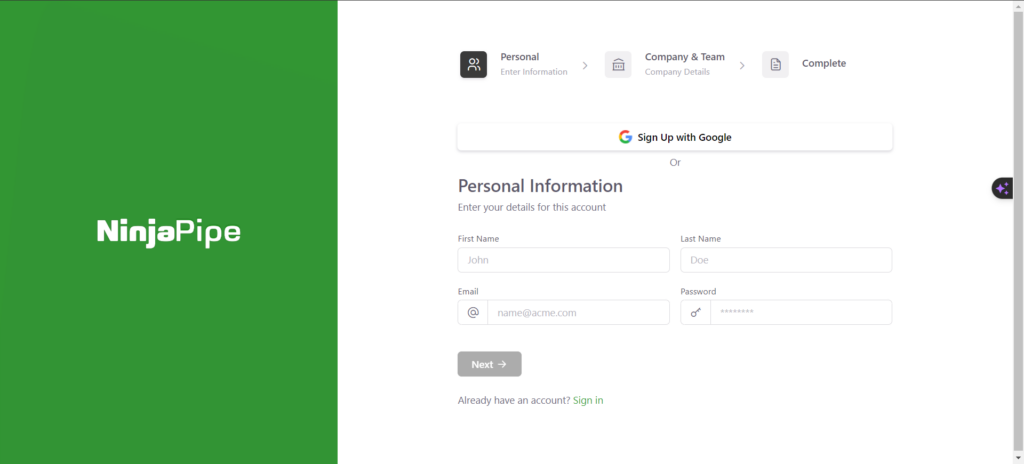
Creating a new account on NinjaPipe
In today’s fast-paced digital landscape, having a reliable platform for seamless communication and project management is crucial. NinjaPipe emerges as a solution, offering a user-friendly interface and powerful features. If you’re ready to join the NinjaPipe community, here’s a step-by-step guide on how to create your account.
Open Your Web Browser: Launch your preferred web browser and type “ninjapipe” in the search bar or directly enter ninjapipe.com.
Visit NinjaPipe’s Home Page: Upon reaching the NinjaPipe website, navigate to the home page by clicking on the provided link or entering ninjapipe.com in the address bar.
Click on Sign-Up: Look for the “Sign-Up” button on the home page and click on it. This will initiate the account creation process.
Fill in Your Details:
Enter Your Name and Last Name: Provide your first and last name in the designated fields.
Email Address: Input a valid email address that you have access to as it will be used for account verification and communication.
Strong Password: Create a strong and secure password to protect your account. Ensure it meets the specified criteria for strength.
Click Next: Once you’ve filled in your personal information, click on the “Next” button to proceed to the next step of the registration process.
Add Your Company Details:
Company Name and URL: Enter your company’s name and its corresponding URL to establish your professional identity on NinjaPipe.
Time Zone: Select your time zone to ensure that your NinjaPipe experience is tailored to your local time.
Click Next:After providing your company information and selecting your time zone, click on the “Next” button to move forward.
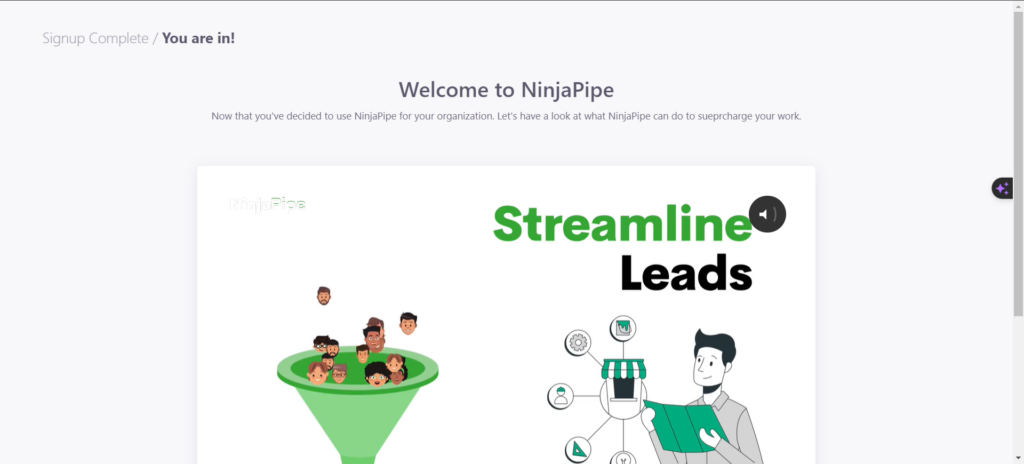
Congratulations! You’re In: You have successfully created your NinjaPipe account. Explore the platform’s features and functionalities to streamline your communication and project management needs.
NinjaPipe simplifies collaboration and enhances productivity, making it an ideal choice for individuals and teams alike. By following these easy steps, you can quickly set up your account and unlock the full potential of NinjaPipe for effective project management and communication. Welcome to the NinjaPipe community!
User Profile & Settings
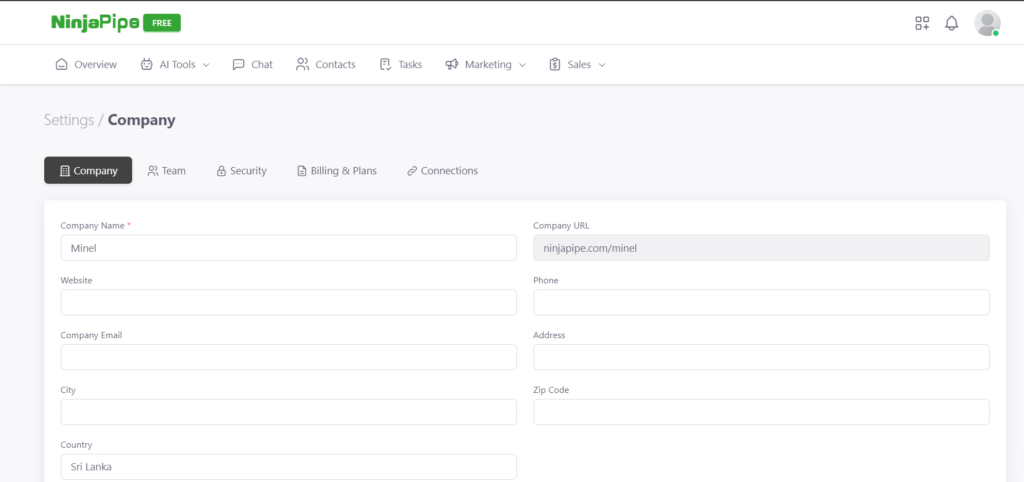
Effortlessly manage and tailor your NinjaPipe experience by utilizing the comprehensive “User Profile & Settings” feature. This flexible tool empowers users to customize their profiles, adjust account settings, and access crucial information with ease. Here’s a detailed guide on how to navigate and make the most of the User Profile & Settings in NinjaPipe:
1. Accessing User Profile & Settings:
Spot the human-shaped icon in the left corner of your dashboard. Click on it to reveal a dropdown menu displaying your username, email address, and key options such as Billing, Settings, Help, and Logout.
2. Navigating to Account Settings:
Click on “Settings” to access your account settings. This action directs you to a page where you can manage various aspects of your NinjaPipe account.
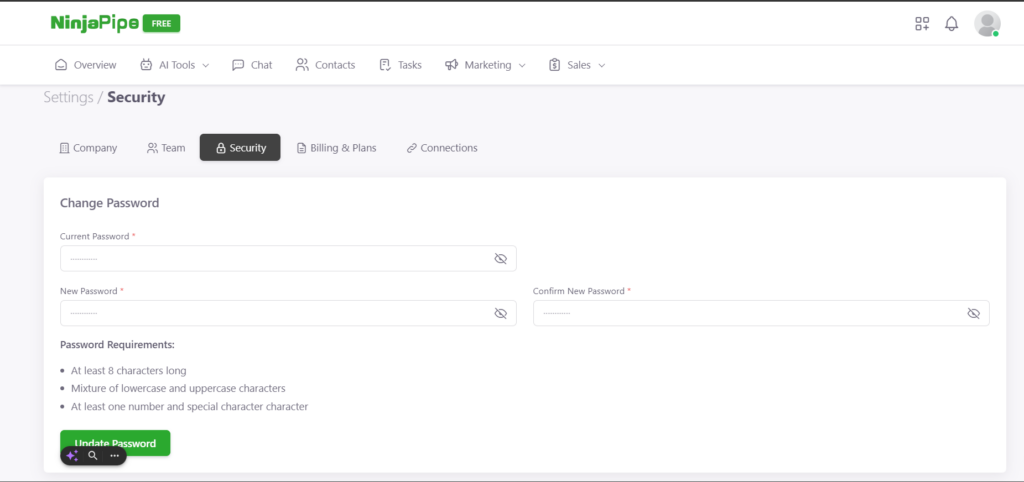
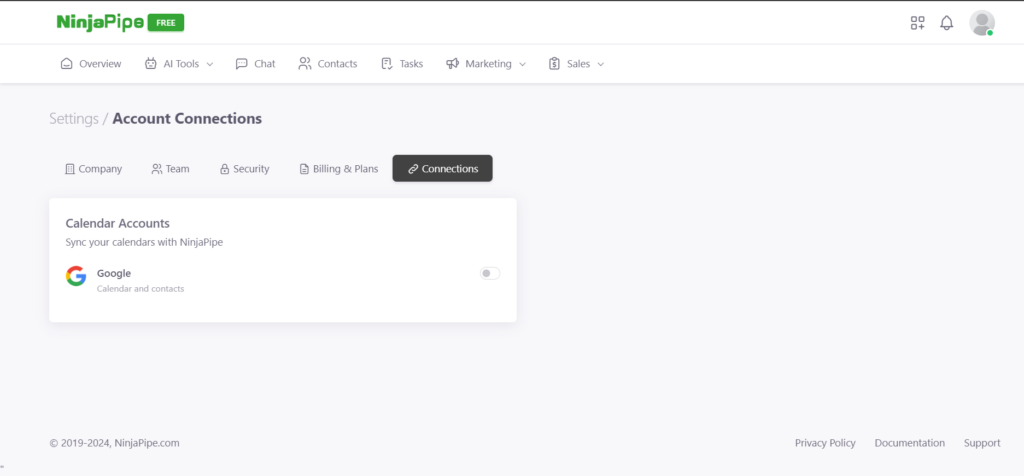
3. Sections Under Settings:
Within the Settings, you’ll find four essential sections:
a. Company:
View and edit your company details.
Upload or change your company logo.
b. Team:
Review the members of your organization.
Check member count.
View your access role, name, and status.
Search contacts and invite team members
c. Security:
Change, view, and update your password.
Enable Two-step verification for enhanced security.
d. Billing & Plans:
Upgrade and manage your plan.
e. Connections:
Sync your calendars with NinjaPipe through Calendar Accounts.
Enable or disable calendar sync based on your preferences.
4. Help and Support:
Click on “Help” to access the NinjaPipe Help and Support Center. Here, you can find a wealth of information, including guide articles, the option to create tickets for personalized assistance, and access to the community for additional support.
The User Profile & Settings feature in NinjaPipe provides users with a central hub for personalizing their experience and managing account-related details. Whether adjusting company information, reviewing team members, enhancing security, managing billing and plans, or syncing calendars, users have a comprehensive suite of tools at their disposal. The Help and Support section further ensures that users can find assistance and information whenever needed, contributing to a seamless and user-friendly experience within the NinjaPipe platform.
Billing
Troubleshooting
Troubleshoot your NinjaPipe Account
Integrations
Frequently asked questions and answers.
Zapier Integration
Zapier is a powerful automation tool designed to interface with thousands of the most well-known applications, such as Gmail, Slack, and Todoist, effectively streamlining your workflow. In a matter of minutes, you’re capable of configuring automated processes (which we refer to as ‘Zaps’), that can transform NinjaPipe into a central hub for managing your sales workflow. Zaps are incredibly versatile. They allow you to generate new leads, modify the status of a deal, attach files to an account, and perform a plethora of other tasks.
This means there’s no need for tedious manual labor. These automated actions not only save you precious time but also reduce the risk of human error and ensure a more consistent and efficient workflow. By creating a bridge between your favorite apps and services, Zapier offers a powerful way to create complex, automated workflows that can significantly enhance productivity and streamline your daily tasks.
As of now, we have a few zaps available for you to use along with some pre-designed recipes. We will continue to add new zaps as we go.
Triggers
You can use the following Zapier Triggers:
New Contact: Triggers when a new contact is created in your NinjaPipe Workspace New Deal: Triggers when a new deal is created in your NinjaPipe Workspace
Actions
You can use the following Zapier Triggers:
Create Contact: Automatically create a new contact when data is received Create Task: Automatically create a new task when data is received
Connecting your NinjaPipe to Zapier
To get started, select the NinjaPipe Zap from Zapier:
Once you select it, you will be prompted to sign in to your NinjaPipe account.
Sign in with the following details:
Email: Your NinjaPipe Email
Password: Your NinjaPipe Password
Tenant URL: Your NinjaPipe Organization URL. You can contact your administrator to get this.
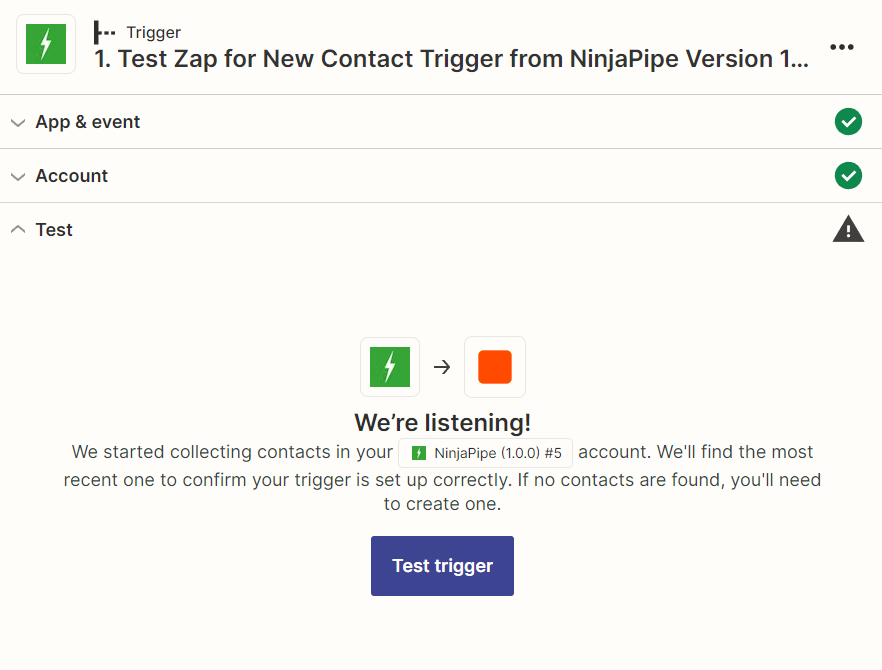
New Contact Trigger
If you connect this trigger, your zap will execute as soon as a new contact is added at any given time on your NinjaPipe workspace. You can connect this with different other applications for varying purposes.
You can test the trigger by creating a new contact via your NinjaPipe Mobile app or your web app and Zapier will detect that new contact. You can skip the test if you want to.
New Deal Trigger
If you connect this trigger, your zap will execute as soon as a new deal is added at any given time on your NinjaPipe workspace. You can connect this with different other applications for varying purposes.
You can test the trigger by creating a new deal via your NinjaPipe Mobile app or your web app and Zapier will detect that new deal. You can skip the test if you want to.
Create Contact
If you connect this action to any of your other triggers, your zap will create a new contact entry in your NinjaPipe workspace. You can connect this with different other triggers on Zapier for creating contacts from different sources.
You can test the action by executing the connected Trigger. The following are the required fields to create a new contact:
1. First name
2. Last name
3. Email
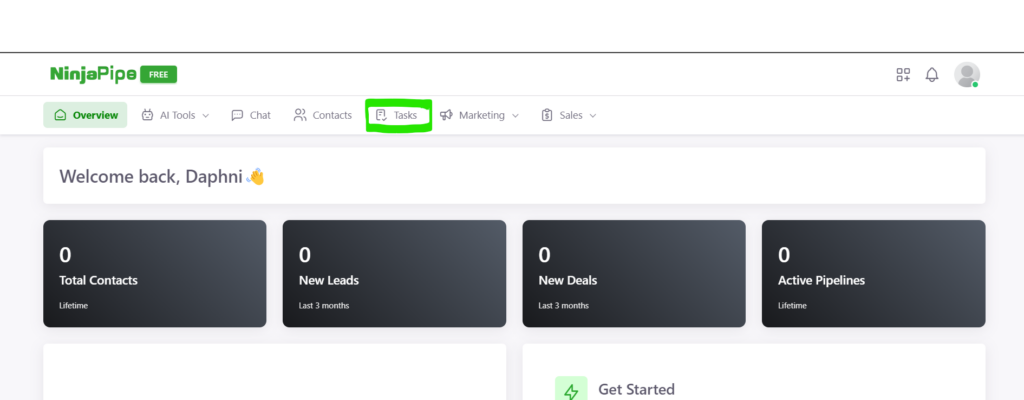
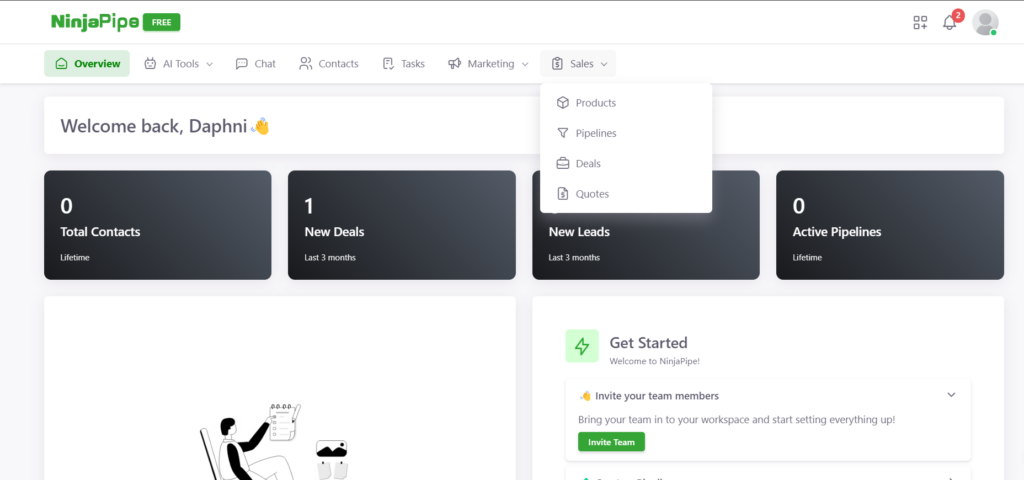
Ninjapipe Overview
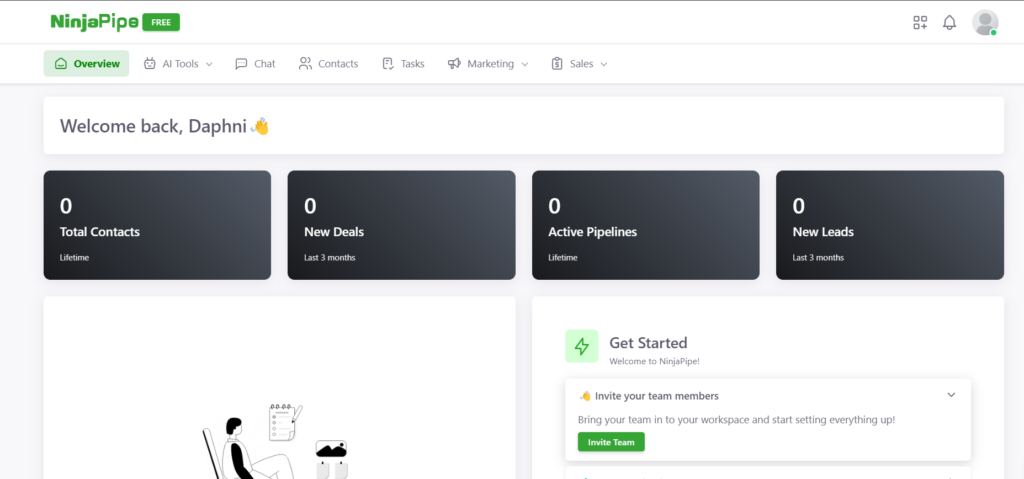
Here is how you can use the Overview feature to view a summary of your business using NinjaPipe. Once you create an account on NinjaPipe, you are greeted with a comprehensive NP Overview that empowers you to take control of your tasks and projects. Let’s looking into the features that make NinjaPipe a go-to solution for teams and individuals alike.
Total Contacts:
Keep your contacts organized effortlessly. The NP Overview provides a snapshot of your total contacts, ensuring you have quick access to essential information about your professional network.
New Deals:
Stay on top of your business opportunities with the “New Deals” feature. This section gives you real-time updates on potential collaborations, allowing you to make informed decisions promptly.
Active Pipelines:
Monitor the progress of your ongoing projects seamlessly. The “Active Pipelines” feature provides insights into the status of your pipelines, ensuring you are always in the loop.
New Leads:
Identify and capitalize on new business prospects efficiently. The NP Overview highlights “New Leads,” enabling you to expand your network and nurture promising connections.
All Tasks:
Keep your tasks organized and prioritized. The NP Overview consolidates all your tasks in one place, providing a centralized hub for efficient task management.
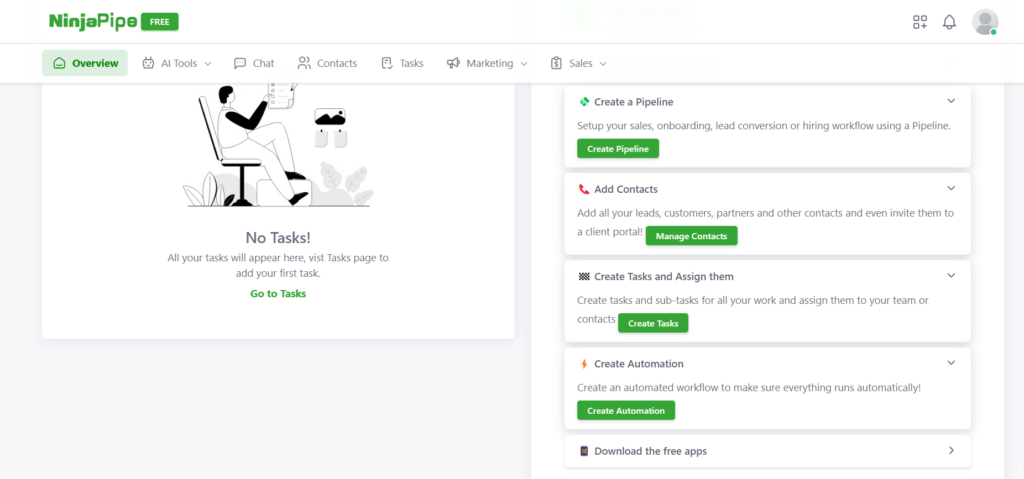
But the exploration doesn’t stop there. NinjaPipe goes beyond the basics, offering a range of features to supercharge your productivity:
Invite Your Team Members:
Collaborate seamlessly by inviting your team members to join NinjaPipe. Foster a culture of teamwork and communication within your organization.
Create a Pipeline:
Tailor your project workflows by creating pipelines that align with your business objectives. NinjaPipe allows you to customize pipelines to suit the unique needs of your projects.
Add Contacts:
Expand your professional network effortlessly. Add contacts directly within the platform, ensuring all your connections are easily accessible when you need them.
Create Tasks and Assign Them:
Efficient task management is at your fingertips. Create tasks, assign them to team members, and track progress seamlessly, all from the NP Overview.
Create Automation:
Upgrade your efficiency with automation. NinjaPipe allows you to create automation rules that streamline repetitive tasks, saving you time and reducing the risk of errors.
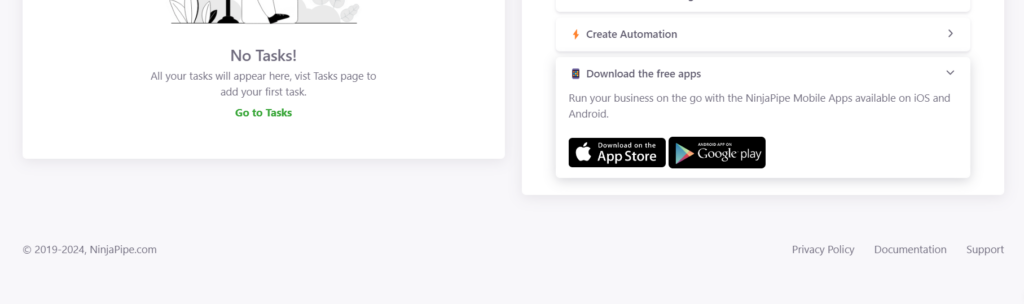
Download the Free Apps:
Stay connected on the go. Download the free NinjaPipe apps for mobile devices, ensuring that you can manage your tasks and projects from anywhere.
In conclusion, NinjaPipe offers more than just an overview; it provides a robust platform for individuals and teams to collaborate effectively, manage tasks effortlessly, and drive business growth. Explore the power of NinjaPipe today and experience a new level of productivity in your professional endeavors.
Notifications
Navigate through your daily tasks, emails, and plans seamlessly with NinjaPipe’s dedicated “Notifications” feature. Situated conveniently at the top of the dashboard, represented by a bell icon, this functionality ensures that you stay informed and on top of your workflow without the need to scour different platforms. Here’s how you can make the most of the Notifications feature:
Spot the Bell Icon:
Look for the distinctive bell icon positioned at the top left side of the dashboard. This is your gateway to accessing all your daily notifications in one centralized location.
Click on Notifications:
With a simple click on the bell icon, you open up the Notifications panel. This area serves as a hub for all the updates, alerts, and reminders related to your tasks, projects, and communications.
Stay Informed in Real-Time:
NinjaPipe’s Notifications feature ensures that you receive real-time updates on essential activities, keeping you informed about new tasks, messages, or any other noteworthy events within the platform.
Efficient Task Management:
No need to sift through emails or various sections of the platform to find updates. The Notifications feature consolidates all relevant information, allowing for efficient task management and timely responses.
Instant Access to Important Alerts:
Whether it’s a deadline approaching, a new message in your inbox, or updates on ongoing projects, the Notifications feature provides instant access to important alerts, allowing you to prioritize your time effectively.
By incorporating the Notifications feature into the NinjaPipe dashboard, the platform enhances the user experience, ensuring that individuals and teams can manage their tasks and communications with agility. This streamlined approach not only saves time but also contributes to a more organized and productive workflow. So, the next time you’re on NinjaPipe, don’t forget to click on the bell icon – your gateway to staying informed and in control of your daily activities.
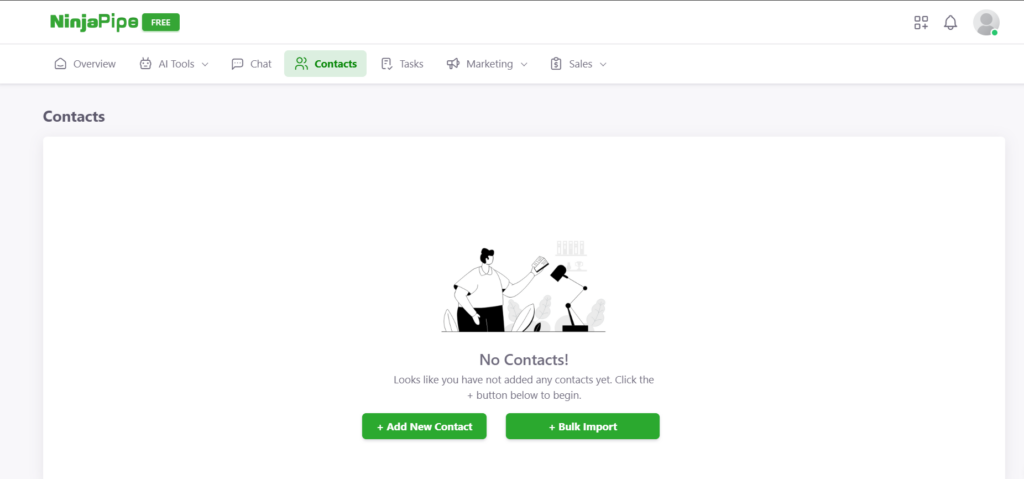
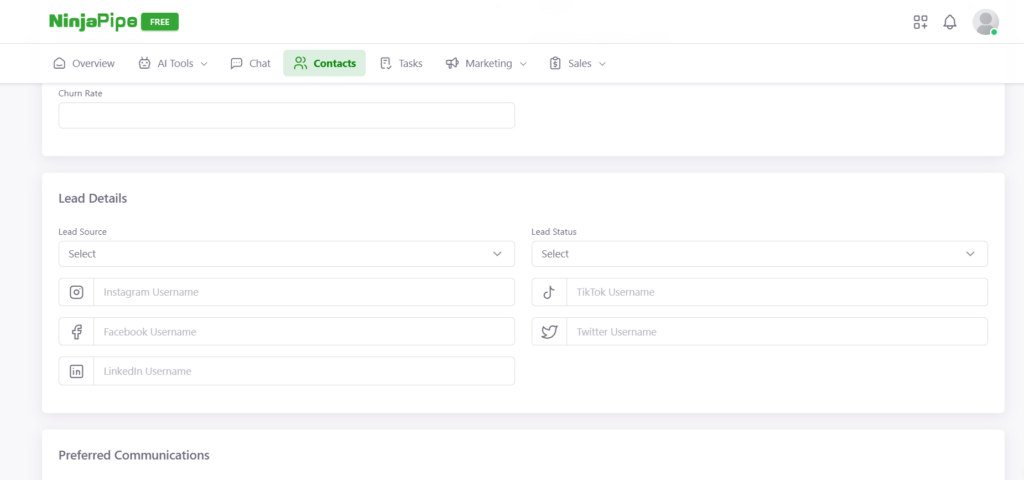
Creating Contacts
Once you create an account, accessing and managing your contacts on NinjaPipe is a breeze. Follow these simple steps to make the most of the contact features:
Locate the Contact Section: After logging in, find the “Contact” section conveniently placed at the top of the NinjaPipe home page.
Navigate to the Contact Page: Click on the “Contact” section, and it will seamlessly transition you to the Contact Page, where you can efficiently manage your professional connections.
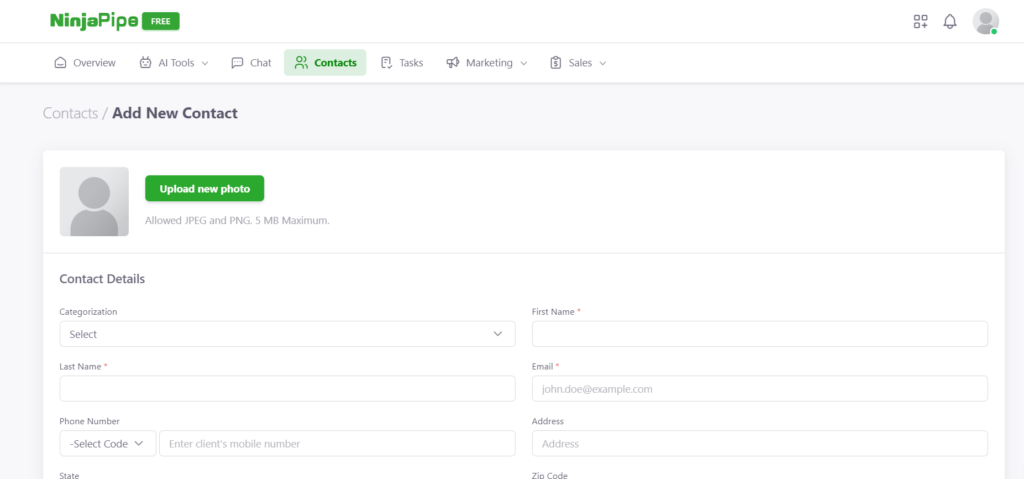
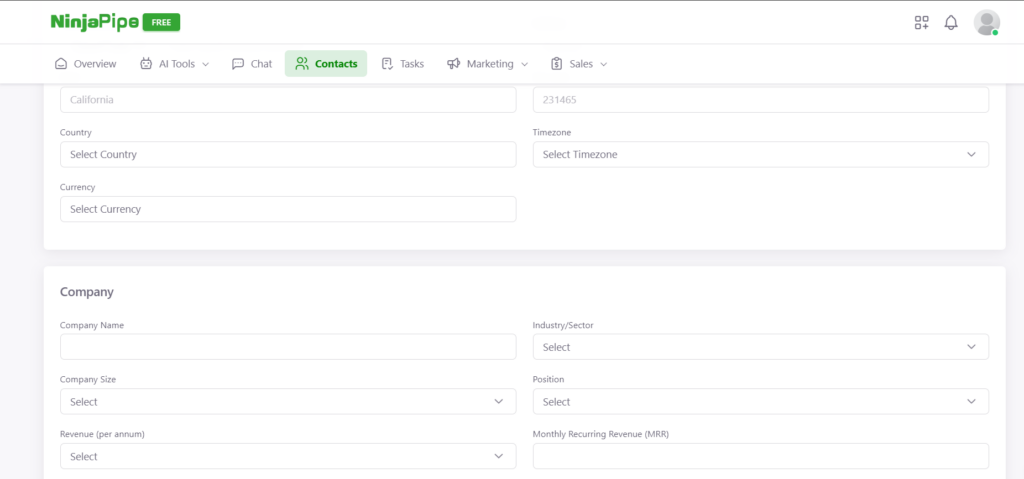
Add New Contact: To add a new contact individually, utilize the “Add New Contact” option. Click on it, and a form will appear, prompting you to fill in the contact details. Provide the necessary information such as name, email address, and any other relevant data to create a comprehensive contact profile.
Bulk Import Contacts: For a more efficient approach, NinjaPipe offers a “Bulk Import” option. If you have a list of contacts sorted in a CSV or Excel file, this feature allows you to import them seamlessly into NinjaPipe. Click on the “Bulk Import” section, follow the prompts, and watch as your contacts populate effortlessly.
With these straightforward steps, managing your contacts on NinjaPipe becomes a streamlined process. Whether you prefer adding contacts one by one or importing them in bulk, NinjaPipe provides the flexibility to adapt to your workflow, ensuring that you stay organized and connected with your professional network.
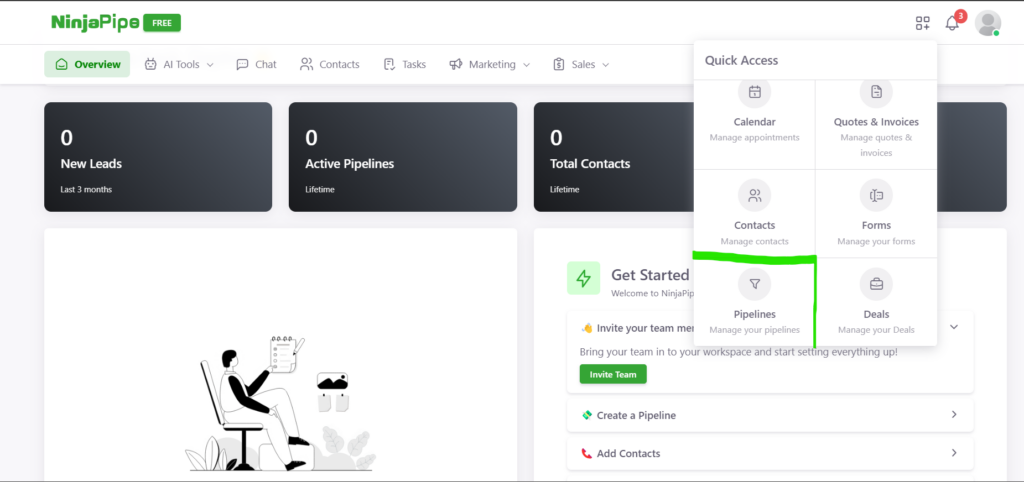
Quick Access Menu
Quick Access Menu
NinjaPipe’s user-friendly interface offers a quick and efficient way to access a myriad of features through the convenient “Quick Access” menu. Placed prominently on the left side of the dashboard, this tool allows users to navigate seamlessly and access essential functions with just a click. Let’s explore the diverse features available through the Quick Access menu:
Calendar:
Stay organized and on top of your schedule by clicking on the “Calendar” option. NinjaPipe’s calendar feature provides a visual overview of your upcoming events and tasks, ensuring that you never miss a deadline or important meeting.
Quotes and Invoices:
Manage your financial transactions effortlessly by navigating to “Quotes and Invoices” through Quick Access. This feature allows users to generate quotes, and invoices, and track payments with ease, streamlining the billing process.
Contacts:
Access your contacts swiftly by clicking on the “Contacts” option in Quick Access. Whether you need to add new contacts, import them in bulk, or simply view your existing network, NinjaPipe’s contact management is just a click away.
Forms:
Simplify data collection and streamline processes with the “Forms” feature. By utilizing Quick Access, users can effortlessly create, customize, and manage forms, facilitating efficient data gathering for various purposes.
Pipelines:
Tailor your project workflows by clicking on “Pipelines” through Quick Access. This feature enables users to create, customize, and manage pipelines, ensuring that projects progress seamlessly from start to finish.
Deals:
Monitor and track your business opportunities by accessing the “Deals” feature. With a single click through Quick Access, users can stay informed about new deals, manage ongoing negotiations, and make data-driven decisions.
NinjaPipe’s Quick Access lies in its simplicity and accessibility. Users can effortlessly navigate through various features without the need for extensive menu searches. This intuitive approach enhances the overall user experience, allowing individuals and teams to focus on their tasks and projects with efficiency and ease. As you explore the Quick Access menu, you’ll discover a wealth of tools at your fingertips, ready to elevate your productivity within the NinjaPipe platform.
Marketing
Marketing
NinjaPipe’s dedicated “Marketing” section is prominently featured at the top of the dashboard. This specialized area empowers users with tools designed to enhance marketing strategies and data management. Let’s explore the two key sections under Marketing:
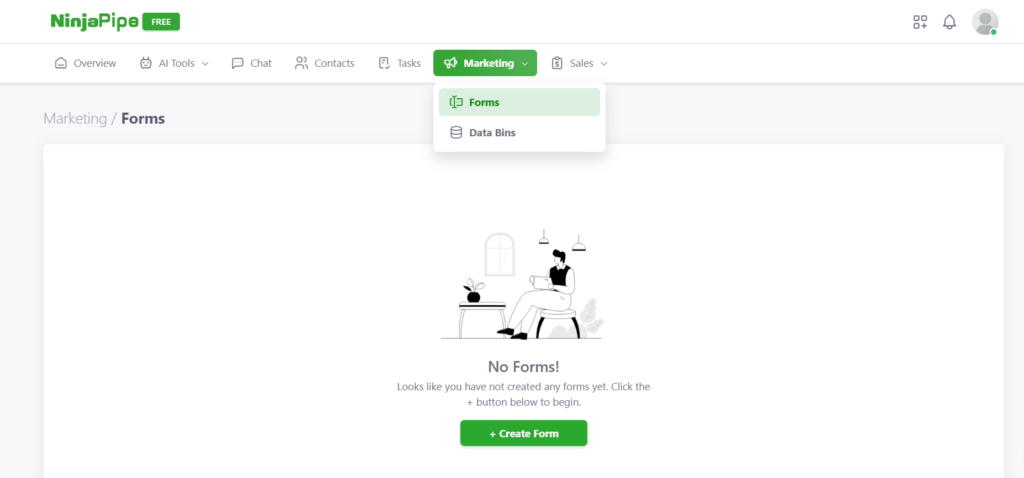
Forms:
Under Marketing, the “Forms” section is a dynamic tool for efficient data collection and management. This feature allows users to create, customize, and manage forms tailored to their marketing needs. Whether you’re gathering customer feedback, conducting surveys, or collecting leads, Forms on NinjaPipe streamlines the data collection process, providing a user-friendly and organized approach to managing crucial marketing information.
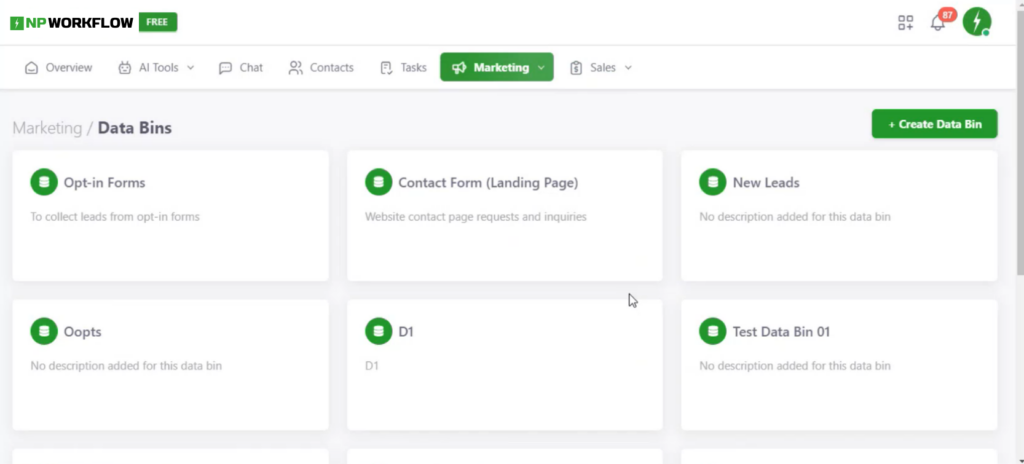
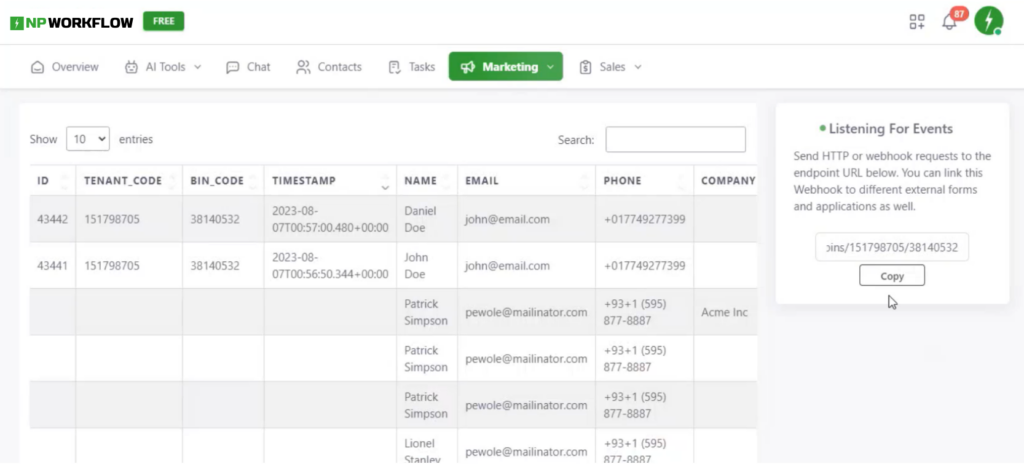
Data Bins:
Another integral component of NinjaPipe’s Marketing section is the “Data Bins” feature. This functionality provides users with a structured and organized way to manage and store marketing-related data. Whether it’s customer information, campaign data, or other crucial marketing assets, Data Bins ensures that your marketing data is easily accessible, searchable, and well-organized.
By incorporating the Marketing section into the NinjaPipe dashboard, the platform extends its utility beyond project management and communication. It caters specifically to the needs of marketing professionals, offering a space for collaboration and efficient data management. The Forum encourages a sense of community, fostering discussions that can lead to valuable insights, while Data Bins provide a structured approach to managing marketing data, contributing to a more organized and streamlined marketing workflow. As you explore NinjaPipe’s Marketing section, you’ll find a suite of tools tailored to enhance your marketing efforts and support the success of your campaigns.
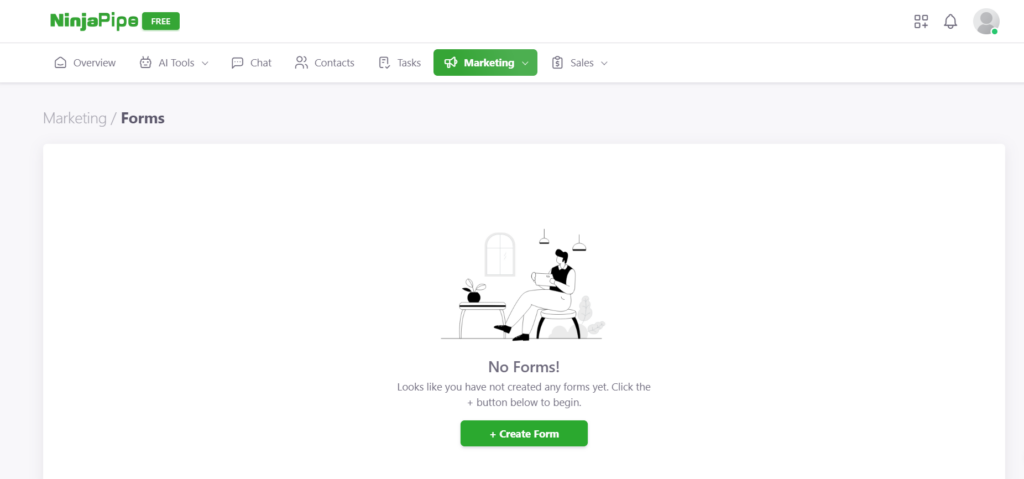
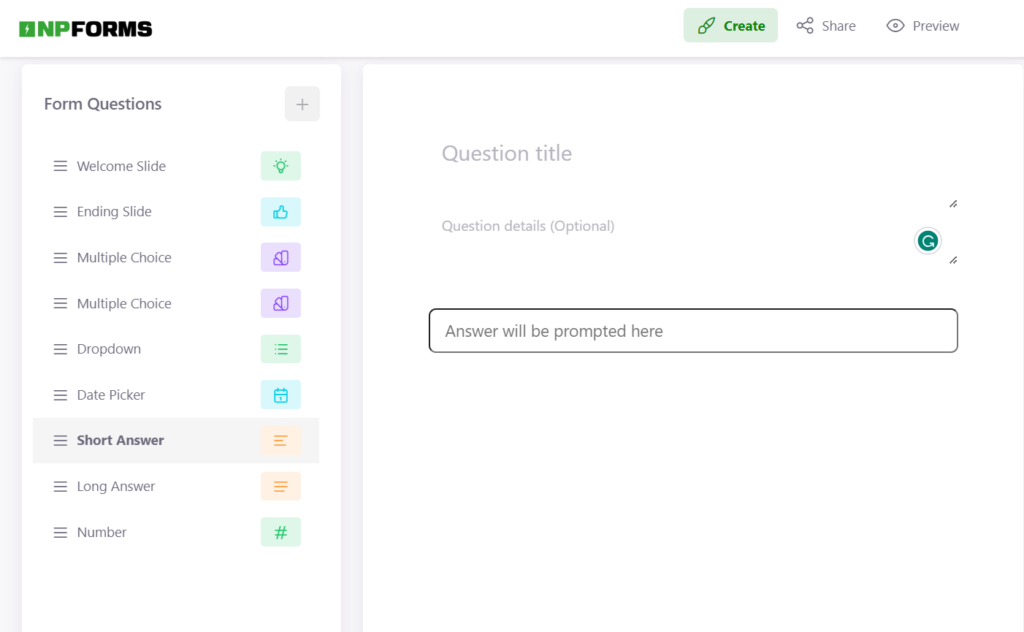
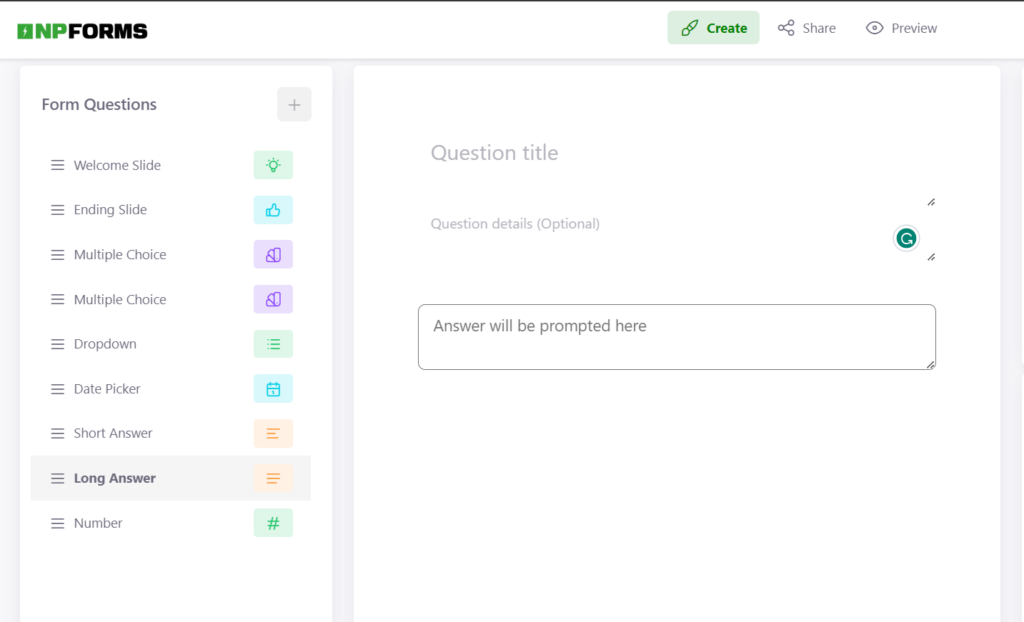
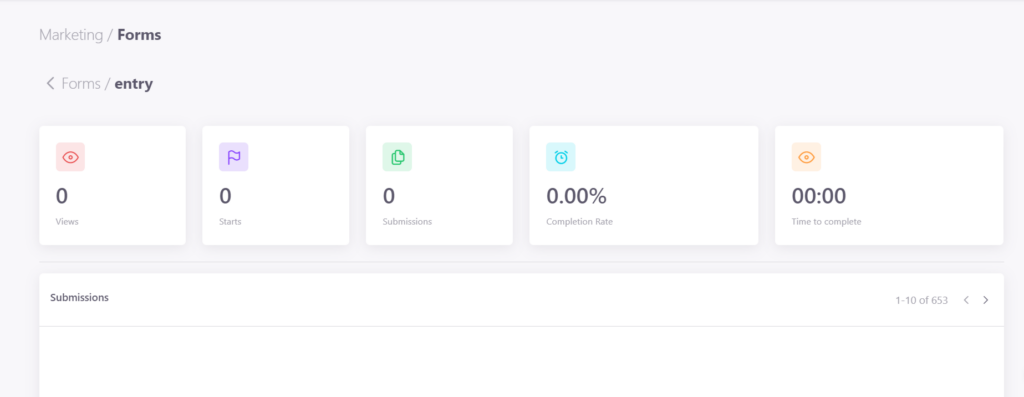
Create Forms
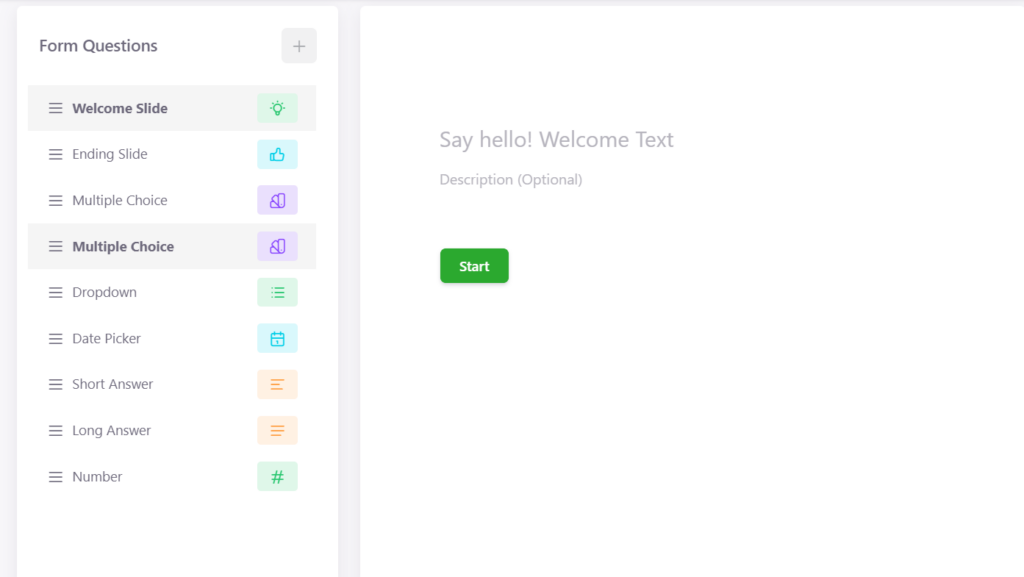
Creating customized forms has never been more straightforward with NinjaPipe’s user-friendly interface. Located under the Marketing section at the top of the dashboard, the “Create Form” feature empowers users to design and personalize forms according to their specific needs. Here’s a step-by-step guide to help you create and customize your form seamlessly:
1. Access the Create Form Page:
Navigate to the Marketing section on the top of the dashboard and select “Create Form.” This action will direct you to the Create Form page, where you can start building your form from scratch.
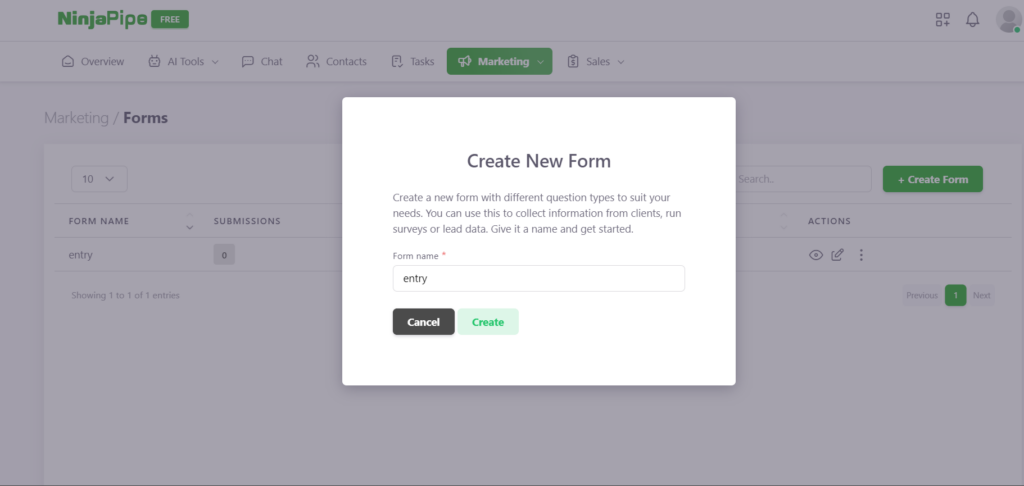
2. Create Form:
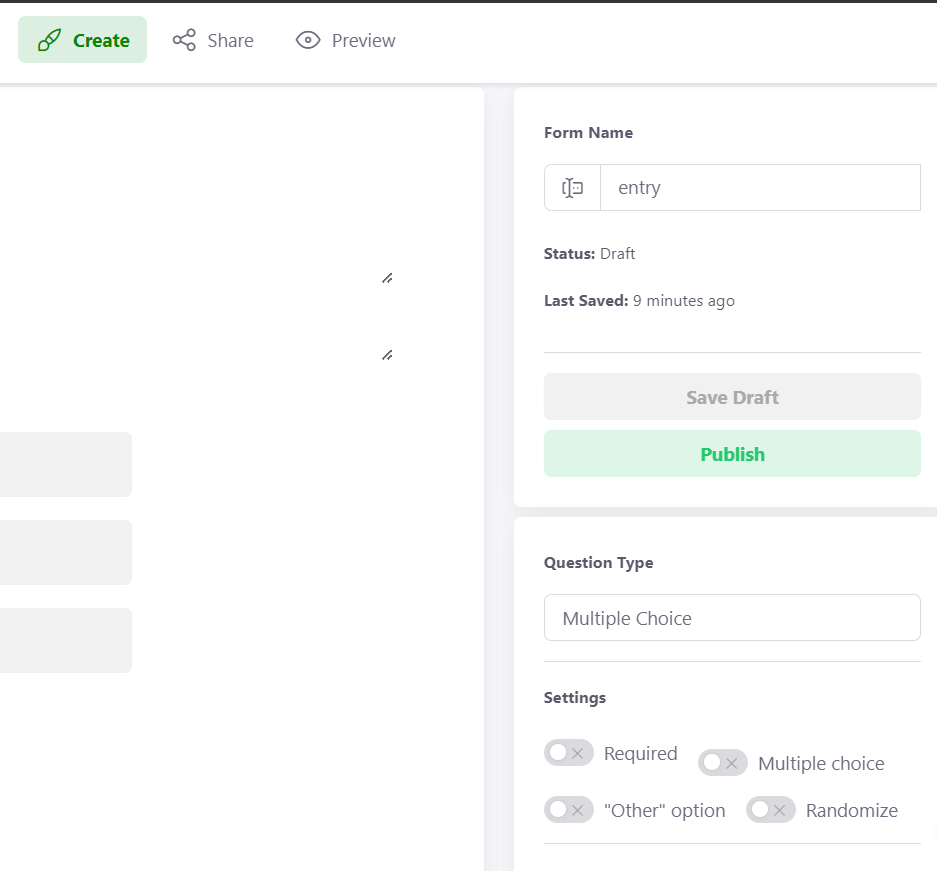
Click on the “Create Form” button to initiate the form-building process. Provide a name for your form and click on “Create.” Congratulations! You now have a form ready to be tailored to your requirements, named “Entry.”
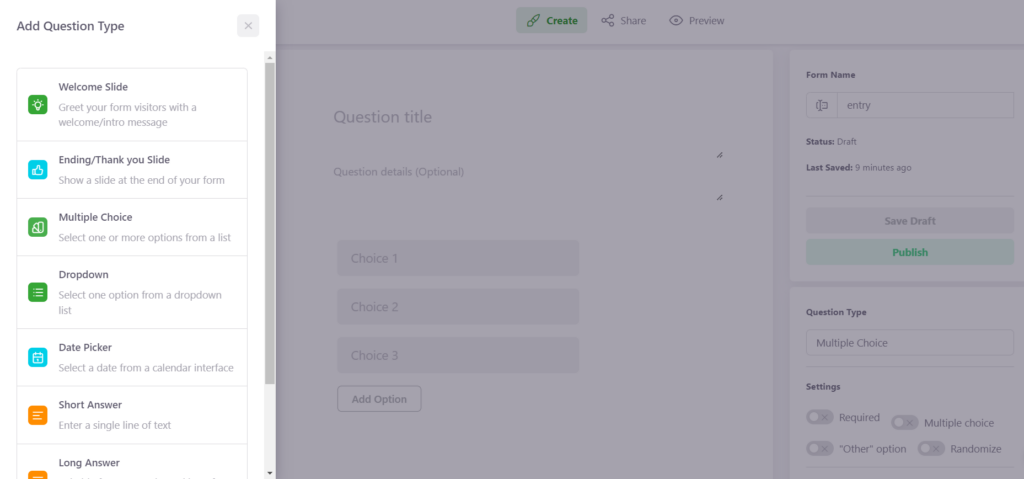
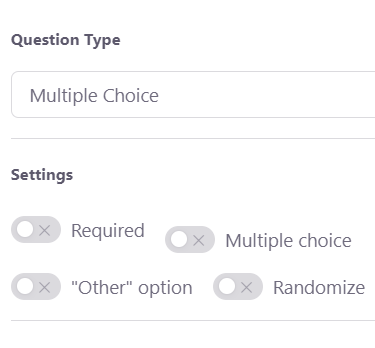
3. Customize Using Various Options:
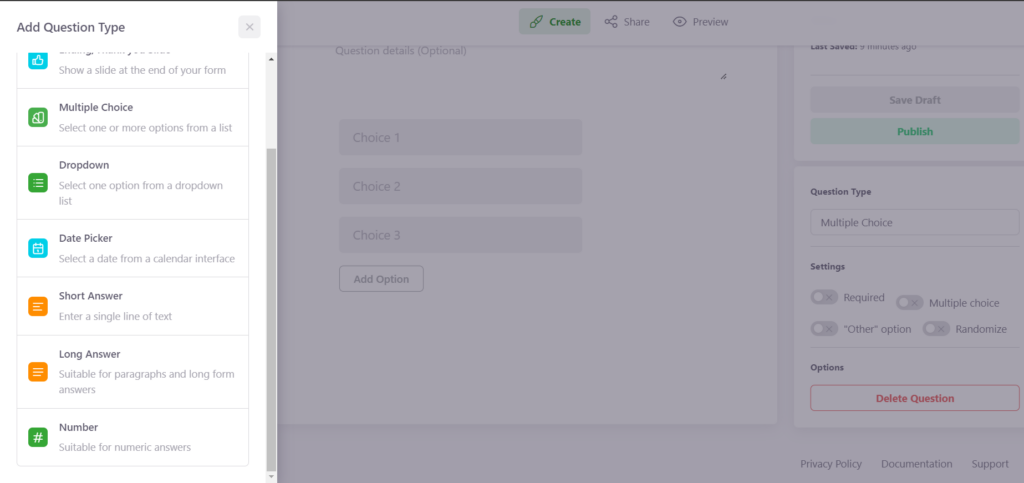
NinjaPipe offers a range of customization options to enhance your form:
Welcome Slide: Begin your form with a welcome or introductory message.
Ending/Thank You Slide: Conclude your form with a concluding message.
Multiple Choice: Choose one or more options from a list.
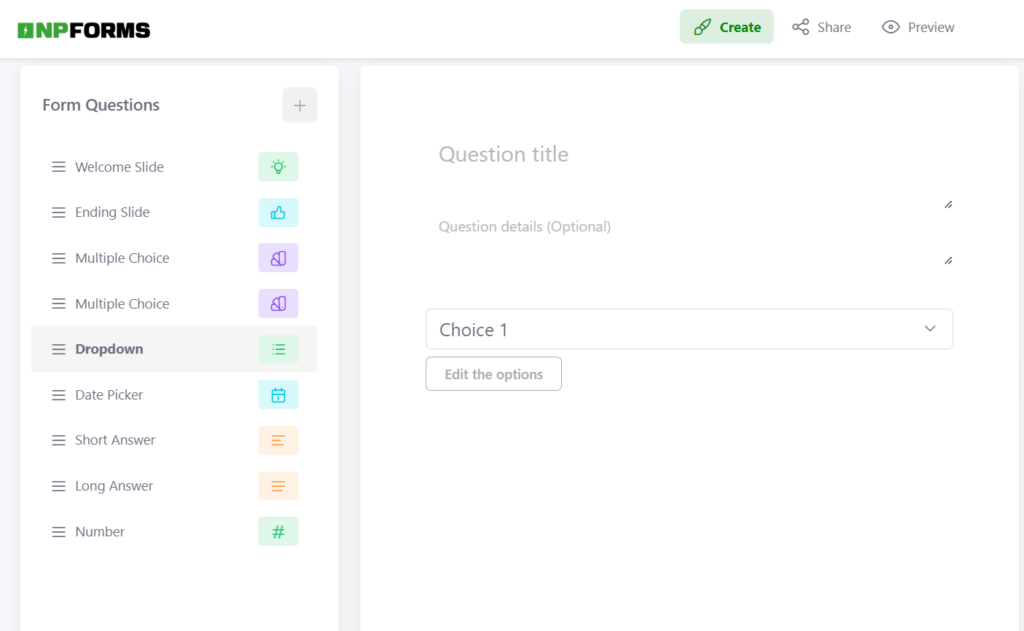
Dropdown: Select one option from a dropdown list.
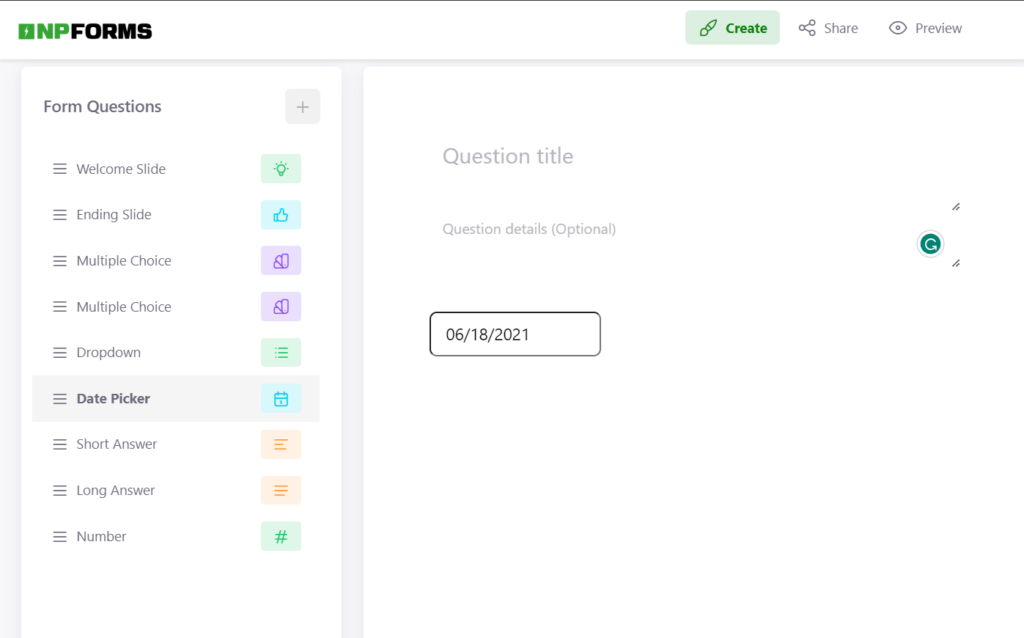
Date Picker: Choose a date using a calendar interface.
Short Answer: Enter a single line of text.
Long Answer: Ideal for paragraphs and longer responses.
Number: Suitable for numeric answers.
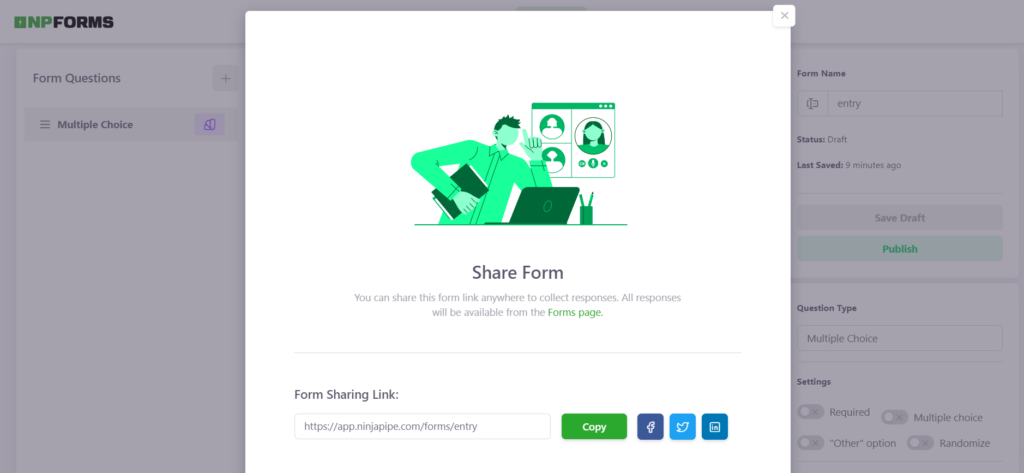
4. Additional Form Actions:
Share Your Form: Distribute your form to the intended audience.
Preview Your Form: Review your form’s appearance before finalizing.
Edit Form Name: Modify your form’s name according to your preferences.
Delete Questions: Remove any unwanted questions for a streamlined form.
Publish or Save as Draft: Choose to publish your form or save it as a draft for later adjustments.
View Responses: Track and analyze the responses submitted through your form.
5. Settings for Further Customization:
Within the settings, you can:
Enable/Disable Questions: Tailor your form by enabling or disabling specific questions and choices.
NinjaPipe’s “Create Form” feature provides a versatile and intuitive platform for designing forms tailored to your unique requirements. With a myriad of customization options and user-friendly controls, you can effortlessly create, modify, and manage forms for various purposes. Whether for surveys, feedback collection, or data gathering, NinjaPipe’s Create Form feature empowers users to design effective forms with ease.
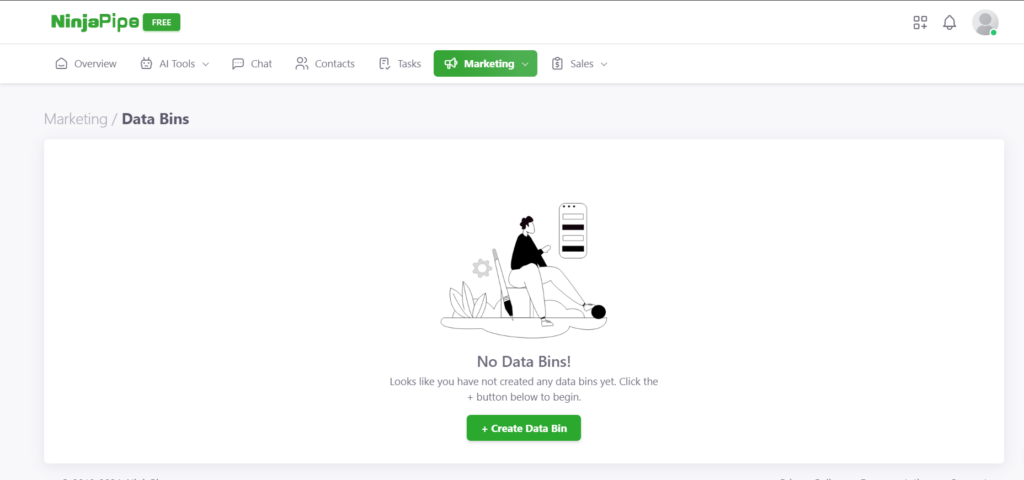
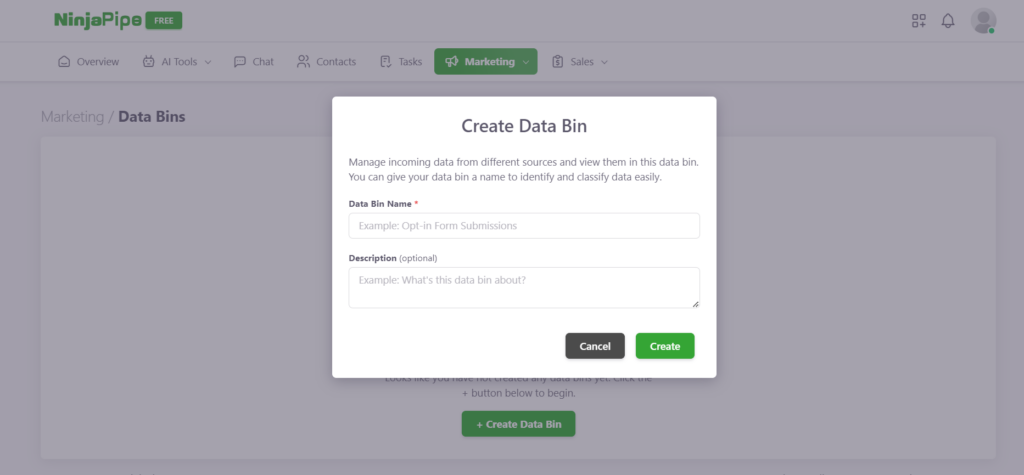
Create Data Bins
Creating and managing your Data Bins in NinjaPipe is a straightforward process that allows you to organize and store your marketing-related data efficiently. Located under the Marketing section at the top of the dashboard, the “Create Data Bins” feature provides users with a powerful tool for structured data management. Here’s a step-by-step guide to help you create your Data Bins seamlessly:
1. Access the Create Data Bins Page:
Navigate to the Marketing section on the top of the dashboard and select “Data Bins.” This action will direct you to the Create Data Bins page, where you can initiate the process of building your own Data Bin.
2. Create Data Bins:
Click on the “Create Data Bins” button to begin the creation process. Provide a name for your Data Bin and a brief description to help identify its purpose. Once filled, click on “Create.”
3. Confirmation and Initial Status:
After successfully creating your Data Bin, you’ll see a confirmation message, and the initial status will display: “Waiting for events. When NinjaPipe gets them, we’ll show them here.” This status indicates that your Data Bin is ready to capture and organize events once they occur.
4. Utilizing Data Bins:
Waiting for Events: As the initial status suggests, your Data Bin is actively waiting for events to occur. Once NinjaPipe receives these events, they will be displayed within your Data Bin.
NinjaPipe’s “Create Data Bins” feature offers a simple yet powerful solution for organizing and managing marketing-related data. By providing a user-friendly interface and a step-by-step creation process, users can efficiently set up Data Bins tailored to their specific needs. Whether you’re handling customer profiles, campaign data, or any other marketing assets, NinjaPipe’s Create Data Bins feature ensures that your data is organized, accessible, and ready for further analysis.
Sales
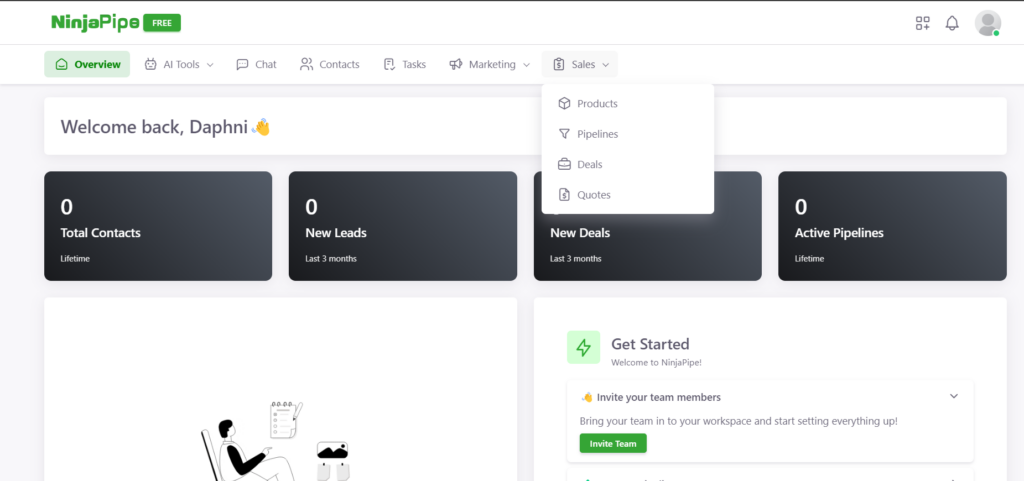
Sales
NinjaPipe’s dedicated “Sales” section is prominently featured at the top of the dashboard. Tailored to meet the needs of sales professionals, this section comprises four essential components designed to enhance your sales strategies and overall workflow. Let’s explore these key features:
Products:
The “Products” section serves as the foundation for your sales endeavors. Here, users can manage and organize product information efficiently. From product descriptions to pricing details, Products on NinjaPipe provide a centralized space to catalog and access crucial information for effective sales presentations and negotiations.
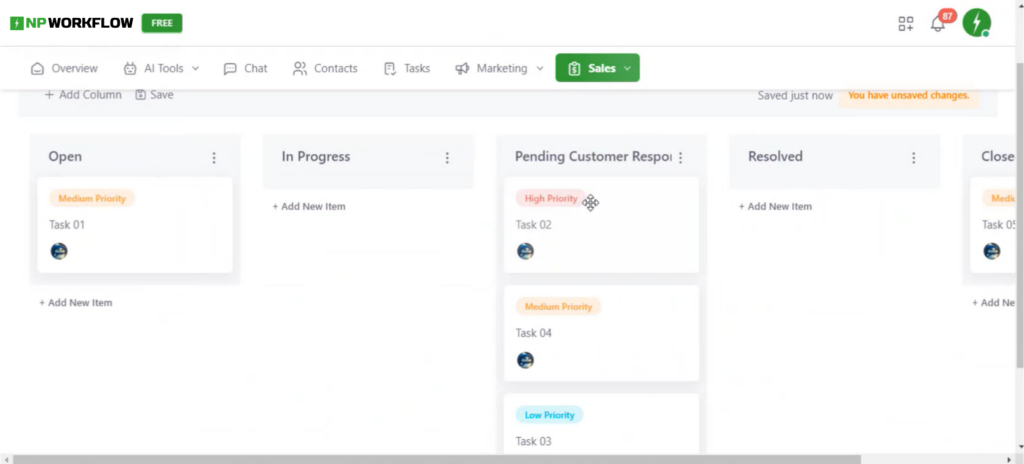
Pipelines:
A flexible tool within the Sales section is “Pipelines.” Beyond its sales-related applications, Pipelines in NinjaPipe can be utilized for various purposes, including recruitment, content creation, and marketing. By clicking on “Create Pipeline” and selecting “Browse Templates,” users can explore a range of templates showcasing the diverse capabilities of Pipelines. This feature allows for the customization of workflows to align with specific needs, making Pipelines a dynamic and adaptable tool for various business functions.
Deals:
The “Deals” section is a dynamic space where sales opportunities come to life. Users can track and manage ongoing deals, gaining insights into the progress of negotiations, potential revenue, and key deal-related details. This feature empowers sales professionals to make informed decisions and strategically advance their deals.
Quotes:
Streamline your quoting process with the “Quotes” feature. Here, users can generate and manage quotes effortlessly. Whether it’s creating quotes for potential clients or revising existing ones, NinjaPipe’s Quotes section provides a user-friendly interface for efficient quote management, contributing to a smoother sales experience.
By integrating the Sales section into the NinjaPipe dashboard, the platform caters specifically to the needs of sales teams and professionals. Whether you’re managing products, optimizing sales pipelines, tracking deals, or generating quotes, NinjaPipe offers a comprehensive suite of tools to enhance your sales strategies and drive success in the competitive world of sales. As you explore the Sales section, you’ll discover a powerful toolkit designed to support your sales efforts and elevate your overall sales management experience.
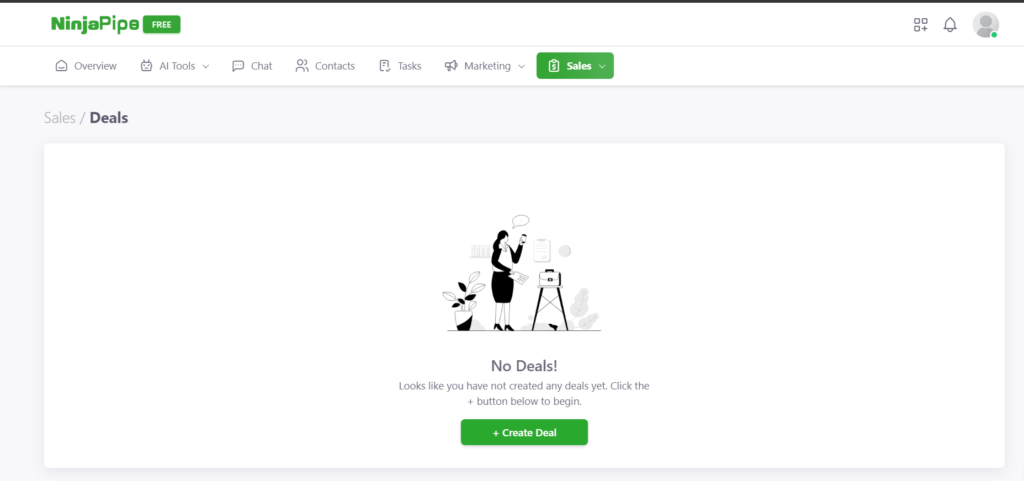
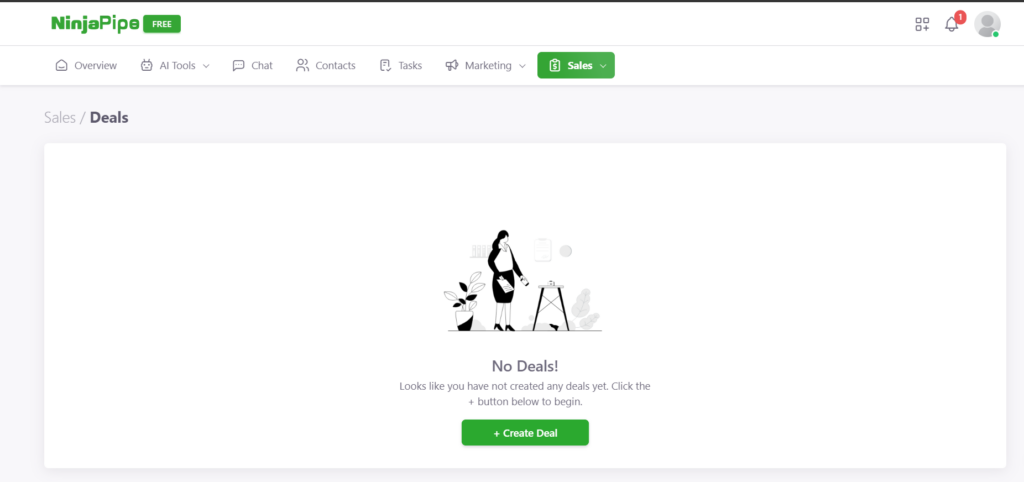
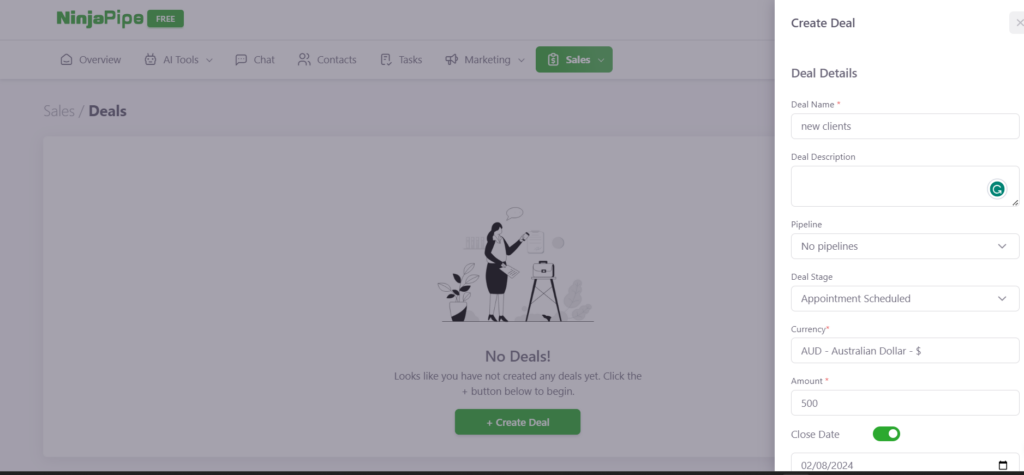
Create Deals
Effortlessly manage your sales opportunities with NinjaPipe’s straightforward “Create Deal” feature. Designed to streamline the process of adding and tracking deals, this tool ensures that users can efficiently organize their sales efforts. Here’s a step-by-step guide to help you create and manage deals within the NinjaPipe platform:
1. Accessing the Sales Section:
Upon logging in, locate the “Sales” section at the top of the dashboard. Click on it to reveal the subcategories, and select “Deals” to navigate to the Deals page.
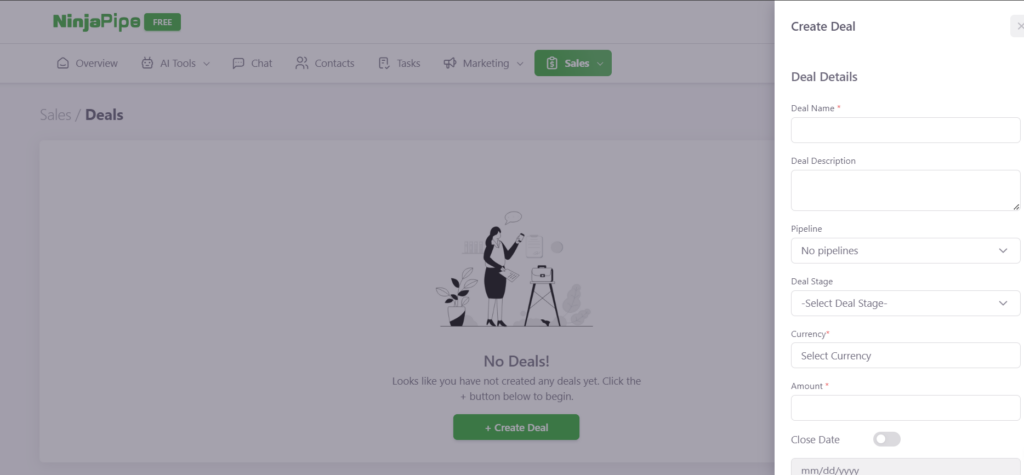
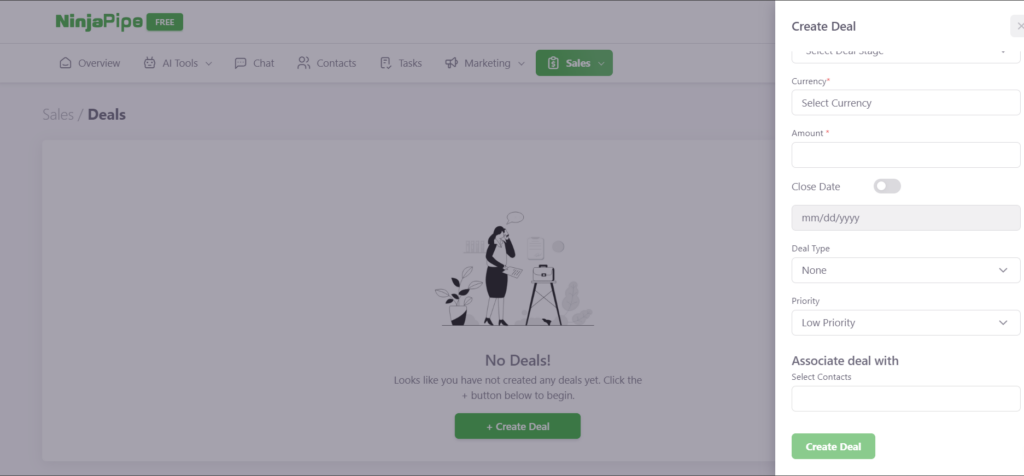
2. Initiating Deal Creation:
On the Deals page, find and click on the “Create Deal” option. A form will promptly appear on the left side of the screen, ready for you to input the necessary information.
3. Filling in Deal Information:
Complete the form by adding essential details:
Deal Name:
Provide a descriptive name for your deal.
Deal Information:
Input relevant information about the deal, such as description, start date, end date, and any other pertinent details.
Contacts:
Associate contacts with the deal, linking it to the individuals involved.
4. Completing Deal Creation:
Once you’ve added all the required information, click on “Create Deal.” Your deal is now successfully created and integrated into the NinjaPipe system.
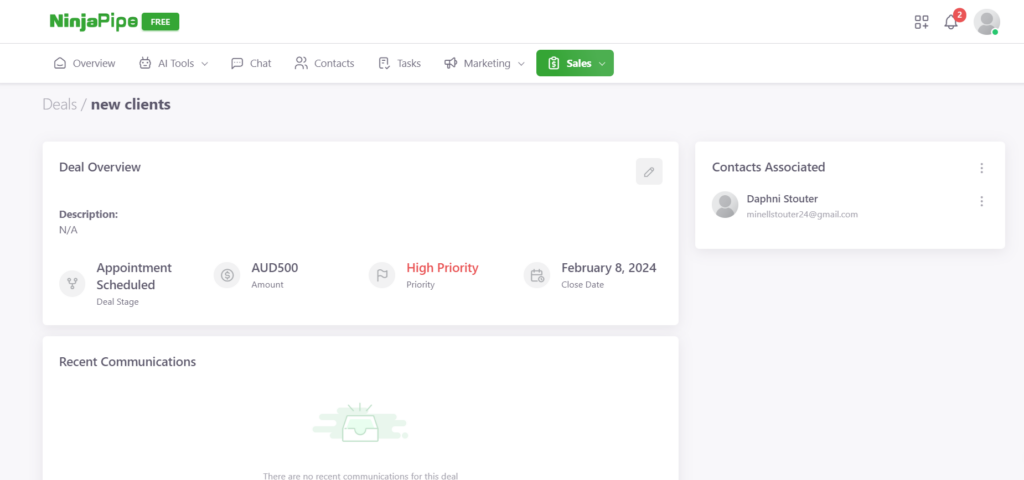
5. Viewing and Managing Deals:
Navigate to the Deals page to view a comprehensive list of your deals. Here, you can track the status, progress, and details of each deal.
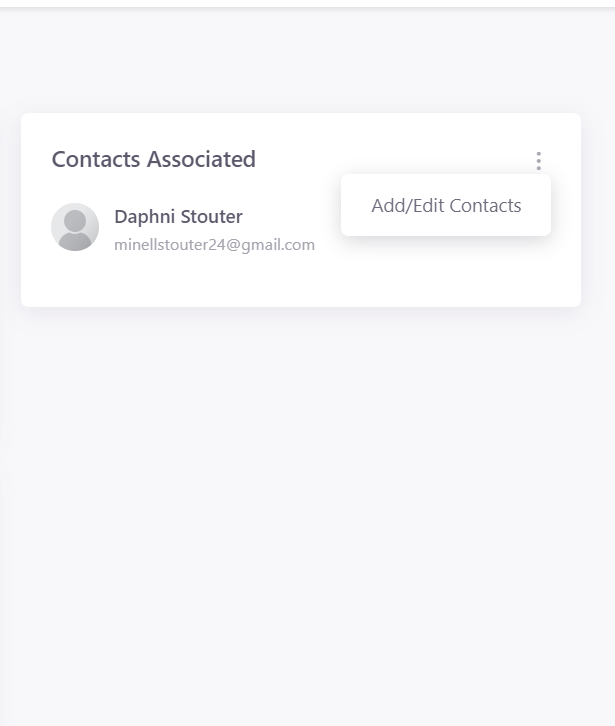
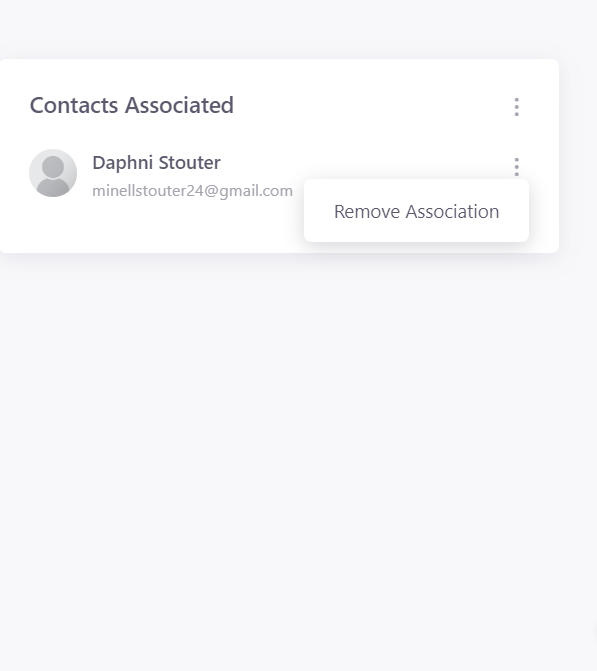
6. Managing Deal Associations:
On the Deals page, you have the flexibility to add or edit contacts associated with a deal. This ensures that your deal information stays up-to-date and accurately reflects your sales interactions.
NinjaPipe’s “Create Deal” feature provides a seamless and user-friendly process for managing sales opportunities. Whether you’re initiating a new deal, updating deal information, or managing associated contacts, this tool streamlines the sales process, ensuring that users can efficiently organize and track their deals within the NinjaPipe platform.
Create Deals Mobile Version – Android
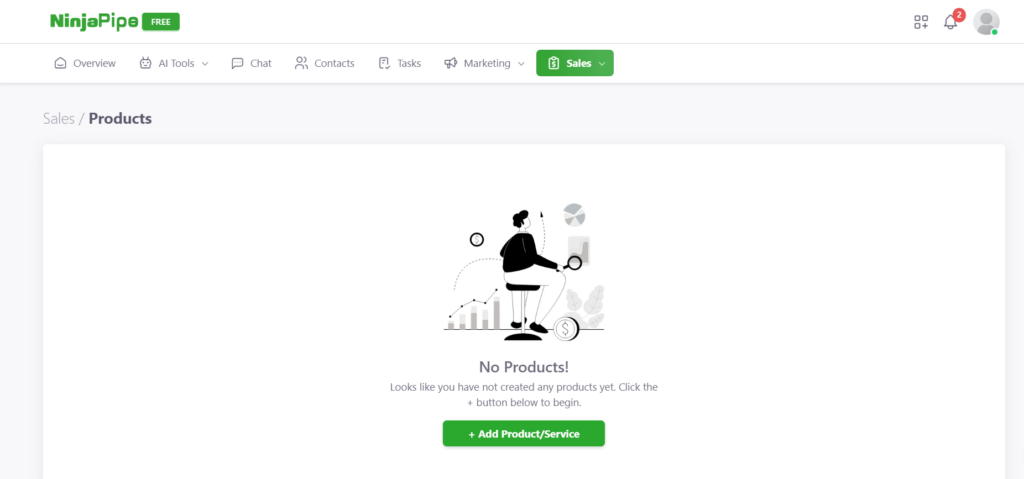
Create Products or Service
Effortlessly expand your sales catalog by utilizing NinjaPipe’s user-friendly “Create Product/Service” feature. This tool empowers users to add and manage products and services efficiently, providing a streamlined process for sales endeavors. Here’s a step-by-step guide to help you create and customize your products/services within the NinjaPipe platform:
1. Accessing the Sales Section:
Start by selecting the “Sales” section at the top of the dashboard. Under Sales, click on “Products.”
2. Initiating Product/Service Creation:
On the Products page, locate and click “Add Product/Service.” A form will appear on the right side of the screen, prompting you to input relevant information.
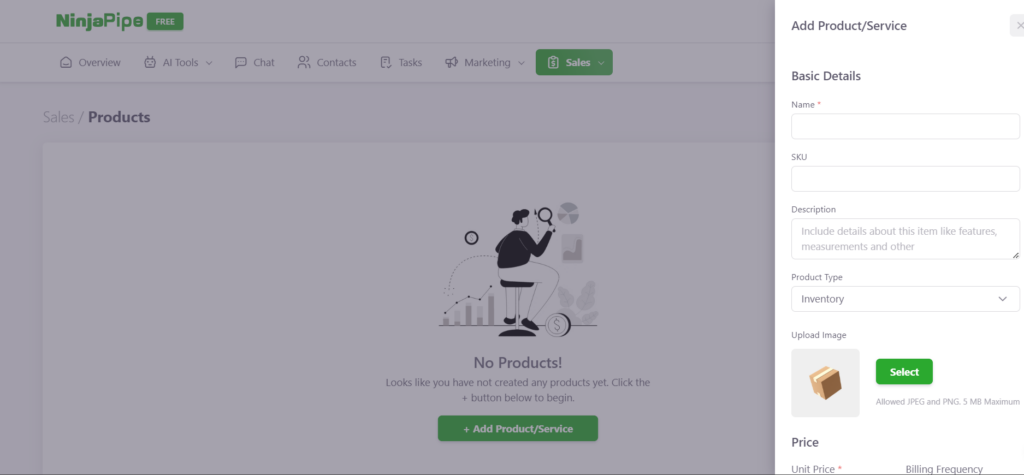
3. Filling Out the Form:
Complete the form with the necessary details:
a. Basic Details:
Name: Provide a descriptive name for your product or service.
SKU (Stock Keeping Unit): Assign a unique identifier for tracking purposes.
Description: Add a brief description of the product or service.
Product Type: Specify whether it’s an inventory item, a non-inventory item, or a service.
Upload Image: Optionally, upload an image for visual representation.
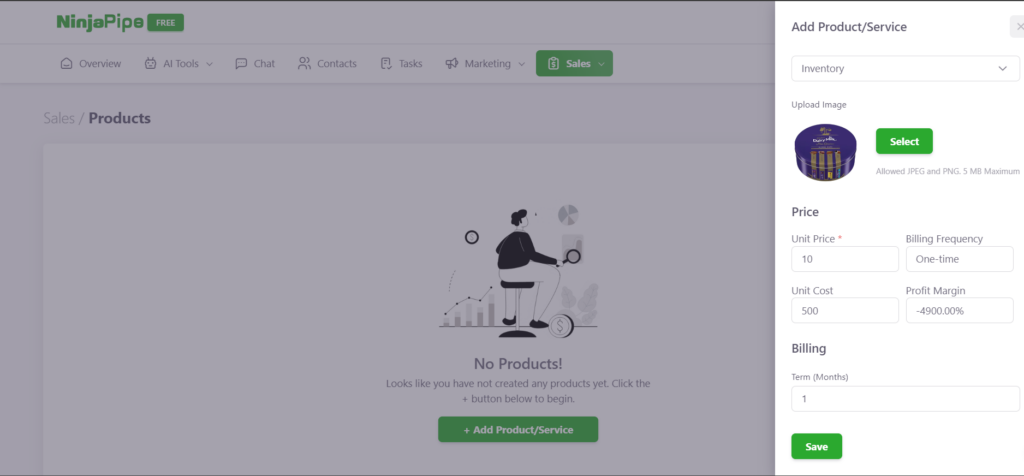
b. Price:
Unit Price: Set the price for your product or service.
Billing Frequency: Choose the billing frequency (Annually, Monthly, One-time, Quarterly, Semi-annually).
c. Cost and Profit:
Unit Cost: Specify the cost per unit.
Profit Margin: Calculate or set the profit margin for your product or service.
d. Billing Term:
Specify the billing term in months.
4. Saving Your Product/Service:
Once you’ve filled out the form with relevant information, click “Save.” Your product or service is now successfully created and integrated into the NinjaPipe system.
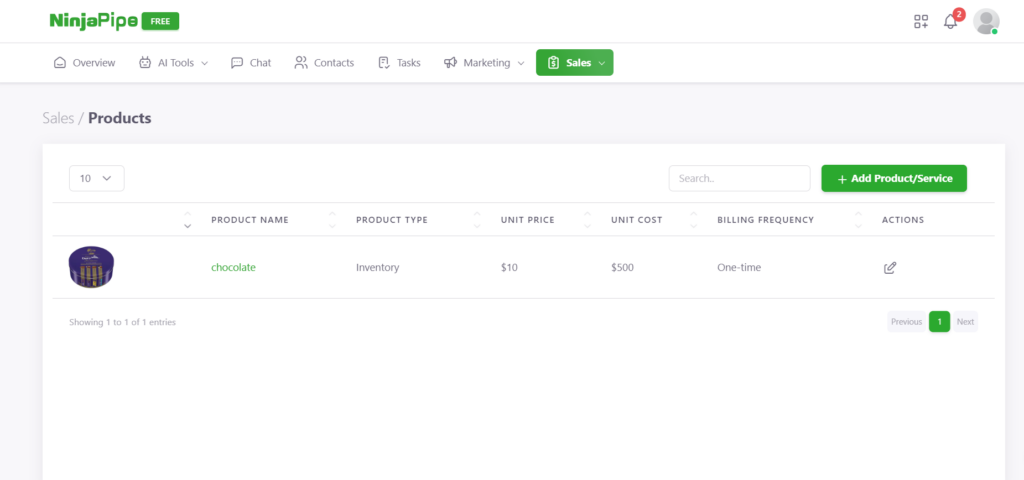
5. Viewing Your Products/Services:
Navigate back to the Products page to view a comprehensive list of your products and services. This allows you to track and manage your sales catalog efficiently.
NinjaPipe’s “Create Product/Service” feature offers a user-friendly and efficient way to expand and manage your sales offerings. Whether you’re adding inventory items, non-inventory items, or services, this tool ensures that users can easily input and customize product/service details, contributing to a more organized and effective sales management experience.
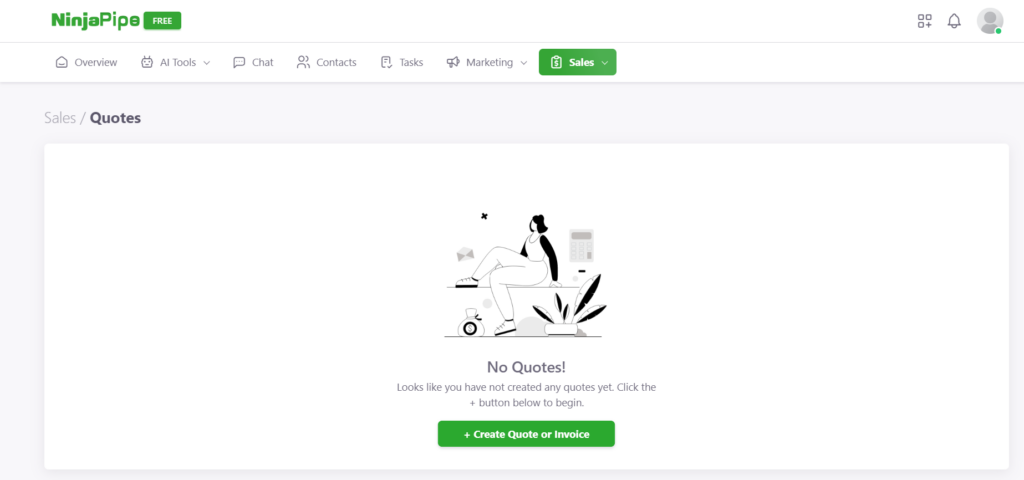
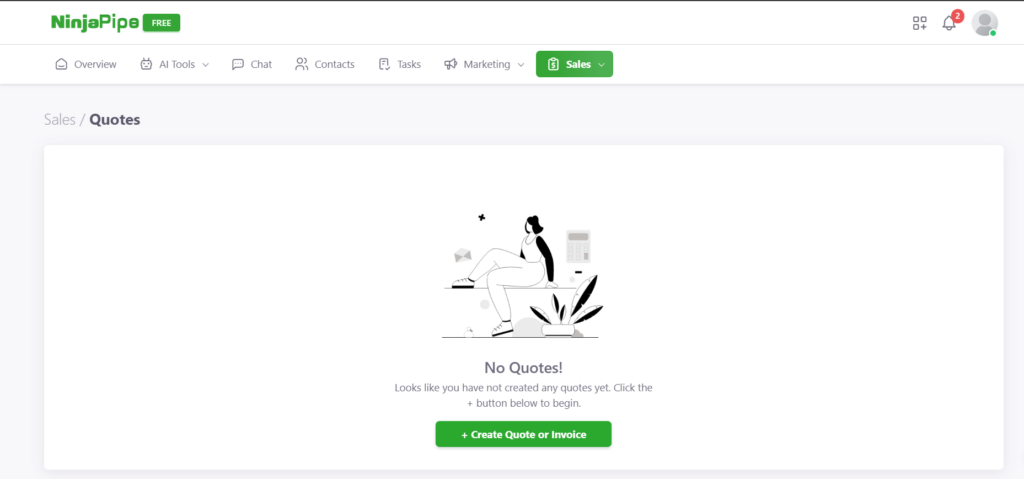
Create Quote or Invoice
Effortlessly generate professional quotes and invoices with NinjaPipe’s intuitive “Create Quote or Invoice” feature. Tailored to simplify the quoting process, this tool allows users to seamlessly create, customize, and share quotes and invoices with clients. Here’s a step-by-step guide to help you navigate and utilize the Quote feature within the NinjaPipe platform:
1. Accessing the Quote Section:
Start by selecting the “Sales” section at the top of the dashboard. Under Sales, click on “Quote” to enter the Quote page.
2. Initiating Quote or Invoice Creation:
On the Quote page, locate and click the “+” button to begin creating a new quote or invoice. This action prompts the creation process.
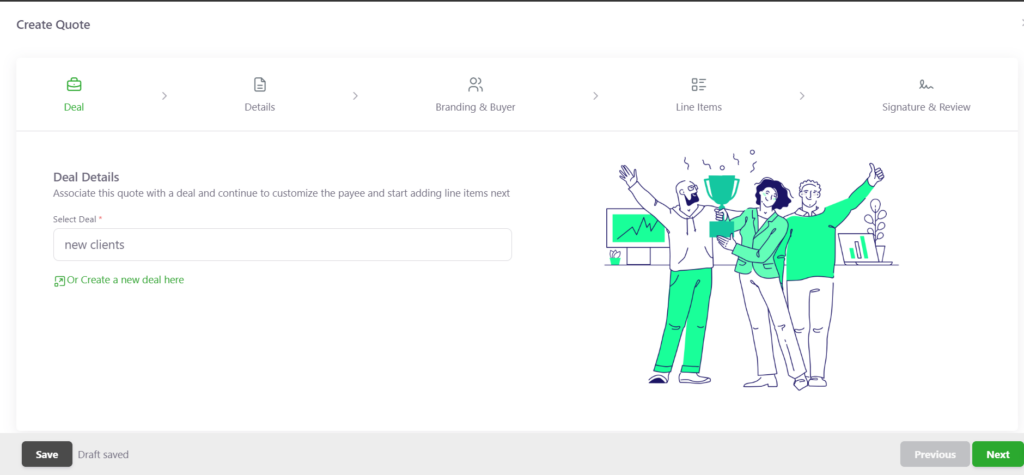
3. Deal Details:
Associate the quote with a deal, customize the payee, and add line items. You can select an existing deal or create a new one. Click “Next” to proceed to the details page.
4. Quote Details:
Specify quote details, including type (Quote, Invoice, Receipt), quote name, domain, content slug, URL, comments to the buyer, and purchase terms. Click “Next” to proceed.
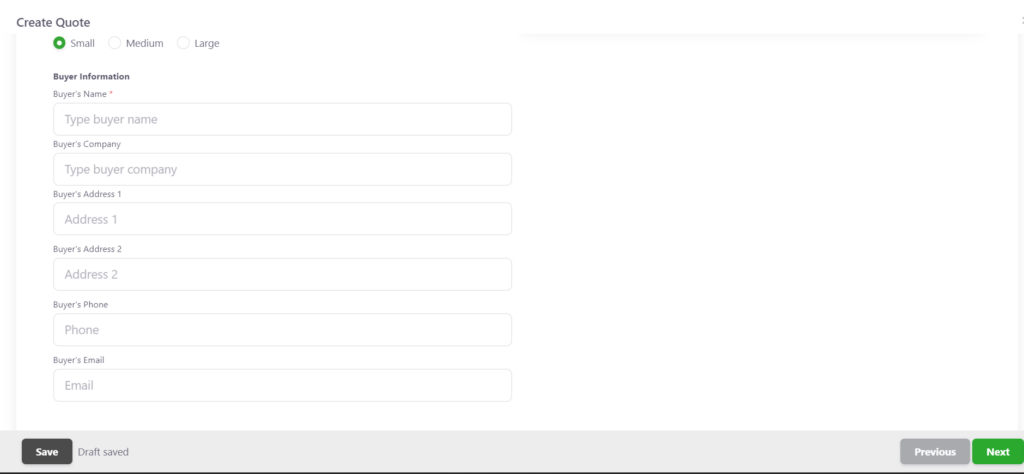
5. Branding & Buyer Information:
Update branding for the quote or invoice and fill in company information for both your company and the buyer. This includes company name, address, phone, logo, and buyer details. Click “Next” to proceed.
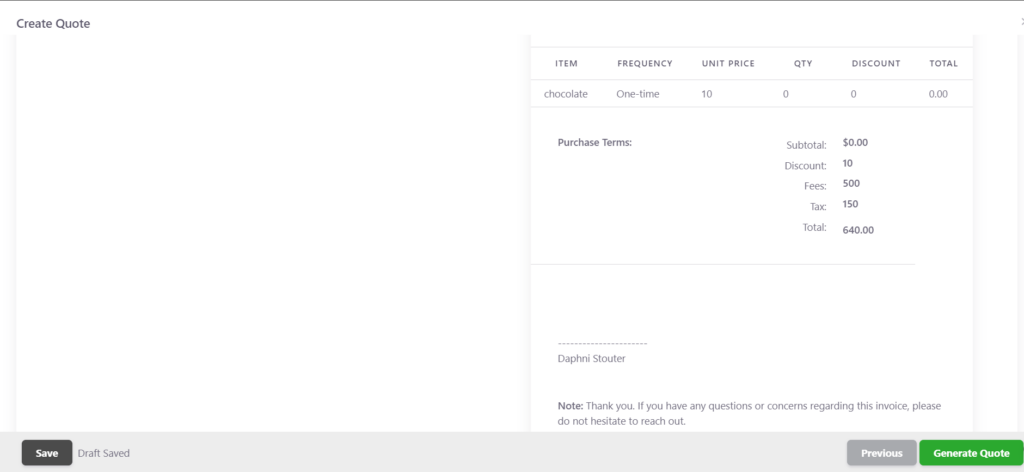
6. Line Items:
Add line items to your quote or invoice. Include product or service details such as name, SKU, billing start date, term, frequency, quantity, unit price, unit discount, and more. Click “Next” to proceed.
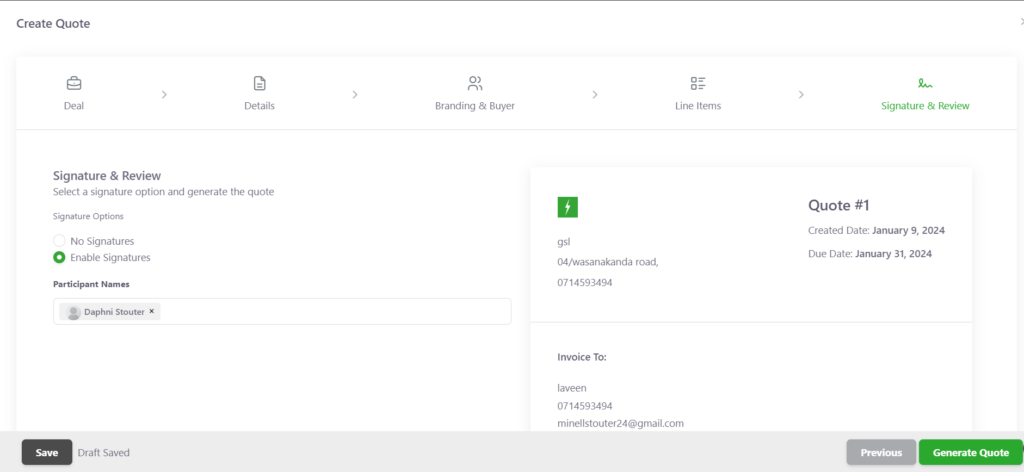
7. Signature & Review:
Enable signatures, add participant names, and generate the quote. Choose a signature option (No Signatures, Enable Signatures, Participant Names) and click “Generate Quote.”
8. View and Download:
Once generated, your quote is successfully created. View it on the Quote page, and also, your quote will be available for download as a PDF document on your desktop.
NinjaPipe’s “Create Quote or Invoice” feature provides a comprehensive and efficient solution for businesses to generate professional quotes and invoices. By guiding users through a step-by-step process, this tool ensures accuracy and customization, making the quoting process seamless and effective within the NinjaPipe platform.
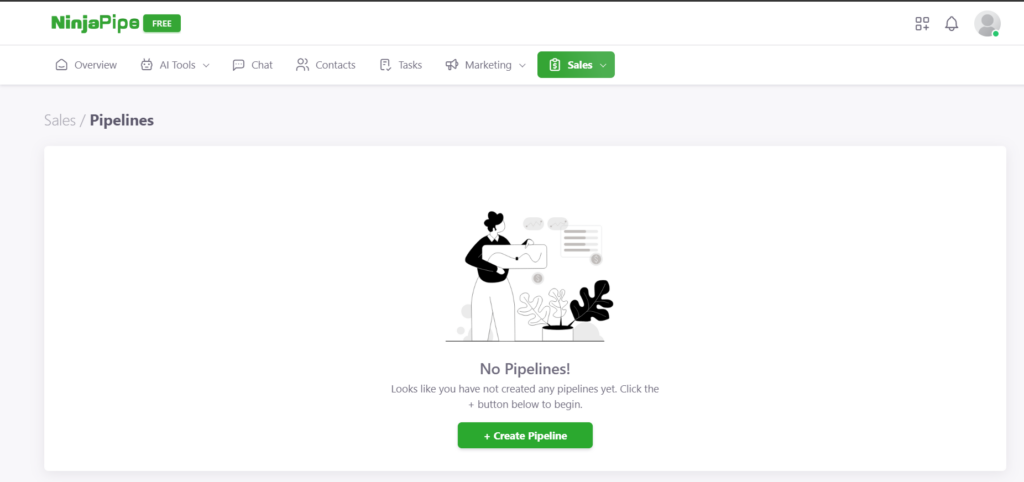
Create Pipelines
Effortlessly organize and streamline your work processes with NinjaPipe’s versatile “Create Pipelines” feature. This tool empowers users to customize their pipelines, making them tailored to specific needs and enhancing project management efficiency. Here’s a step-by-step guide to help you create and manage pipelines within the NinjaPipe platform:
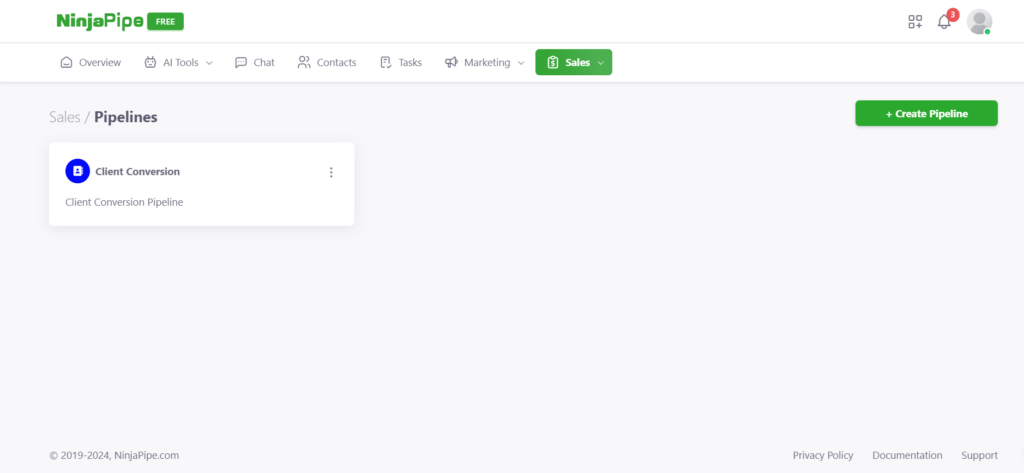
1. Accessing Pipelines:
Navigate to the dashboard and click on the “Sales” section. Select “Pipelines” or, alternatively, choose to create a pipeline directly from the “Get Started” section on your dashboard or through the “Quick Access” menu.
2. Creating a Pipeline:
Once on the pipeline page, click on “Create Pipeline.” Provide a name, description, and customize your pipeline with an icon and color for easy identification. NinjaPipe allows you to personalize your pipelines to suit your preferences.
3. Finishing Pipeline Creation:
After inputting the necessary pipeline information, click “Create.” Your pipeline is now successfully created and ready for customization.
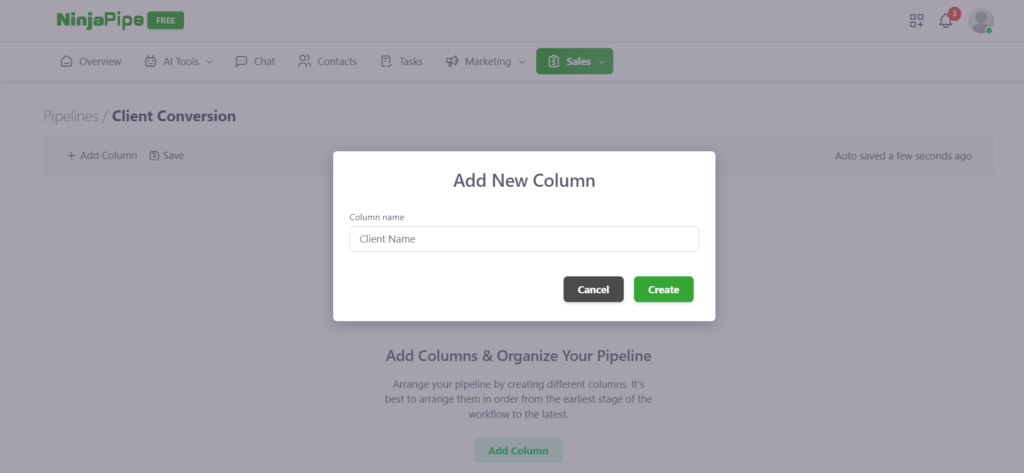
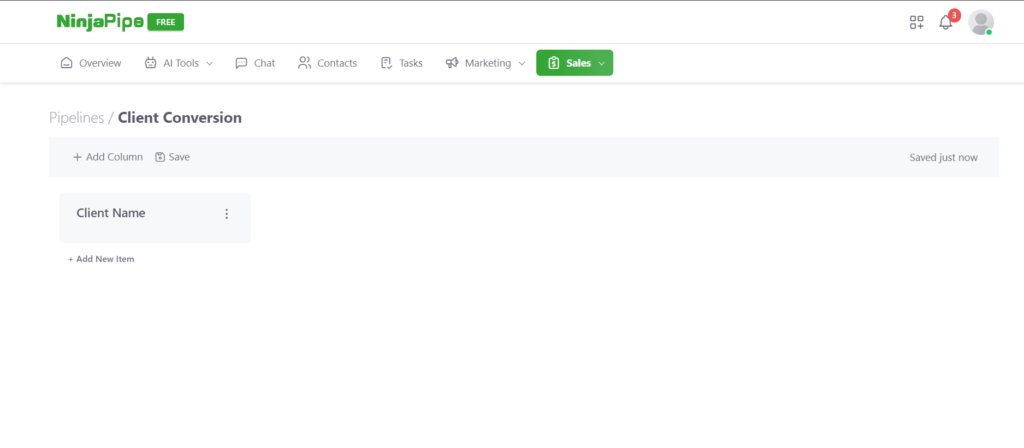
4. Adding Columns:
Enhance your pipeline by adding columns. Click on “Add Column,” give it a name, and click “Create.” For instance, you can add a column named “Client Name” to track client-related information.
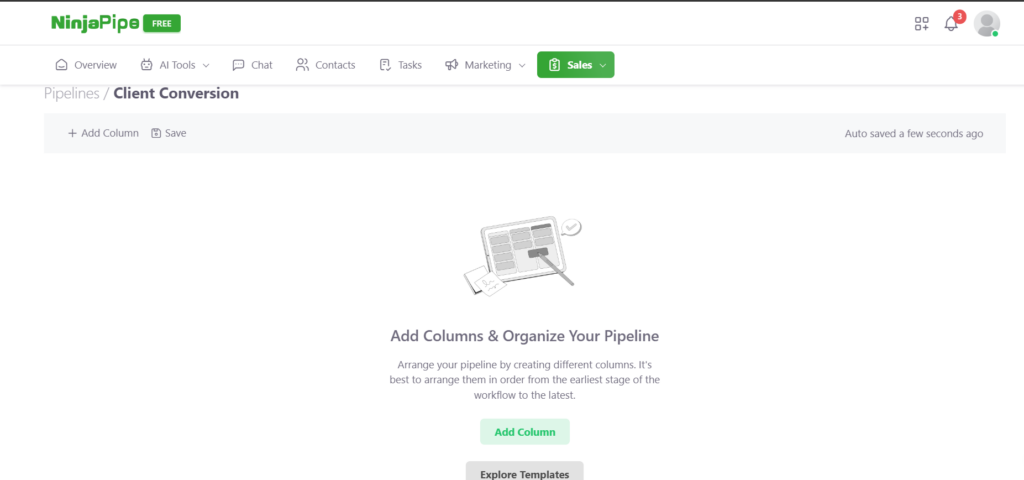
5. Exploring Templates:
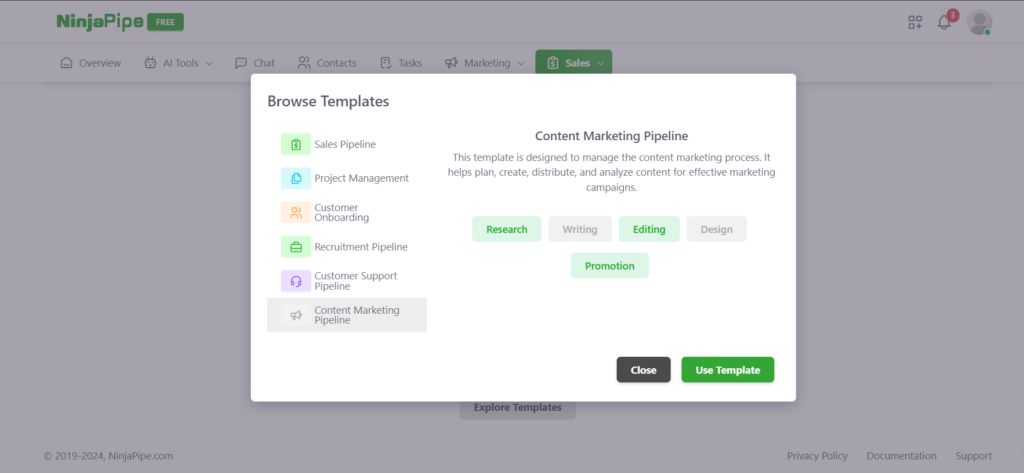
NinjaPipe provides templates for various purposes. Click on “Explore Templates” to find ready-made pipelines for Sales, Project Management, Customer Onboarding, Recruitment, Customer Support, and Content Marketing. These templates offer pre-defined columns tailored to specific processes.
6. Additional Templates:
Explore the different templates available, such as:
Sales Pipeline: Manages the sales process from prospecting to deal closure.
Project Management: Efficiently handles projects and tasks.
Customer Onboarding: Streamlines the customer onboarding process.
Recruitment Pipeline: Manages the recruitment process from sourcing candidates to hiring decisions.
Customer Support Pipeline: Manages customer support tickets and resolutions.
Content Marketing Pipeline: Handles the content marketing process for effective campaigns.
NinjaPipe’s “Create Pipelines” feature offers a flexible and user-friendly solution for structuring and managing work processes. By allowing users to customize pipelines, add columns, and explore templates, NinjaPipe ensures that teams can efficiently organize their tasks, projects, and workflows according to their unique requirements within the platform.
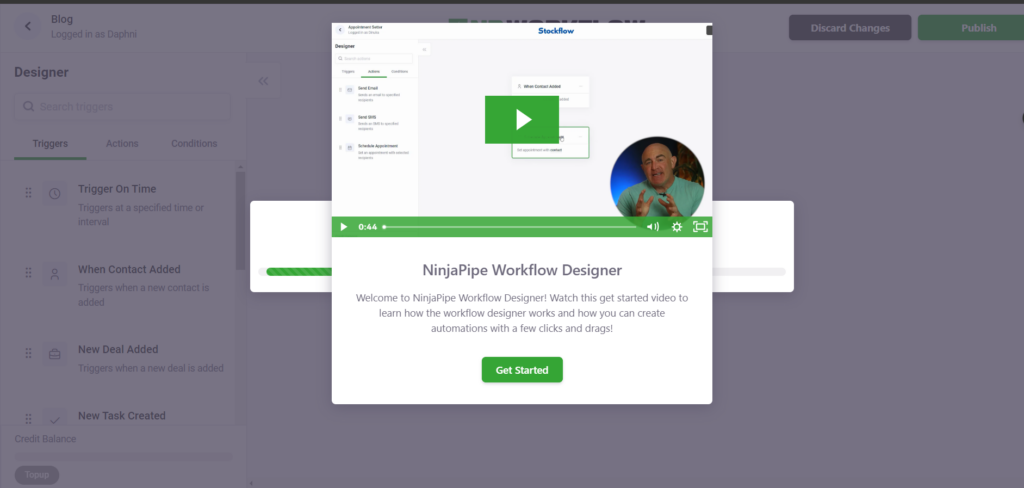
Workflows
Workflows
Navigating and optimizing your workflow is made simple with NinjaPipe’s AI Tools, specifically the Workflow feature. Here’s a step-by-step guide on how to create and manage your workflow efficiently:
1. Accessing AI Tools:
Once you log in, head to the dashboard and locate the AI Tools section. Click on it to reveal the available tools, and select “Workflow.“
2. Creating a Workflow:
Click on “Create Workflow” to initiate the workflow creation process. Provide a name and description for your workflow to give it context and clarity.
3. Workflow Initialization:
After naming and describing your workflow, click “Create.” The system will then generate your workflow, and a guide video will pop up to provide additional assistance during the loading process.
4. Workflow Sections:
Your workflow is divided into three key sections:
Triggers: Define when you want your workflow to run. For instance, you can set triggers for sending emails based on specific conditions.
Actions: Create various actions, such as classes, that will be executed as part of your workflow.
Conditions: Set conditions to guide the workflow’s decision-making process.
5. Credit Balance Monitoring:
Keep an eye on your credit balance, visible in the right-side bottom corner. This balance is crucial for actions like sending emails and SMS. Each tenant has a credit limit, and when your balance approaches zero, you won’t be able to send further SMS or emails.
6. Top-Up Credit Balance:
To ensure uninterrupted communication, you can top up your credit balance by clicking “Top Up.” This action initiates a payment process specifically for emails and SMS.
NinjaPipe’s Workflow feature empowers users to streamline and automate processes effectively. By providing a user-friendly interface for creating workflows, setting triggers, and monitoring credit balances, NinjaPipe ensures that users can enhance their project management experience with intelligent automation and seamless communication.
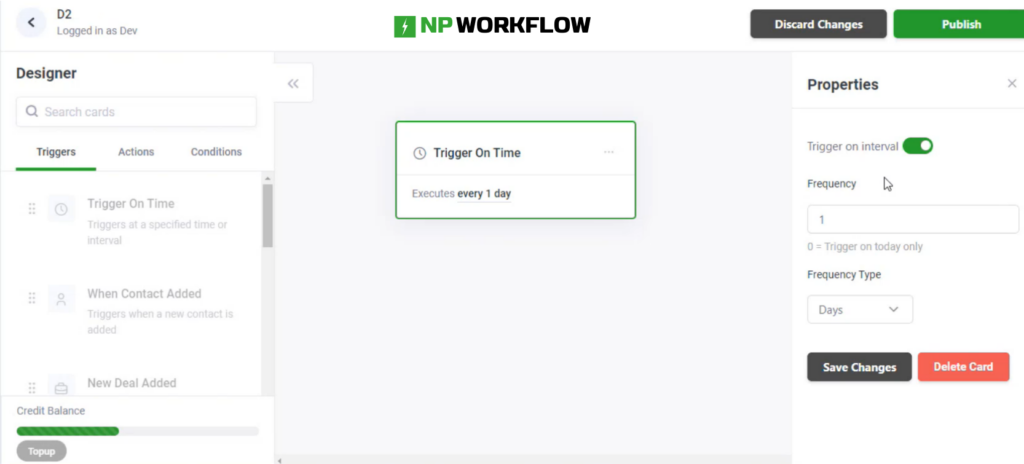
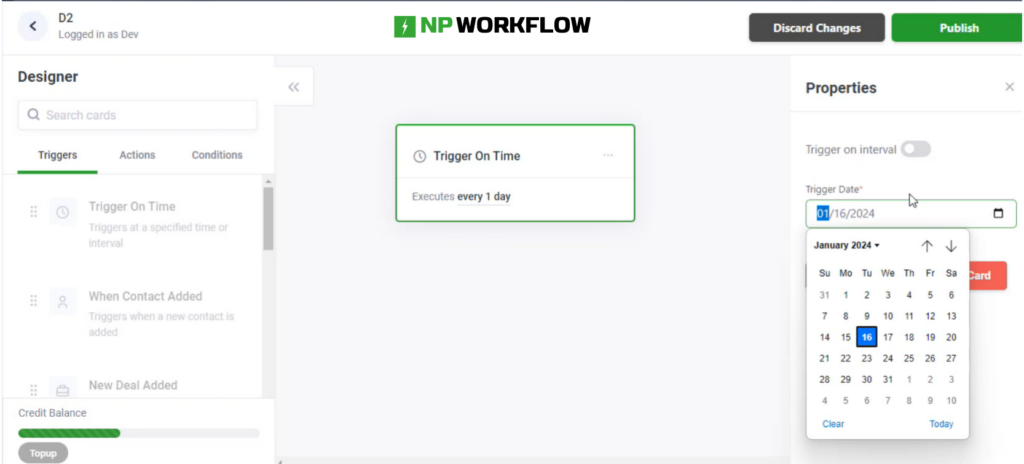
Triggers
Understanding and utilizing triggers in your NinjaPipe workflow adds a layer of automation to your project management processes. Triggers serve as the catalysts for actions and conditions, making your workflow more dynamic and responsive. Let’s delve into the various aspects of triggers within the NinjaPipe platform:
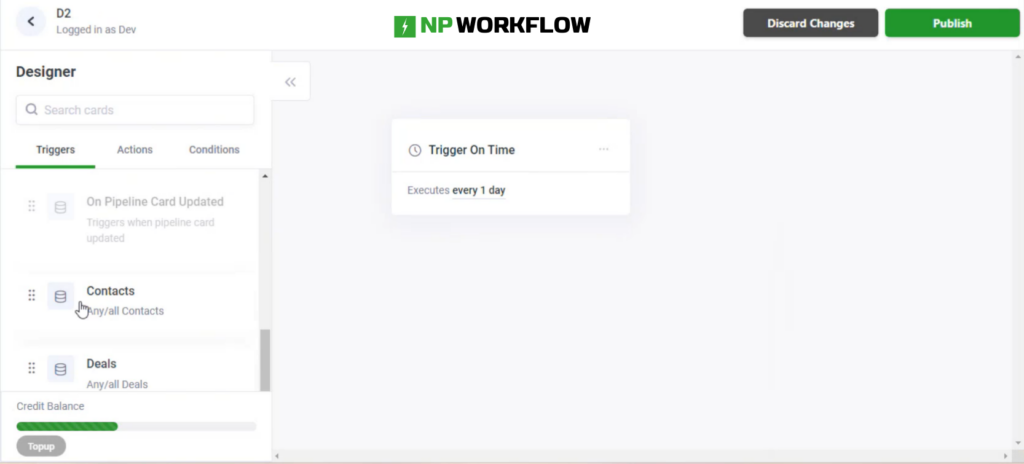
1. Trigger on Time:
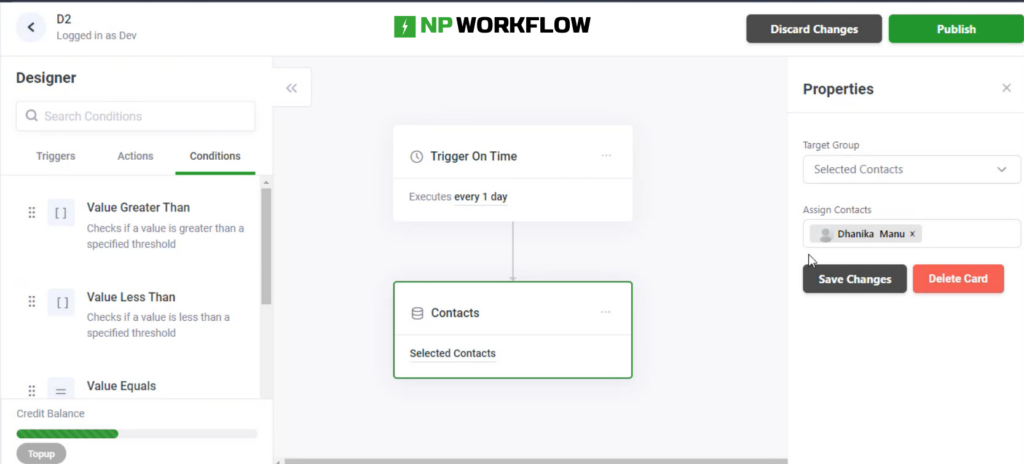
In the “Triggers” section, you have the option to set triggers based on time. You can define the frequency, such as daily or on a specific date. When creating a workflow with a time trigger, it’s crucial to attach contacts or deals to enable actions and conditions.
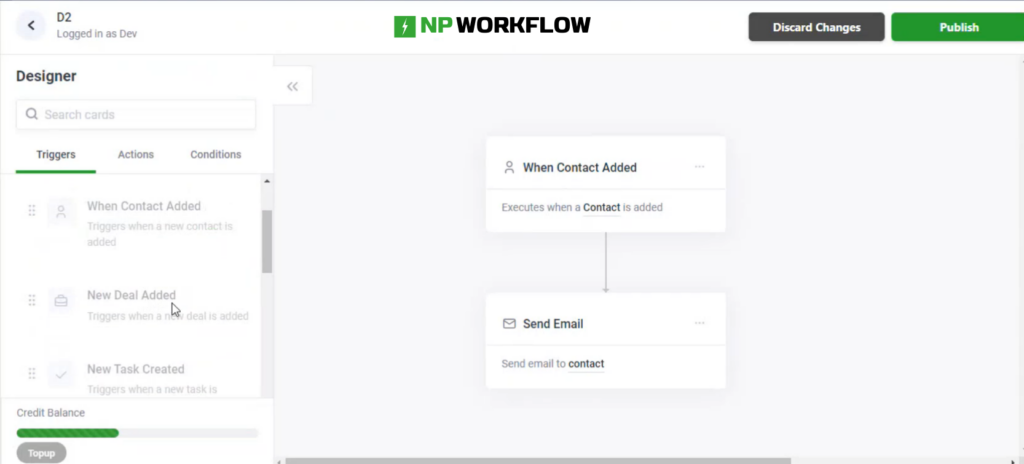
2. When Contact Added:
This trigger activates actions when a new contact is added. For example, if you set an action to send an email, it will be triggered when a contact is created using the contact section.
3. New Deal Added:
Similar to the contact trigger, this activates actions when a new deal is added. The associated contact from the deal will determine which actions are triggered, such as sending emails or SMS.
4. New Task:
Actions under this trigger will be activated when a new task is created. For instance, creating a task may trigger an email notification to keep you informed.
5. Task Completed:
This trigger is linked to task completion. When a sub-task is marked as completed, actions associated with this trigger will be activated, providing notifications or triggering specific actions.
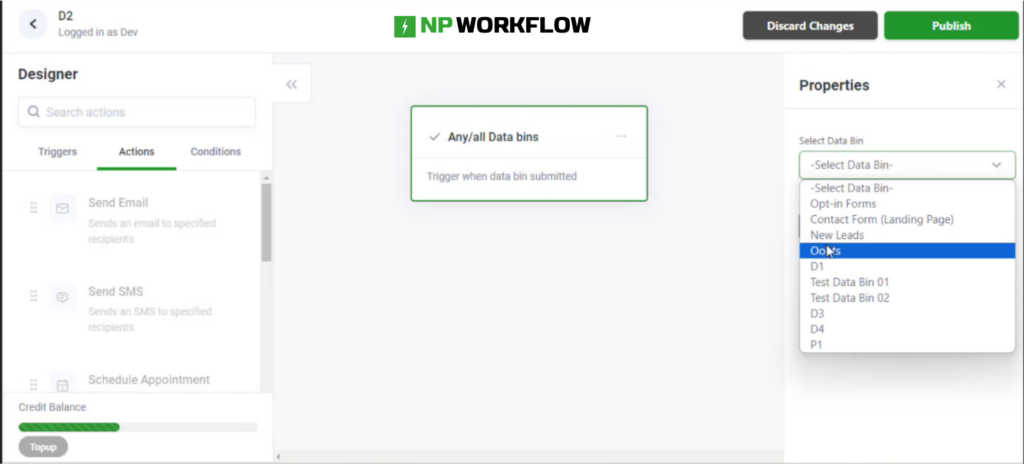
6. Data Bin:
Data Bins allow you to collect and manage customer details effectively. By creating a link to the Data Bin in your customer detail forms, you can seamlessly add customer details to the specified Data Bin.
7. On Pipeline Card Moved:
This new feature lets you trigger actions when a pipeline card is moved from one section to another. For example, moving a card from “In Progress” to “Pending Customer Report” can trigger specific actions associated with that card.
8. On Pipeline Card Updated:
This feature allows you to trigger actions when details on a pipeline card are updated. Whether it’s changing dates or modifying any details, associated contacts on the card will be triggered based on the updated information.
mastering triggers in NinjaPipe’s workflow ensures that your project management processes become more automated and responsive. By setting up triggers based on time, contact or deal-related activities, task management, and pipeline card movements, you can create workflows that adapt to your dynamic project requirements.
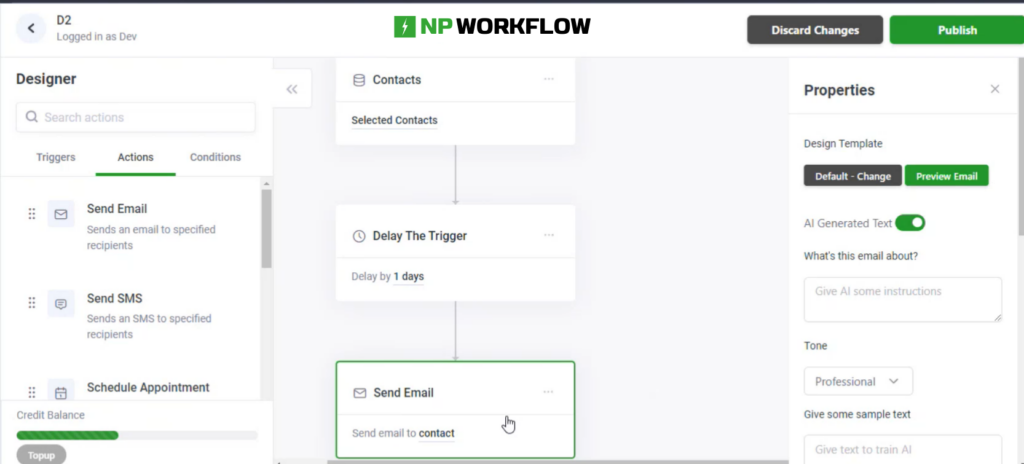
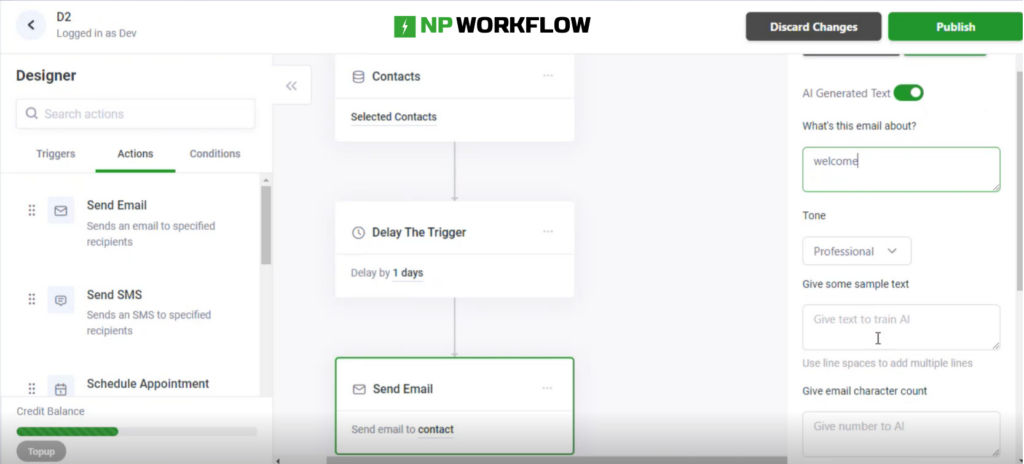
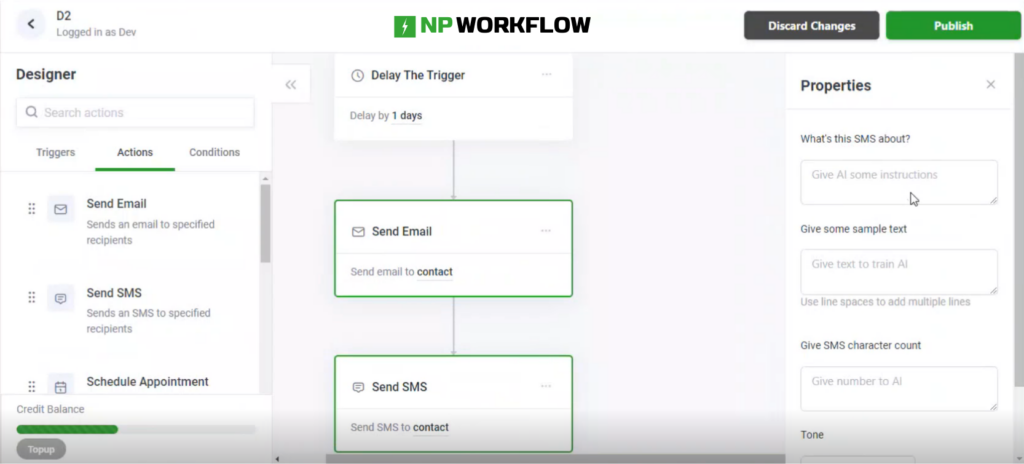
Actions
NinjaPipe’s Actions feature adds a dynamic layer to your workflow, allowing you to execute a variety of tasks seamlessly. Understanding the functionalities within the Actions section is crucial for optimizing your project management processes. Let’s explore the different sub-sections under Actions and how each enhances your automation capabilities:
1. Send Emails:
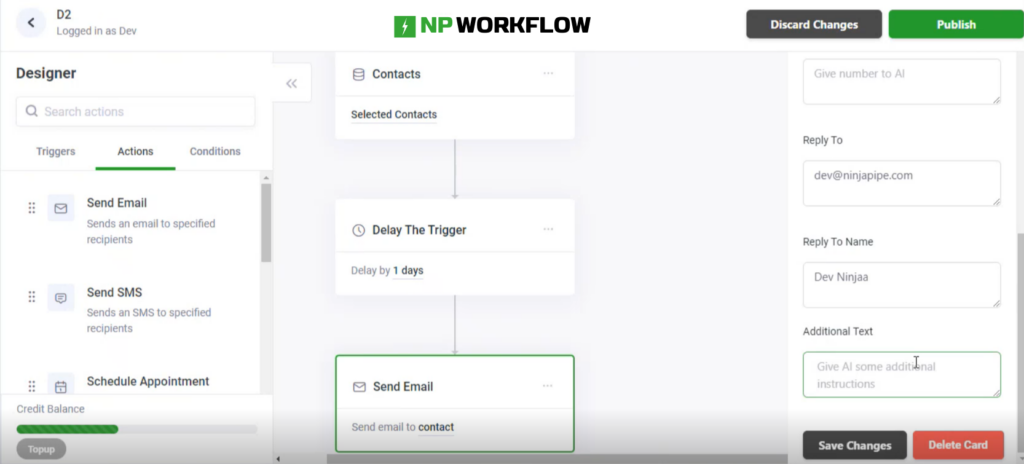
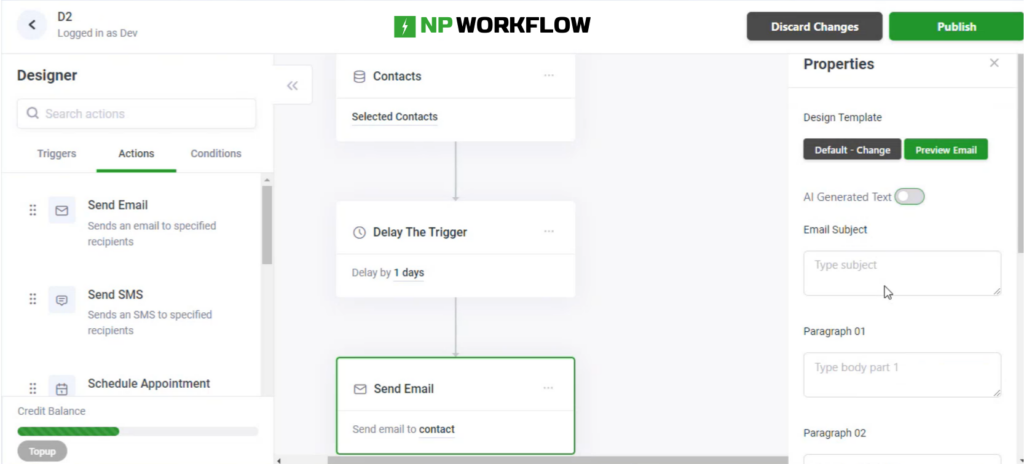
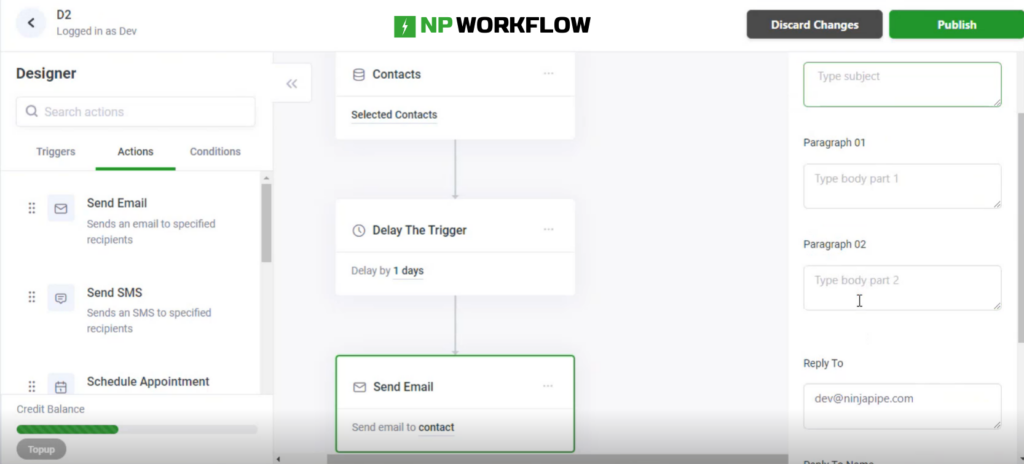
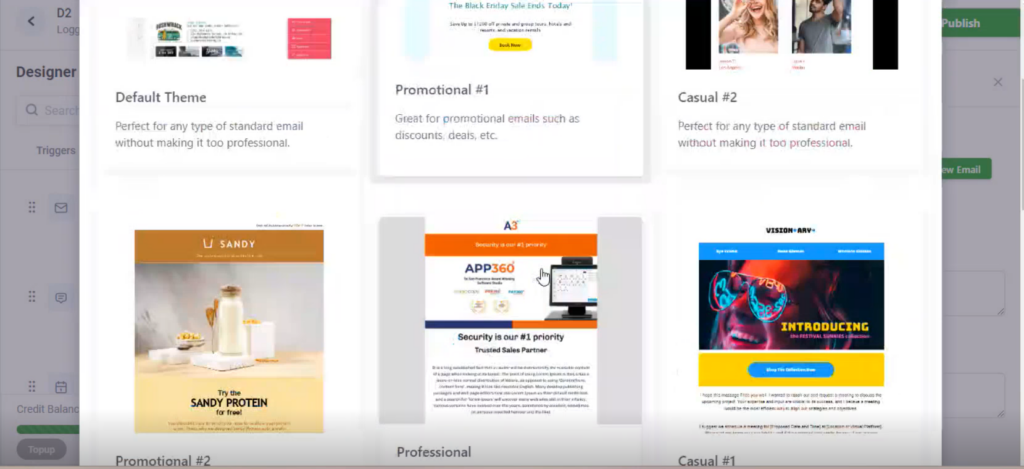
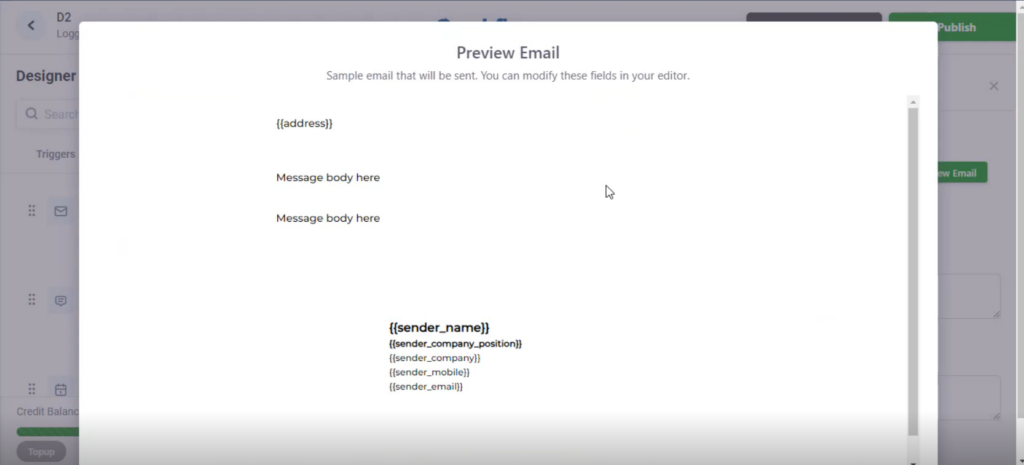
The “Send Emails” section offers two options: AI-generated emails and manual emails.
AI-Generated: You can input instructions and sample text, allowing the system to generate emails based on specified criteria. You can customize reply-to information and add additional text.
Manual emails: For more control, you can disable AI generation and compose emails manually. You can also select from email templates and preview them before sending them.
2. Send SMS:
Similar to sending emails, the “Send SMS” section generates AI-driven SMS based on provided instructions. This feature streamlines communication by automating the SMS creation process.
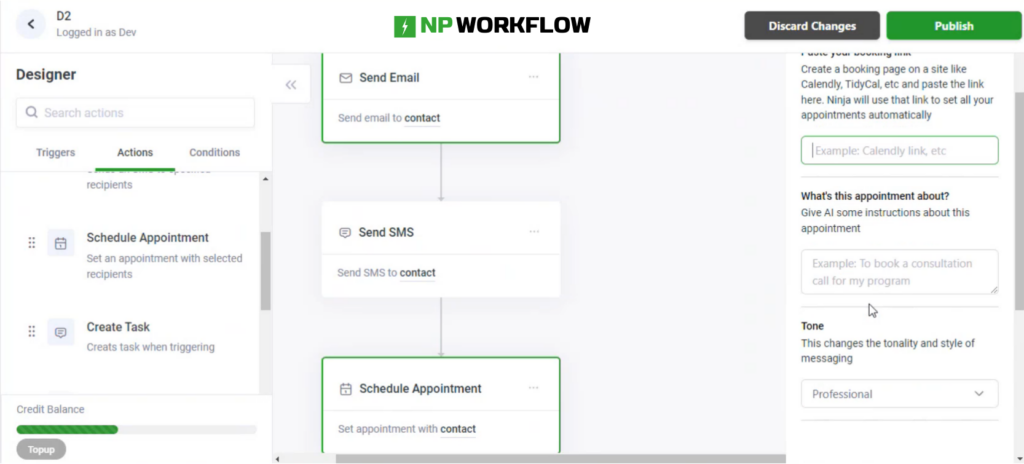
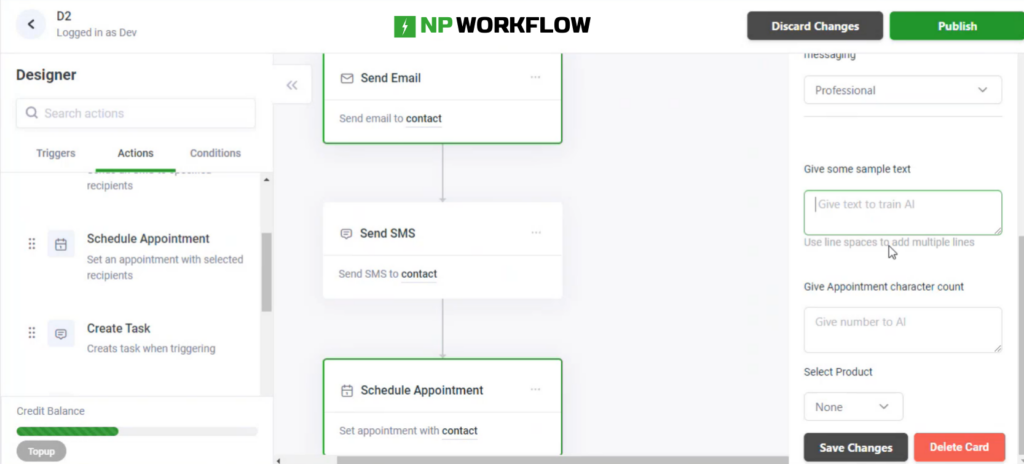
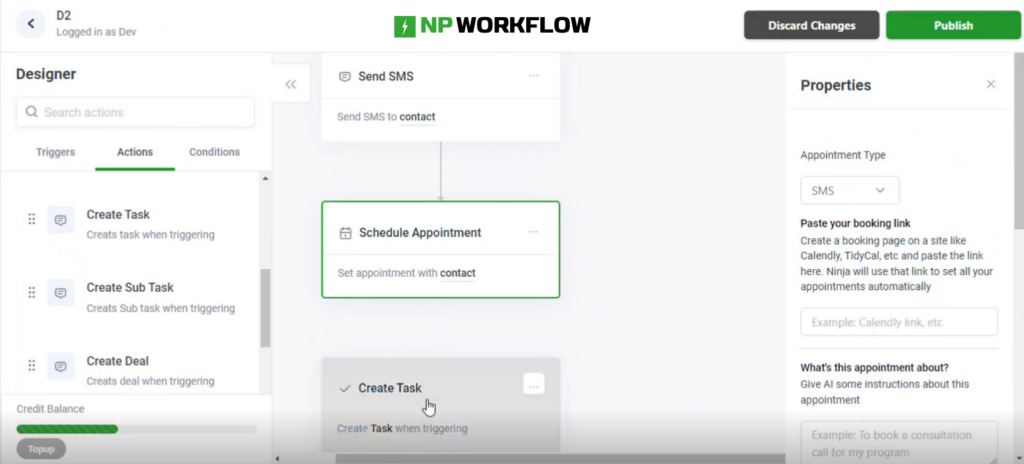
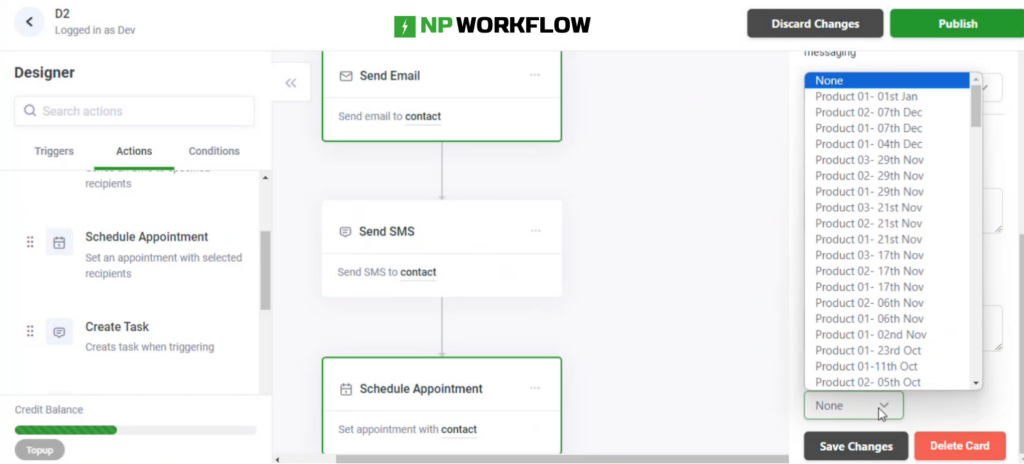
3. Schedule Appointments:
The “Schedule Appointments” section introduces new features, enabling the scheduling of both SMS and emails. You can book appointments, add relevant details, include sample text, and link products for discussion during the appointment.
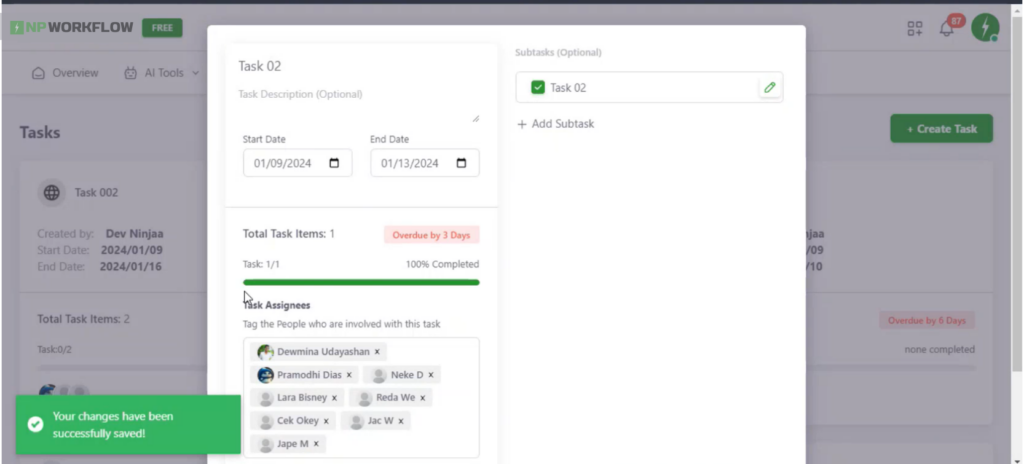
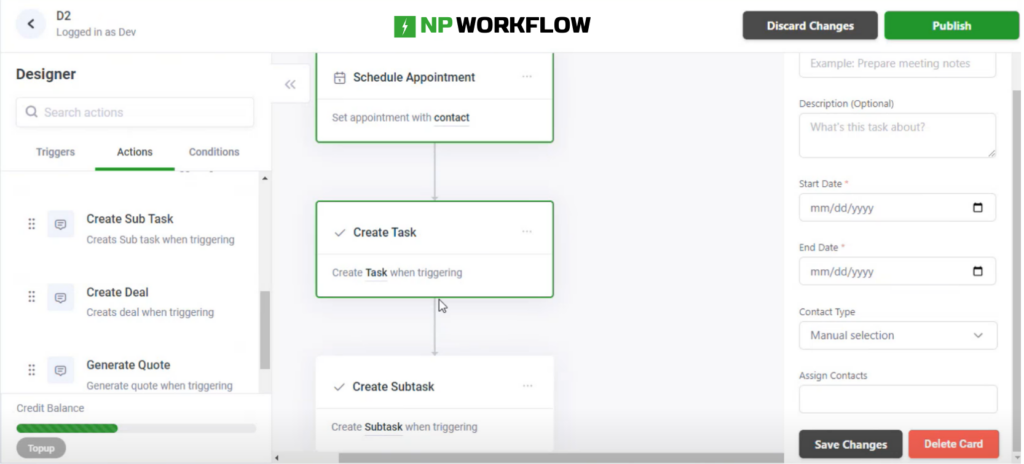
4. Create Task:
In this section, you can create tasks to be triggered on a specific day. Additionally, you can add subtasks to break down larger tasks into manageable components, enhancing task management within your workflow.
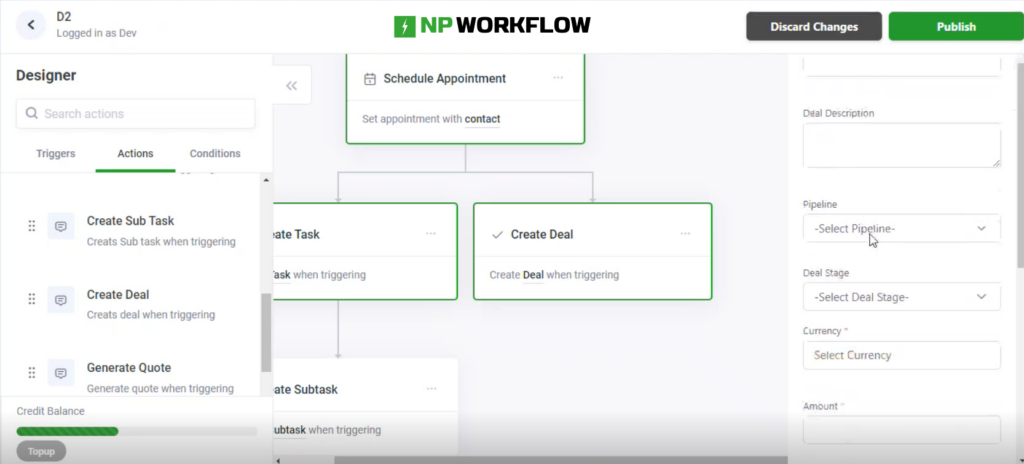
5. Create Deals:
Similar to task creation, you can use this section to generate deals. Input the necessary details, and the created deal becomes part of your workflow, allowing for seamless deal management.
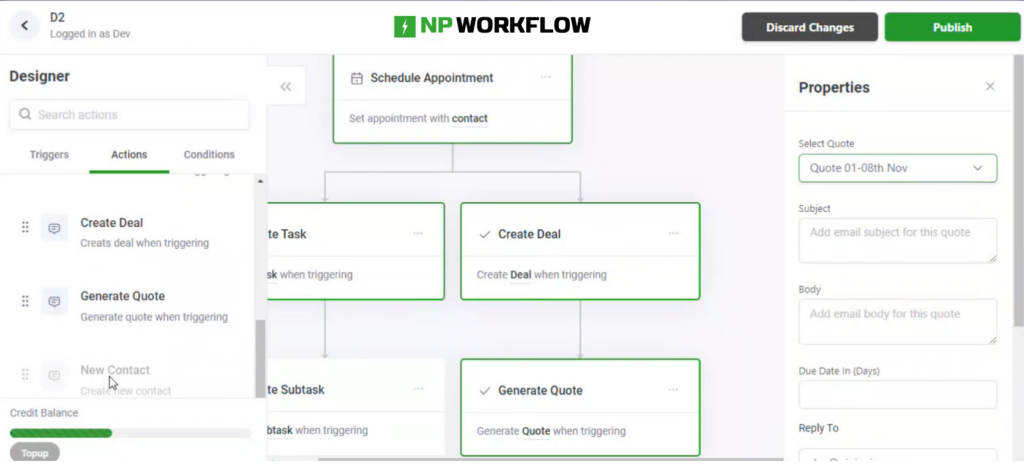
6. Generate Quote:
This section enables the selection of a quote and facilitates the sending of an email associated with that quote. While there is no AI-generated content for quotes, you can manually input all necessary details and attach the selected quote to the email.
7. New Contact:
The “New Contact” section allows you to create new contacts. However, this feature is specifically enabled for tasks related to data bins.
Understanding how to leverage these Actions effectively empowers you to automate and streamline various aspects of your project management. Whether it’s sending communications, scheduling appointments, or managing tasks and deals, NinjaPipe’s Actions feature offers a versatile toolkit for enhancing your workflow automation.
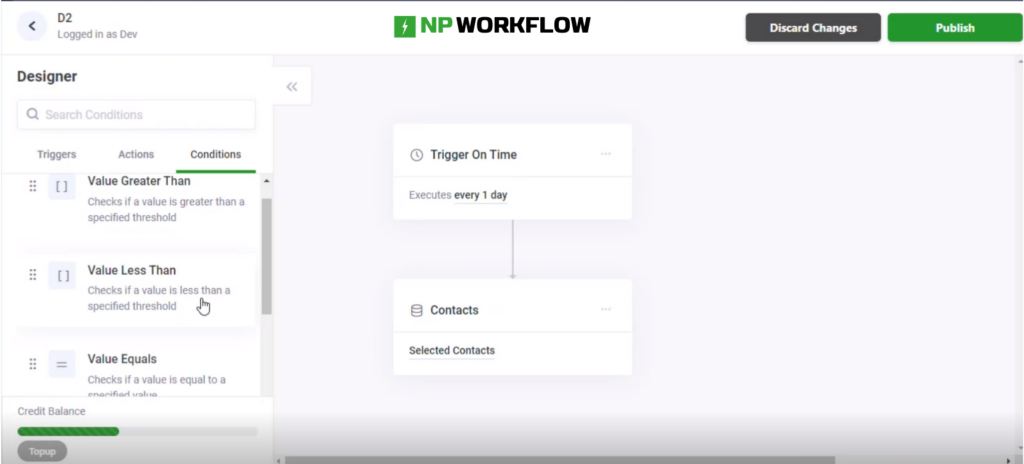
Conditions
Conditions in NinjaPipe’s workflow bring a nuanced layer to your project management, allowing you to tailor actions based on specific criteria. Understanding the intricacies of conditions is key to optimizing the functionality of your workflow. Let’s explore the five sections under Conditions and how they enhance your automation capabilities:
1. Value Greater Than:
This condition allows you to filter contacts or deals based on a specified value. For instance, if you set a condition where the value is greater than a certain threshold, you can send emails or SMS to contacts whose birthdays fall on a specific date.
2. Value Less Than:
Similar to the “Value Greater Than” condition, this section enables you to filter contacts or deals based on a value that is less than a specified threshold. It’s a flexible tool for refining your target audience for various actions.
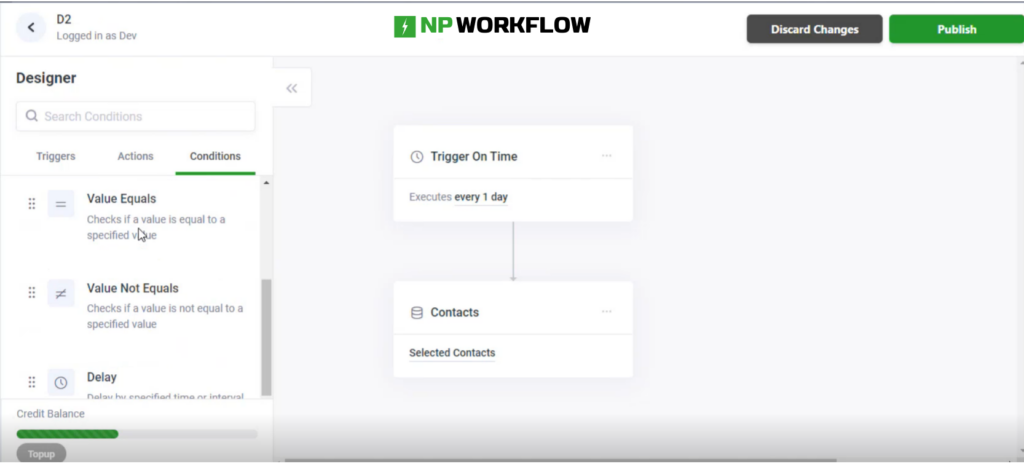
3. Value Equal:
The “Value Equal” condition filters contacts or deals based on equality to a specific value. This precise condition ensures that actions are triggered only for contacts or deals that match the specified criteria.
4. Value Not Equal:
In contrast to the “Value Equal” condition, this section filters out contacts or deals that do not match a specified value. It provides a way to exclude certain entities from triggering specific actions.
5. Delay:
The “Delay” section introduces a temporal element to your workflow. When you add a delay card, you can postpone the execution of triggers. For example, if your time-based trigger executes every day, adding a delay card can shift the trigger to activate every other day.
Understanding how to use these conditions effectively allows you to fine-tune your workflow based on specific criteria, ensuring that actions are executed with precision. Whether you’re filtering contacts based on values, delaying triggers, or implementing equality conditions, NinjaPipe’s Conditions feature empowers you to create workflows that adapt to the dynamic needs of your projects.
Create An AI Appointment
NinjaPipe’s innovative AI Appointment feature introduces a seamless way to schedule appointments, integrating SMS and Emails within your workflow. This cutting-edge functionality streamlines the appointment booking process, enhancing communication and organization. Here’s a guide on creating an AI Appointment within NinjaPipe:
1. Access the Schedule Appointments Section:
Navigate to the workflow in the AI Tools and click on the “Schedule Appointments” of the Actions feature option. This feature offers advanced capabilities to schedule both SMS and Emails, providing a comprehensive solution for appointment management.
2. Select Staging:
Choose the staging option that best suits your needs. Staging allows you to plan and coordinate appointments effectively before making them live. This strategic feature ensures a smooth transition when the appointments are implemented.
3. Book Appointments:
Similar to scheduling SMS and Emails, you can book appointments seamlessly. Specify essential details such as the appointment link, and text describing the appointment, and provide sample text to guide the communication process.
4. Link Products:
Enhance the appointment by linking relevant products that are intended for discussion. This integration ensures that the appointment is well-prepared, with products easily accessible for reference and discussion during the scheduled interaction.
Creating an AI Appointment with NinjaPipe’s advanced features not only simplifies the scheduling process but also adds a layer of intelligence to your appointments. The ability to link products and provide detailed information contributes to a more organized and efficient workflow. Embrace this forward-thinking approach to appointment management, allowing NinjaPipe to optimize your scheduling processes.
Create An Email Automation
NinjaPipe’s Email Automation feature, particularly the AI-generated option, provides a powerful tool for streamlining your communication processes. Here’s a step-by-step guide to creating Email Automation with AI-generated content within NinjaPipe:
1. Access Email Automation:
Navigate to the Email Automation section within NinjaPipe. This can usually be found in the workflow under Action in the work platform.
2. Select AI-Generated:
Choose the AI-generated option within the Email Automation interface. This selection enables the system to dynamically generate email content based on your instructions and predefined parameters.
3. Provide Instructions:
Input clear instructions for the AI to follow. Specify the structure, character count, and any other relevant guidelines for the generated email. This step helps train the AI to produce content that aligns with your communication style.
4. Sample Text with Line Breaks:
Include sample text in the provided space, incorporating line breaks as needed. The AI utilizes this information to understand your email’s formatting and style preferences.
5. Reply To Functionality:
The “Reply-To” field is automatically filled with the email associated with your NinjaPipe account. Clicking the “Reply” button will direct any replies to this email. You can change the reply-to name as desired, offering flexibility in how recipients perceive the sender.
6. Additional Text:
Add a courteous touch to your emails by including additional text, such as best regards or thank-you sentences. Utilize line breaks to format this content effectively, ensuring a professional and polished appearance.
Following these steps, you can leverage NinjaPipe’s AI-generated Email Automation to enhance your communication efficiency. The platform’s intuitive features and customizable options empower users to create dynamic, personalized email content while automating the sending process. Incorporate this tool into your workflow to experience streamlined and effective email communication within your projects.
Automation
Creating an SMS Automation
Creating an SMS Automation with NinjaPipe’s AI-generated content is a straightforward process streamlining your communication efforts. Here’s a simple guide on how to set up an SMS Automation within NinjaPipe:
Access SMS Automation:
Navigate to the SMS Automation section within NinjaPipe. This is typically located in the workflow or automation features of the platform.
Choose AI-Generated Option:
Select the AI-generated option within the SMS Automation interface. This choice enables the system to dynamically generate SMS content based on your provided instructions and predefined parameters.
Provide Clear Instructions:
Input precise instructions for the AI to follow. Clearly define the structure, character count, and other relevant guidelines for the generated SMS. This step trains the AI to produce content that aligns with your communication preferences.
No Manual Input for SMS:
Unlike manual input, the AI-generated SMS feature does not require you to compose the content personally. Instead, the AI utilizes the instructions you provide to generate SMS messages, automating the content creation process.
Additional Settings:
Depending on the capabilities of NinjaPipe, you may have additional settings to configure for your SMS Automation. Ensure that all relevant parameters, such as recipient selection and sending schedule, are appropriately set.
Review and Confirm:
Before activating the SMS Automation, review the instructions, settings, and any other details. Confirm that everything aligns with your communication goals and preferences.
Activate Automation:
Once satisfied with the setup, activate the SMS Automation. This triggers the AI to generate SMS messages based on the provided instructions and sends them to the selected recipients.
By following these steps, you can leverage NinjaPipe’s AI-generated SMS Automation to enhance the efficiency of your communication processes. This feature allows you to automate SMS content creation while ensuring that the messages align with your communication style and preferences. Integrate SMS Automation into your workflow for streamlined and effective communication within your projects.
Zapier Integration
Zapier is a powerful automation tool designed to interface with thousands of the most well-known applications, such as Gmail, Slack, and Todoist, effectively streamlining your workflow. In a matter of minutes, you’re capable of configuring automated processes (which we refer to as ‘Zaps’), that can transform NinjaPipe into a central hub for managing your sales workflow. Zaps are incredibly versatile. They allow you to generate new leads, modify the status of a deal, attach files to an account, and perform a plethora of other tasks.
This means there’s no need for tedious manual labor. These automated actions not only save you precious time but also reduce the risk of human error and ensure a more consistent and efficient workflow. By creating a bridge between your favorite apps and services, Zapier offers a powerful way to create complex, automated workflows that can significantly enhance productivity and streamline your daily tasks.
As of now, we have a few zaps available for you to use along with some pre-designed recipes. We will continue to add new zaps as we go.
Triggers
You can use the following Zapier Triggers:
New Contact: Triggers when a new contact is created in your NinjaPipe Workspace New Deal: Triggers when a new deal is created in your NinjaPipe Workspace
Actions
You can use the following Zapier Triggers:
Create Contact: Automatically create a new contact when data is received Create Task: Automatically create a new task when data is received
Connecting your NinjaPipe to Zapier
To get started, select the NinjaPipe Zap from Zapier:
Once you select it, you will be prompted to sign in to your NinjaPipe account.
Sign in with the following details:
Email: Your NinjaPipe Email
Password: Your NinjaPipe Password
Tenant URL: Your NinjaPipe Organization URL. You can contact your administrator to get this.
New Contact Trigger
If you connect this trigger, your zap will execute as soon as a new contact is added at any given time on your NinjaPipe workspace. You can connect this with different other applications for varying purposes.
You can test the trigger by creating a new contact via your NinjaPipe Mobile app or your web app and Zapier will detect that new contact. You can skip the test if you want to.
New Deal Trigger
If you connect this trigger, your zap will execute as soon as a new deal is added at any given time on your NinjaPipe workspace. You can connect this with different other applications for varying purposes.
You can test the trigger by creating a new deal via your NinjaPipe Mobile app or your web app and Zapier will detect that new deal. You can skip the test if you want to.
Create Contact
If you connect this action to any of your other triggers, your zap will create a new contact entry in your NinjaPipe workspace. You can connect this with different other triggers on Zapier for creating contacts from different sources.
You can test the action by executing the connected Trigger. The following are the required fields to create a new contact:
To get started on NinjaPipe, you’ll need to first create an organization and enter your company details. You will need to enter your company or team name and choose a company URL that’s unique on the platform. This will be the company’s unique name which you and your team members will be prompted with when logging in. You will not be able to select a URL that another company has already taken.
Select Tier & Start Free Trial
NinjaPipe is made for Coaches and Agencies and therefore provides 2 packages to suit these two groups. Each package has 3 tiers which you can choose from. Select the package and tier that suits you, your company or your team and get started.
We collect your card details when signing up to make sure that we only welcome real humans with valid payment details, while combatting spam. We do not charge you during the free trial and you can cancel anytime with no conditions. You can also modify or remove your details anytime through the billing settings after signing in.
We partner with Stripe to manage our payments securely.
Navigating NinjaPipe Web
Navigating
Browse through the following features by clicking on any of the tabs in the navigation bar:
Overview - Overview of your entire workspace
AI Tools - Use features like Workflow designer to automate tasks
Chat - Chat with your contacts and team members
Contacts - Manage your clients, team members and other contacts
Tasks - Create tasks, set dead lines and assign to contacts
Calendar - Manage your schedule by syncing your Google Calendar
Marketing - Manage marketing features like Forms
Sales - Manage sales related features like products, pipelines, deals and create quotes and invoices
Data - Create data bins for other applications to send data to your NinjaPipe
Chats
Effortlessly connect and communicate with your team members using NinjaPipe’s intuitive “Chat” feature. Designed for seamless and real-time communication, the chat functionality ensures that collaboration is at your fingertips. Here’s a step-by-step guide to help you navigate and make the most of the Chat feature within the NinjaPipe platform:
1. Accessing the Chat Section:
On the top of the dashboard, click on “Chat.” This action will direct you to the Chat page, where you can initiate and engage in conversations with your team members.
2. Chat Interface:
Upon entering the Chat page, your ongoing chats will appear on the right side of the page. This interface provides a clear and convenient view of your active conversations.
3. Initiating a New Chat:
To start a new chat, use the search function to find contacts. Simply enter the name of the person you want to chat with, and a list of matching contacts will appear. Click on the contact’s name to start a new chat with them.
4. Searching Contacts and Chats:
The search functionality extends beyond initiating new chats. You can also search for old chats by team member names. This ensures that you can easily retrieve and reference previous conversations for seamless collaboration.
NinjaPipe’s “Chat” feature serves as a dynamic and user-friendly communication tool. By providing a clear interface for ongoing chats, an efficient search function for initiating new conversations, and the ability to search for past interactions, NinjaPipe’s Chat feature facilitates effective team communication within the platform. Whether you’re starting new discussions or referring to past conversations, the Chat feature ensures that communication remains fluid and accessible for enhanced collaboration.
Invite Team Members
Effectively collaborate and build your team within NinjaPipe by utilizing the “Invite Team Members” feature. This streamlined process ensures that you can easily bring your team on board, fostering a collaborative environment. Here’s a step-by-step guide to help you invite team members within the NinjaPipe platform:
1. Accessing the Invite Team Members Section:
From the dashboard, navigate to the “Get Started” section. Click on “Invite Team Members” to initiate the team invitation process.
2. Navigating to the Manage Team Page:
Upon clicking, you will be directed to the “Manage Team” page. Here, you can view the existing members in your organization, providing an overview of your team structure.
3. Searching for Team Members:
Utilize the search function to find specific team members or navigate through the list to locate individuals within your organization.
4. Inviting Team Members:
To invite new team members, click on “Invite Team Members.” This action will prompt a form where you can add the first name, last name, and email address of the team members you wish to invite.
5. Adding Team Member Details:
Fill in the required information for the team members, including their first name, last name, and email address.
6. Sending Invitations:
Once the details are added, click on “Send Invitation” to dispatch the invitations to the specified team members.
NinjaPipe’s “Invite Team Members” feature offers a straightforward and efficient method for expanding and managing your team within the platform. By providing a user-friendly interface to add and invite team members, NinjaPipe ensures that the onboarding process is seamless, enabling teams to collaborate and communicate effectively within the collaborative environment of the platform.
Download NinjaPipe Mobile App – Android
Downloading NinjaPipe on your Android device is a simple and quick process, allowing you to stay connected and manage your tasks on the go. Here’s a step-by-step guide to help you download NinjaPipe from the Play Store:
1. Accessing the Play Store:
Open the Play Store on your Android device.
2. Searching for NinjaPipe:
Type “NinjaPipe” in the search bar and initiate the search.
3. Selecting NinjaPipe:
Once you find the NinjaPipe app, click on it to access the app’s page.
4. Installing the App:
On the NinjaPipe app page, click on the “Install” button to start the installation process.
5. Opening the App:
After the installation is complete, click on “Open” to launch the NinjaPipe app.
6. Creating an Account or Signing In:
If you are new to NinjaPipe, you can create an account by providing the necessary details. If you already have an account, simply sign in using your company ID and password.
7. Exploring the Mobile App:
Once signed in, you can explore the features of the NinjaPipe mobile app, allowing you to manage tasks, collaborate with your team, and stay updated on the go.
8. Video Guide:
For a visual guide on downloading, installing, and setting up the NinjaPipe mobile app, you can refer to the accompanying video tutorial.
The NinjaPipe Android app provides a convenient way to access and manage your tasks from your mobile device. By following these simple steps, you can quickly download the app, whether you’re new to NinjaPipe or an existing user looking to extend your workflow to your Android device.
Features- NinjaPipe Mobile App
Navigating and managing your tasks on the go has never been easier with the NinjaPipe Mobile App. This user-friendly application mirrors the functionality of the website, ensuring a seamless experience whether you’re in the office or on the move. Let’s explore the key features of the NinjaPipe Mobile App:
1.Sign-In or Account Creation: Upon completing the installation, users can effortlessly sign in using their company ID and password. Alternatively, new users have the option to create an account directly from the mobile app.
2. Dashboard Overview: The Dashboard on the mobile app provides a quick overview of essential information, allowing users to stay informed about key metrics and updates at a glance.
3. Contact Management: Users can easily access and manage their contacts through the Contact feature. This functionality ensures that your important connections are just a tap away.
4. Real-time Chats: The Chats feature enables real-time communication, allowing team members to collaborate seamlessly through instant messaging.
5.Instant Notifications: Stay on top of your tasks and updates with the Notifications feature. Receive instant alerts and keep track of important changes within your projects.
6.More Options:
Explore additional features under the “More” section, including:
Deals: Manage and track your deals efficiently.
Tasks: Access and manage your tasks on the go.
Settings: Customize your app preferences.
Forms: Utilize forms for specific data collection.
Data Policy: Review and manage data policies.
Manage Profile: Update and customize your user profile.
Privacy Policy: Access and review the privacy policy.
The NinjaPipe Mobile App brings the power of project management and collaboration to your fingertips. With a focus on simplicity and functionality, this app ensures that users can seamlessly access, update, and manage their tasks and projects while on the move. Whether you’re checking notifications, engaging in real-time chats, or managing contacts, the NinjaPipe Mobile App is designed to enhance your mobile project management experience.
Navigating NinjaPipe Web
Navigating
Browse through the following features by clicking on any of the tabs in the navigation bar:
Overview - Overview of your entire workspace
AI Tools - Use features like Workflow designer to automate tasks
Chat - Chat with your contacts and team members
Contacts - Manage your clients, team members and other contacts
Tasks - Create tasks, set dead lines and assign to contacts
Calendar - Manage your schedule by syncing your Google Calendar
Marketing - Manage marketing features like Forms
Sales - Manage sales related features like products, pipelines, deals and create quotes and invoices
Data - Create data bins for other applications to send data to your NinjaPipe
Notifications
Navigate through your daily tasks, emails, and plans seamlessly with NinjaPipe’s dedicated “Notifications” feature. Situated conveniently at the top of the dashboard, represented by a bell icon, this functionality ensures that you stay informed and on top of your workflow without the need to scour different platforms. Here’s how you can make the most of the Notifications feature:
Spot the Bell Icon:
Look for the distinctive bell icon positioned at the top left side of the dashboard. This is your gateway to accessing all your daily notifications in one centralized location.
Click on Notifications:
With a simple click on the bell icon, you open up the Notifications panel. This area serves as a hub for all the updates, alerts, and reminders related to your tasks, projects, and communications.
Stay Informed in Real-Time:
NinjaPipe’s Notifications feature ensures that you receive real-time updates on essential activities, keeping you informed about new tasks, messages, or any other noteworthy events within the platform.
Efficient Task Management:
No need to sift through emails or various sections of the platform to find updates. The Notifications feature consolidates all relevant information, allowing for efficient task management and timely responses.
Instant Access to Important Alerts:
Whether it’s a deadline approaching, a new message in your inbox, or updates on ongoing projects, the Notifications feature provides instant access to important alerts, allowing you to prioritize your time effectively.
By incorporating the Notifications feature into the NinjaPipe dashboard, the platform enhances the user experience, ensuring that individuals and teams can manage their tasks and communications with agility. This streamlined approach not only saves time but also contributes to a more organized and productive workflow. So, the next time you’re on NinjaPipe, don’t forget to click on the bell icon – your gateway to staying informed and in control of your daily activities.
Quick Access Menu
NinjaPipe’s user-friendly interface offers a quick and efficient way to access a myriad of features through the convenient “Quick Access” menu. Placed prominently on the left side of the dashboard, this tool allows users to navigate seamlessly and access essential functions with just a click. Let’s explore the diverse features available through the Quick Access menu:
Calendar:
Stay organized and on top of your schedule by clicking on the “Calendar” option. NinjaPipe’s calendar feature provides a visual overview of your upcoming events and tasks, ensuring that you never miss a deadline or important meeting.
Quotes and Invoices:
Manage your financial transactions effortlessly by navigating to “Quotes and Invoices” through Quick Access. This feature allows users to generate quotes, and invoices, and track payments with ease, streamlining the billing process.
Contacts:
Access your contacts swiftly by clicking on the “Contacts” option in Quick Access. Whether you need to add new contacts, import them in bulk, or simply view your existing network, NinjaPipe’s contact management is just a click away.
Forms:
Simplify data collection and streamline processes with the “Forms” feature. By utilizing Quick Access, users can effortlessly create, customize, and manage forms, facilitating efficient data gathering for various purposes.
Pipelines:
Tailor your project workflows by clicking on “Pipelines” through Quick Access. This feature enables users to create, customize, and manage pipelines, ensuring that projects progress seamlessly from start to finish.
Deals:
Monitor and track your business opportunities by accessing the “Deals” feature. With a single click through Quick Access, users can stay informed about new deals, manage ongoing negotiations, and make data-driven decisions.
NinjaPipe’s Quick Access lies in its simplicity and accessibility. Users can effortlessly navigate through various features without the need for extensive menu searches. This intuitive approach enhances the overall user experience, allowing individuals and teams to focus on their tasks and projects with efficiency and ease. As you explore the Quick Access menu, you’ll discover a wealth of tools at your fingertips, ready to elevate your productivity within the NinjaPipe platform.
Marketing
NinjaPipe’s dedicated “Marketing” section is prominently featured at the top of the dashboard. This specialized area empowers users with tools designed to enhance marketing strategies and data management. Let’s explore the two key sections under Marketing:
Forms:
Under Marketing, the “Forms” section is a dynamic tool for efficient data collection and management. This feature allows users to create, customize, and manage forms tailored to their marketing needs. Whether you’re gathering customer feedback, conducting surveys, or collecting leads, Forms on NinjaPipe streamlines the data collection process, providing a user-friendly and organized approach to managing crucial marketing information.
Data Bins:
Another integral component of NinjaPipe’s Marketing section is the “Data Bins” feature. This functionality provides users with a structured and organized way to manage and store marketing-related data. Whether it’s customer information, campaign data, or other crucial marketing assets, Data Bins ensures that your marketing data is easily accessible, searchable, and well-organized.
By incorporating the Marketing section into the NinjaPipe dashboard, the platform extends its utility beyond project management and communication. It caters specifically to the needs of marketing professionals, offering a space for collaboration and efficient data management. The Forum encourages a sense of community, fostering discussions that can lead to valuable insights, while Data Bins provide a structured approach to managing marketing data, contributing to a more organized and streamlined marketing workflow. As you explore NinjaPipe’s Marketing section, you’ll find a suite of tools tailored to enhance your marketing efforts and support the success of your campaigns.
Sales
NinjaPipe’s dedicated “Sales” section is prominently featured at the top of the dashboard. Tailored to meet the needs of sales professionals, this section comprises four essential components designed to enhance your sales strategies and overall workflow. Let’s explore these key features:
Products:
The “Products” section serves as the foundation for your sales endeavors. Here, users can manage and organize product information efficiently. From product descriptions to pricing details, Products on NinjaPipe provide a centralized space to catalog and access crucial information for effective sales presentations and negotiations.
Pipelines:
A flexible tool within the Sales section is “Pipelines.” Beyond its sales-related applications, Pipelines in NinjaPipe can be utilized for various purposes, including recruitment, content creation, and marketing. By clicking on “Create Pipeline” and selecting “Browse Templates,” users can explore a range of templates showcasing the diverse capabilities of Pipelines. This feature allows for the customization of workflows to align with specific needs, making Pipelines a dynamic and adaptable tool for various business functions.
Deals:
The “Deals” section is a dynamic space where sales opportunities come to life. Users can track and manage ongoing deals, gaining insights into the progress of negotiations, potential revenue, and key deal-related details. This feature empowers sales professionals to make informed decisions and strategically advance their deals.
Quotes:
Streamline your quoting process with the “Quotes” feature. Here, users can generate and manage quotes effortlessly. Whether it’s creating quotes for potential clients or revising existing ones, NinjaPipe’s Quotes section provides a user-friendly interface for efficient quote management, contributing to a smoother sales experience.
By integrating the Sales section into the NinjaPipe dashboard, the platform caters specifically to the needs of sales teams and professionals. Whether you’re managing products, optimizing sales pipelines, tracking deals, or generating quotes, NinjaPipe offers a comprehensive suite of tools to enhance your sales strategies and drive success in the competitive world of sales. As you explore the Sales section, you’ll discover a powerful toolkit designed to support your sales efforts and elevate your overall sales management experience.
Create Tasks
Navigate your daily workflow seamlessly with NinjaPipe’s intuitive “Create Tasks” feature. Designed for efficient task management, this tool allows you to organize and track your tasks effortlessly. Here’s a step-by-step guide to help you create tasks and stay on top of your work:
1. Accessing the Task Section:
you can see a section called “Task” on top of your NinjaPipe dashboard. This is your entry to creating and managing tasks within the NinjaPipe platform.
2. Initiating Task Creation:
Click on the “Task” section to enter the task management interface. Here, you can initiate the creation of a new task to streamline your workflow.
3. Adding Task Details:
Provide essential details to define your task:
Task Name: Give your task a descriptive name, ensuring clarity and easy identification.
Description (Optional): Add additional context or details to the task if needed.
Start Date: Specify when the task should commence.
End Date: Set the deadline or completion date for the task.
Assign Contacts: Allocate the task to specific contacts or team members.
4. Completing the Task Creation:
Once you’ve filled in the necessary details, click on “Create.” Congratulations! You have successfully created your task, and it is now integrated into the NinjaPipe task management system.
5. Viewing Your Tasks:
Your newly created task will be displayed in the “Tasks” section, providing a clear overview of your ongoing tasks and their respective details.
NinjaPipe’s “Create Tasks” feature offers a user-friendly and efficient way to manage your workflow. By providing a structured approach to task creation and organization, users can stay organized and focused on their priorities. Whether you’re working individually or collaboratively, NinjaPipe’s task management functionality ensures that you can easily create, track, and complete tasks, contributing to a more productive and streamlined work experience.
Create Tasks Mobile Version – Android
Workflows
Navigating and optimizing your workflow is made simple with NinjaPipe’s AI Tools, specifically the Workflow feature. Here’s a step-by-step guide on how to create and manage your workflow efficiently:
1. Accessing AI Tools:
Once you log in, head to the dashboard and locate the AI Tools section. Click on it to reveal the available tools, and select “Workflow.“
2. Creating a Workflow:
Click on “Create Workflow” to initiate the workflow creation process. Provide a name and description for your workflow to give it context and clarity.
3. Workflow Initialization:
After naming and describing your workflow, click “Create.” The system will then generate your workflow, and a guide video will pop up to provide additional assistance during the loading process.
4. Workflow Sections:
Your workflow is divided into three key sections:
Triggers: Define when you want your workflow to run. For instance, you can set triggers for sending emails based on specific conditions.
Actions: Create various actions, such as classes, that will be executed as part of your workflow.
Conditions: Set conditions to guide the workflow’s decision-making process.
5. Credit Balance Monitoring:
Keep an eye on your credit balance, visible in the right-side bottom corner. This balance is crucial for actions like sending emails and SMS. Each tenant has a credit limit, and when your balance approaches zero, you won’t be able to send further SMS or emails.
6. Top-Up Credit Balance:
To ensure uninterrupted communication, you can top up your credit balance by clicking “Top Up.” This action initiates a payment process specifically for emails and SMS.
NinjaPipe’s Workflow feature empowers users to streamline and automate processes effectively. By providing a user-friendly interface for creating workflows, setting triggers, and monitoring credit balances, NinjaPipe ensures that users can enhance their project management experience with intelligent automation and seamless communication.
Creating an SMS Automation
Creating an SMS Automation with NinjaPipe’s AI-generated content is a straightforward process streamlining your communication efforts. Here’s a simple guide on how to set up an SMS Automation within NinjaPipe:
Access SMS Automation:
Navigate to the SMS Automation section within NinjaPipe. This is typically located in the workflow or automation features of the platform.
Choose AI-Generated Option:
Select the AI-generated option within the SMS Automation interface. This choice enables the system to dynamically generate SMS content based on your provided instructions and predefined parameters.
Provide Clear Instructions:
Input precise instructions for the AI to follow. Clearly define the structure, character count, and other relevant guidelines for the generated SMS. This step trains the AI to produce content that aligns with your communication preferences.
No Manual Input for SMS:
Unlike manual input, the AI-generated SMS feature does not require you to compose the content personally. Instead, the AI utilizes the instructions you provide to generate SMS messages, automating the content creation process.
Additional Settings:
Depending on the capabilities of NinjaPipe, you may have additional settings to configure for your SMS Automation. Ensure that all relevant parameters, such as recipient selection and sending schedule, are appropriately set.
Review and Confirm:
Before activating the SMS Automation, review the instructions, settings, and any other details. Confirm that everything aligns with your communication goals and preferences.
Activate Automation:
Once satisfied with the setup, activate the SMS Automation. This triggers the AI to generate SMS messages based on the provided instructions and sends them to the selected recipients.
By following these steps, you can leverage NinjaPipe’s AI-generated SMS Automation to enhance the efficiency of your communication processes. This feature allows you to automate SMS content creation while ensuring that the messages align with your communication style and preferences. Integrate SMS Automation into your workflow for streamlined and effective communication within your projects.
Create Deals
Effortlessly manage your sales opportunities with NinjaPipe’s straightforward “Create Deal” feature. Designed to streamline the process of adding and tracking deals, this tool ensures that users can efficiently organize their sales efforts. Here’s a step-by-step guide to help you create and manage deals within the NinjaPipe platform:
1. Accessing the Sales Section:
Upon logging in, locate the “Sales” section at the top of the dashboard. Click on it to reveal the subcategories, and select “Deals” to navigate to the Deals page.
2. Initiating Deal Creation:
On the Deals page, find and click on the “Create Deal” option. A form will promptly appear on the left side of the screen, ready for you to input the necessary information.
3. Filling in Deal Information:
Complete the form by adding essential details:
Deal Name:
Provide a descriptive name for your deal.
Deal Information:
Input relevant information about the deal, such as description, start date, end date, and any other pertinent details.
Contacts:
Associate contacts with the deal, linking it to the individuals involved.
4. Completing Deal Creation:
Once you’ve added all the required information, click on “Create Deal.” Your deal is now successfully created and integrated into the NinjaPipe system.
5. Viewing and Managing Deals:
Navigate to the Deals page to view a comprehensive list of your deals. Here, you can track the status, progress, and details of each deal.
6. Managing Deal Associations:
On the Deals page, you have the flexibility to add or edit contacts associated with a deal. This ensures that your deal information stays up-to-date and accurately reflects your sales interactions.
NinjaPipe’s “Create Deal” feature provides a seamless and user-friendly process for managing sales opportunities. Whether you’re initiating a new deal, updating deal information, or managing associated contacts, this tool streamlines the sales process, ensuring that users can efficiently organize and track their deals within the NinjaPipe platform.
Create Deals Mobile Version – Android
Triggers
Understanding and utilizing triggers in your NinjaPipe workflow adds a layer of automation to your project management processes. Triggers serve as the catalysts for actions and conditions, making your workflow more dynamic and responsive. Let’s delve into the various aspects of triggers within the NinjaPipe platform:
1. Trigger on Time:
In the “Triggers” section, you have the option to set triggers based on time. You can define the frequency, such as daily or on a specific date. When creating a workflow with a time trigger, it’s crucial to attach contacts or deals to enable actions and conditions.
2. When Contact Added:
This trigger activates actions when a new contact is added. For example, if you set an action to send an email, it will be triggered when a contact is created using the contact section.
3. New Deal Added:
Similar to the contact trigger, this activates actions when a new deal is added. The associated contact from the deal will determine which actions are triggered, such as sending emails or SMS.
4. New Task:
Actions under this trigger will be activated when a new task is created. For instance, creating a task may trigger an email notification to keep you informed.
5. Task Completed:
This trigger is linked to task completion. When a sub-task is marked as completed, actions associated with this trigger will be activated, providing notifications or triggering specific actions.
6. Data Bin:
Data Bins allow you to collect and manage customer details effectively. By creating a link to the Data Bin in your customer detail forms, you can seamlessly add customer details to the specified Data Bin.
7. On Pipeline Card Moved:
This new feature lets you trigger actions when a pipeline card is moved from one section to another. For example, moving a card from “In Progress” to “Pending Customer Report” can trigger specific actions associated with that card.
8. On Pipeline Card Updated:
This feature allows you to trigger actions when details on a pipeline card are updated. Whether it’s changing dates or modifying any details, associated contacts on the card will be triggered based on the updated information.
mastering triggers in NinjaPipe’s workflow ensures that your project management processes become more automated and responsive. By setting up triggers based on time, contact or deal-related activities, task management, and pipeline card movements, you can create workflows that adapt to your dynamic project requirements.
Create Forms
Creating customized forms has never been more straightforward with NinjaPipe’s user-friendly interface. Located under the Marketing section at the top of the dashboard, the “Create Form” feature empowers users to design and personalize forms according to their specific needs. Here’s a step-by-step guide to help you create and customize your form seamlessly:
1. Access the Create Form Page:
Navigate to the Marketing section on the top of the dashboard and select “Create Form.” This action will direct you to the Create Form page, where you can start building your form from scratch.
2. Create Form:
Click on the “Create Form” button to initiate the form-building process. Provide a name for your form and click on “Create.” Congratulations! You now have a form ready to be tailored to your requirements, named “Entry.”
3. Customize Using Various Options:
NinjaPipe offers a range of customization options to enhance your form:
Welcome Slide: Begin your form with a welcome or introductory message.
Ending/Thank You Slide: Conclude your form with a concluding message.
Multiple Choice: Choose one or more options from a list.
Dropdown: Select one option from a dropdown list.
Date Picker: Choose a date using a calendar interface.
Short Answer: Enter a single line of text.
Long Answer: Ideal for paragraphs and longer responses.
Number: Suitable for numeric answers.
4. Additional Form Actions:
Share Your Form: Distribute your form to the intended audience.
Preview Your Form: Review your form’s appearance before finalizing.
Edit Form Name: Modify your form’s name according to your preferences.
Delete Questions: Remove any unwanted questions for a streamlined form.
Publish or Save as Draft: Choose to publish your form or save it as a draft for later adjustments.
View Responses: Track and analyze the responses submitted through your form.
5. Settings for Further Customization:
Within the settings, you can:
Enable/Disable Questions: Tailor your form by enabling or disabling specific questions and choices.
NinjaPipe’s “Create Form” feature provides a versatile and intuitive platform for designing forms tailored to your unique requirements. With a myriad of customization options and user-friendly controls, you can effortlessly create, modify, and manage forms for various purposes. Whether for surveys, feedback collection, or data gathering, NinjaPipe’s Create Form feature empowers users to design effective forms with ease.
Creating a new account on NinjaPipe
In today’s fast-paced digital landscape, having a reliable platform for seamless communication and project management is crucial. NinjaPipe emerges as a solution, offering a user-friendly interface and powerful features. If you’re ready to join the NinjaPipe community, here’s a step-by-step guide on how to create your account.
Open Your Web Browser: Launch your preferred web browser and type “ninjapipe” in the search bar or directly enter ninjapipe.com.
Visit NinjaPipe’s Home Page: Upon reaching the NinjaPipe website, navigate to the home page by clicking on the provided link or entering ninjapipe.com in the address bar.
Click on Sign-Up: Look for the “Sign-Up” button on the home page and click on it. This will initiate the account creation process.
Fill in Your Details:
Enter Your Name and Last Name: Provide your first and last name in the designated fields.
Email Address: Input a valid email address that you have access to as it will be used for account verification and communication.
Strong Password: Create a strong and secure password to protect your account. Ensure it meets the specified criteria for strength.
Click Next: Once you’ve filled in your personal information, click on the “Next” button to proceed to the next step of the registration process.
Add Your Company Details:
Company Name and URL: Enter your company’s name and its corresponding URL to establish your professional identity on NinjaPipe.
Time Zone: Select your time zone to ensure that your NinjaPipe experience is tailored to your local time.
Click Next:After providing your company information and selecting your time zone, click on the “Next” button to move forward.
Congratulations! You’re In: You have successfully created your NinjaPipe account. Explore the platform’s features and functionalities to streamline your communication and project management needs.
NinjaPipe simplifies collaboration and enhances productivity, making it an ideal choice for individuals and teams alike. By following these easy steps, you can quickly set up your account and unlock the full potential of NinjaPipe for effective project management and communication. Welcome to the NinjaPipe community!
Apparently we had reached a great height in the atmosphere, for the sky was a dead black, and the stars had ceased to twinkle. By the same illusion which lifts the horizon of the sea to the level of the spectator on a hillside, the sable cloud beneath was dished out, and the car seemed to float in the middle of an immense dark sphere, whose upper half was strewn with silver. Looking down into the dark gulf below, I could see a ruddy light streaming through a rift in the clouds.
Lorem ipsum [1]
dolor sit amet consectetur adipisicing elit. Quod labore suscipit animi consequatur. Accusantium quibusdam dolorum at a, numquam deserunt.
Lorem ipsum dolor [2]
sit amet consectetur, adipisicing elit. Quia quos autem veniam libero! Deleniti nemo quas optio voluptas voluptatibus sint ratione. Id vel error quia ipsam sit saepe [3]
hic at amet excepturi ea. Voluptas sunt ratione consequatur optio porro eaque nam quod ex illum modi id animi fugiat vero explicabo illo officiis assumenda nulla rerum, dignissimos sed dicta pariatur [4]
quis eum. Beatae ea cumque alias ducimus quos maxime sed, modi illum at repellendus, ex deleniti nesciunt tempore placeat in accusantium!
Lorem, ipsum dolor sit amet consectetur adipisicing elit. Necessitatibus voluptas molestias expedita, ad dolorem inventore dolorum ipsum deleniti illum tempore veritatis iure nam numquam maxime [5]
eaque magnam, similique quo dolore vero optio ex reprehenderit! Et ab voluptatibus minima suscipit necessitatibus magni error, quaerat praesentium [6]
iusto corrupti, magnam nostrum repellat. Eligendi ipsam, voluptatibus quidem quos quasi totam aperiam voluptates illum quibusdam similique, sapiente necessitatibus. Dolore in est dolores [7]
debitis voluptas, sunt et ullam. Voluptates similique incidunt numquam porro, veniam totam dolore error, iste consequuntur quibusdam quod dignissimos in laborum deserunt impedit cum fugit quisquam ex quo, quidem voluptatum minima velit! Nisi accusantium ullam suscipit sapiente, harum quvelit animi laborum veritatis, ipsam eius, natus facere. Natus voluptates, et deleniti eum odio eligendi dolores cupiditate. Consequuntur hic adipisci quisquam praesentium commodi laudantium sed et modi reprehenderit. Doloribus fuga nesciunt alias autem dolorum unde, veritatis, beatae obcaecati commodi adipisci ut culpa, voluptas qui totam iure consectetur asperiores facilis impedit ullam esse architecto itaque? Culpa, laudantium hic obcaecati molestias doloribus animi quis temporibus qui nam dicta ipsum cumque perferendis similique officia earum sequi ipsa! Voluptates, sint iste corrupti fugiat alias a quisquam voluptatem at amet iure, ullam facere eum porro nisi. Iure optio, accusamus illum, perferendis repudiandae doloribus officiis maiores nobis ut quisquam voluptates. Ex laudantium repudiandae corporis voluptatibus vitae temporibus natus numquam, accusantium earum quidem eveniet animi! Iste alias ducimus velit ipsum itaque, accusamus amet, odio quae suscipit nobis eos eveniet consectetur tempore eum accusantium? Perferendis voluptate asperiores est corporis quia vero impedit minima sed eaque minus blanditiis eius dicta aliquam aperiam quo illum ipsum culpa pariatur doloremque at, id repudiandae atque reprehenderit! Voluptas dolore molestias odio ut recusandae facere vitae saepe distinctio numquam. Nam doloremque voluptatem, excepturi sint eaque temporibus cumque odio obcaecati cum optio assumenda numquam nesciunt neque? Iste ipsum esse modi iusto impedit odio vel neque. Voluptatem.
Footnotes
Creating a new account on NinjaPipe
In today’s fast-paced digital landscape, having a reliable platform for seamless communication and project management is crucial. NinjaPipe emerges as a solution, offering a user-friendly interface and powerful features. If you’re ready to join the NinjaPipe community, here’s a step-by-step guide on how to create your account.
Open Your Web Browser: Launch your preferred web browser and type “ninjapipe” in the search bar or directly enter ninjapipe.com.
Visit NinjaPipe’s Home Page: Upon reaching the NinjaPipe website, navigate to the home page by clicking on the provided link or entering ninjapipe.com in the address bar.
Click on Sign-Up: Look for the “Sign-Up” button on the home page and click on it. This will initiate the account creation process.
Fill in Your Details:
Enter Your Name and Last Name: Provide your first and last name in the designated fields.
Email Address: Input a valid email address that you have access to as it will be used for account verification and communication.
Strong Password: Create a strong and secure password to protect your account. Ensure it meets the specified criteria for strength.
Click Next: Once you’ve filled in your personal information, click on the “Next” button to proceed to the next step of the registration process.
Add Your Company Details:
Company Name and URL: Enter your company’s name and its corresponding URL to establish your professional identity on NinjaPipe.
Time Zone: Select your time zone to ensure that your NinjaPipe experience is tailored to your local time.
Click Next:After providing your company information and selecting your time zone, click on the “Next” button to move forward.
Congratulations! You’re In: You have successfully created your NinjaPipe account. Explore the platform’s features and functionalities to streamline your communication and project management needs.
NinjaPipe simplifies collaboration and enhances productivity, making it an ideal choice for individuals and teams alike. By following these easy steps, you can quickly set up your account and unlock the full potential of NinjaPipe for effective project management and communication. Welcome to the NinjaPipe community!
User Profile & Settings
Effortlessly manage and tailor your NinjaPipe experience by utilizing the comprehensive “User Profile & Settings” feature. This flexible tool empowers users to customize their profiles, adjust account settings, and access crucial information with ease. Here’s a detailed guide on how to navigate and make the most of the User Profile & Settings in NinjaPipe:
1. Accessing User Profile & Settings:
Spot the human-shaped icon in the left corner of your dashboard. Click on it to reveal a dropdown menu displaying your username, email address, and key options such as Billing, Settings, Help, and Logout.
2. Navigating to Account Settings:
Click on “Settings” to access your account settings. This action directs you to a page where you can manage various aspects of your NinjaPipe account.
3. Sections Under Settings:
Within the Settings, you’ll find four essential sections:
a. Company:
View and edit your company details.
Upload or change your company logo.
b. Team:
Review the members of your organization.
Check member count.
View your access role, name, and status.
Search contacts and invite team members
c. Security:
Change, view, and update your password.
Enable Two-step verification for enhanced security.
d. Billing & Plans:
Upgrade and manage your plan.
e. Connections:
Sync your calendars with NinjaPipe through Calendar Accounts.
Enable or disable calendar sync based on your preferences.
4. Help and Support:
Click on “Help” to access the NinjaPipe Help and Support Center. Here, you can find a wealth of information, including guide articles, the option to create tickets for personalized assistance, and access to the community for additional support.
The User Profile & Settings feature in NinjaPipe provides users with a central hub for personalizing their experience and managing account-related details. Whether adjusting company information, reviewing team members, enhancing security, managing billing and plans, or syncing calendars, users have a comprehensive suite of tools at their disposal. The Help and Support section further ensures that users can find assistance and information whenever needed, contributing to a seamless and user-friendly experience within the NinjaPipe platform.
Actions
NinjaPipe’s Actions feature adds a dynamic layer to your workflow, allowing you to execute a variety of tasks seamlessly. Understanding the functionalities within the Actions section is crucial for optimizing your project management processes. Let’s explore the different sub-sections under Actions and how each enhances your automation capabilities:
1. Send Emails:
The “Send Emails” section offers two options: AI-generated emails and manual emails.
AI-Generated: You can input instructions and sample text, allowing the system to generate emails based on specified criteria. You can customize reply-to information and add additional text.
Manual emails: For more control, you can disable AI generation and compose emails manually. You can also select from email templates and preview them before sending them.
2. Send SMS:
Similar to sending emails, the “Send SMS” section generates AI-driven SMS based on provided instructions. This feature streamlines communication by automating the SMS creation process.
3. Schedule Appointments:
The “Schedule Appointments” section introduces new features, enabling the scheduling of both SMS and emails. You can book appointments, add relevant details, include sample text, and link products for discussion during the appointment.
4. Create Task:
In this section, you can create tasks to be triggered on a specific day. Additionally, you can add subtasks to break down larger tasks into manageable components, enhancing task management within your workflow.
5. Create Deals:
Similar to task creation, you can use this section to generate deals. Input the necessary details, and the created deal becomes part of your workflow, allowing for seamless deal management.
6. Generate Quote:
This section enables the selection of a quote and facilitates the sending of an email associated with that quote. While there is no AI-generated content for quotes, you can manually input all necessary details and attach the selected quote to the email.
7. New Contact:
The “New Contact” section allows you to create new contacts. However, this feature is specifically enabled for tasks related to data bins.
Understanding how to leverage these Actions effectively empowers you to automate and streamline various aspects of your project management. Whether it’s sending communications, scheduling appointments, or managing tasks and deals, NinjaPipe’s Actions feature offers a versatile toolkit for enhancing your workflow automation.
Create Data Bins
Creating and managing your Data Bins in NinjaPipe is a straightforward process that allows you to organize and store your marketing-related data efficiently. Located under the Marketing section at the top of the dashboard, the “Create Data Bins” feature provides users with a powerful tool for structured data management. Here’s a step-by-step guide to help you create your Data Bins seamlessly:
1. Access the Create Data Bins Page:
Navigate to the Marketing section on the top of the dashboard and select “Data Bins.” This action will direct you to the Create Data Bins page, where you can initiate the process of building your own Data Bin.
2. Create Data Bins:
Click on the “Create Data Bins” button to begin the creation process. Provide a name for your Data Bin and a brief description to help identify its purpose. Once filled, click on “Create.”
3. Confirmation and Initial Status:
After successfully creating your Data Bin, you’ll see a confirmation message, and the initial status will display: “Waiting for events. When NinjaPipe gets them, we’ll show them here.” This status indicates that your Data Bin is ready to capture and organize events once they occur.
4. Utilizing Data Bins:
Waiting for Events: As the initial status suggests, your Data Bin is actively waiting for events to occur. Once NinjaPipe receives these events, they will be displayed within your Data Bin.
NinjaPipe’s “Create Data Bins” feature offers a simple yet powerful solution for organizing and managing marketing-related data. By providing a user-friendly interface and a step-by-step creation process, users can efficiently set up Data Bins tailored to their specific needs. Whether you’re handling customer profiles, campaign data, or any other marketing assets, NinjaPipe’s Create Data Bins feature ensures that your data is organized, accessible, and ready for further analysis.
User Profile & Settings
Effortlessly manage and tailor your NinjaPipe experience by utilizing the comprehensive “User Profile & Settings” feature. This flexible tool empowers users to customize their profiles, adjust account settings, and access crucial information with ease. Here’s a detailed guide on how to navigate and make the most of the User Profile & Settings in NinjaPipe:
1. Accessing User Profile & Settings:
Spot the human-shaped icon in the left corner of your dashboard. Click on it to reveal a dropdown menu displaying your username, email address, and key options such as Billing, Settings, Help, and Logout.
2. Navigating to Account Settings:
Click on “Settings” to access your account settings. This action directs you to a page where you can manage various aspects of your NinjaPipe account.
3. Sections Under Settings:
Within the Settings, you’ll find four essential sections:
a. Company:
View and edit your company details.
Upload or change your company logo.
b. Team:
Review the members of your organization.
Check member count.
View your access role, name, and status.
Search contacts and invite team members
c. Security:
Change, view, and update your password.
Enable Two-step verification for enhanced security.
d. Billing & Plans:
Upgrade and manage your plan.
e. Connections:
Sync your calendars with NinjaPipe through Calendar Accounts.
Enable or disable calendar sync based on your preferences.
4. Help and Support:
Click on “Help” to access the NinjaPipe Help and Support Center. Here, you can find a wealth of information, including guide articles, the option to create tickets for personalized assistance, and access to the community for additional support.
The User Profile & Settings feature in NinjaPipe provides users with a central hub for personalizing their experience and managing account-related details. Whether adjusting company information, reviewing team members, enhancing security, managing billing and plans, or syncing calendars, users have a comprehensive suite of tools at their disposal. The Help and Support section further ensures that users can find assistance and information whenever needed, contributing to a seamless and user-friendly experience within the NinjaPipe platform.
Chats
Effortlessly connect and communicate with your team members using NinjaPipe’s intuitive “Chat” feature. Designed for seamless and real-time communication, the chat functionality ensures that collaboration is at your fingertips. Here’s a step-by-step guide to help you navigate and make the most of the Chat feature within the NinjaPipe platform:
1. Accessing the Chat Section:
On the top of the dashboard, click on “Chat.” This action will direct you to the Chat page, where you can initiate and engage in conversations with your team members.
2. Chat Interface:
Upon entering the Chat page, your ongoing chats will appear on the right side of the page. This interface provides a clear and convenient view of your active conversations.
3. Initiating a New Chat:
To start a new chat, use the search function to find contacts. Simply enter the name of the person you want to chat with, and a list of matching contacts will appear. Click on the contact’s name to start a new chat with them.
4. Searching Contacts and Chats:
The search functionality extends beyond initiating new chats. You can also search for old chats by team member names. This ensures that you can easily retrieve and reference previous conversations for seamless collaboration.
NinjaPipe’s “Chat” feature serves as a dynamic and user-friendly communication tool. By providing a clear interface for ongoing chats, an efficient search function for initiating new conversations, and the ability to search for past interactions, NinjaPipe’s Chat feature facilitates effective team communication within the platform. Whether you’re starting new discussions or referring to past conversations, the Chat feature ensures that communication remains fluid and accessible for enhanced collaboration.
Create Products or Service
Effortlessly expand your sales catalog by utilizing NinjaPipe’s user-friendly “Create Product/Service” feature. This tool empowers users to add and manage products and services efficiently, providing a streamlined process for sales endeavors. Here’s a step-by-step guide to help you create and customize your products/services within the NinjaPipe platform:
1. Accessing the Sales Section:
Start by selecting the “Sales” section at the top of the dashboard. Under Sales, click on “Products.”
2. Initiating Product/Service Creation:
On the Products page, locate and click “Add Product/Service.” A form will appear on the right side of the screen, prompting you to input relevant information.
3. Filling Out the Form:
Complete the form with the necessary details:
a. Basic Details:
Name: Provide a descriptive name for your product or service.
SKU (Stock Keeping Unit): Assign a unique identifier for tracking purposes.
Description: Add a brief description of the product or service.
Product Type: Specify whether it’s an inventory item, a non-inventory item, or a service.
Upload Image: Optionally, upload an image for visual representation.
b. Price:
Unit Price: Set the price for your product or service.
Billing Frequency: Choose the billing frequency (Annually, Monthly, One-time, Quarterly, Semi-annually).
c. Cost and Profit:
Unit Cost: Specify the cost per unit.
Profit Margin: Calculate or set the profit margin for your product or service.
d. Billing Term:
Specify the billing term in months.
4. Saving Your Product/Service:
Once you’ve filled out the form with relevant information, click “Save.” Your product or service is now successfully created and integrated into the NinjaPipe system.
5. Viewing Your Products/Services:
Navigate back to the Products page to view a comprehensive list of your products and services. This allows you to track and manage your sales catalog efficiently.
NinjaPipe’s “Create Product/Service” feature offers a user-friendly and efficient way to expand and manage your sales offerings. Whether you’re adding inventory items, non-inventory items, or services, this tool ensures that users can easily input and customize product/service details, contributing to a more organized and effective sales management experience.
Invite Team Members
Effectively collaborate and build your team within NinjaPipe by utilizing the “Invite Team Members” feature. This streamlined process ensures that you can easily bring your team on board, fostering a collaborative environment. Here’s a step-by-step guide to help you invite team members within the NinjaPipe platform:
1. Accessing the Invite Team Members Section:
From the dashboard, navigate to the “Get Started” section. Click on “Invite Team Members” to initiate the team invitation process.
2. Navigating to the Manage Team Page:
Upon clicking, you will be directed to the “Manage Team” page. Here, you can view the existing members in your organization, providing an overview of your team structure.
3. Searching for Team Members:
Utilize the search function to find specific team members or navigate through the list to locate individuals within your organization.
4. Inviting Team Members:
To invite new team members, click on “Invite Team Members.” This action will prompt a form where you can add the first name, last name, and email address of the team members you wish to invite.
5. Adding Team Member Details:
Fill in the required information for the team members, including their first name, last name, and email address.
6. Sending Invitations:
Once the details are added, click on “Send Invitation” to dispatch the invitations to the specified team members.
NinjaPipe’s “Invite Team Members” feature offers a straightforward and efficient method for expanding and managing your team within the platform. By providing a user-friendly interface to add and invite team members, NinjaPipe ensures that the onboarding process is seamless, enabling teams to collaborate and communicate effectively within the collaborative environment of the platform.
Billing
Conditions
Conditions in NinjaPipe’s workflow bring a nuanced layer to your project management, allowing you to tailor actions based on specific criteria. Understanding the intricacies of conditions is key to optimizing the functionality of your workflow. Let’s explore the five sections under Conditions and how they enhance your automation capabilities:
1. Value Greater Than:
This condition allows you to filter contacts or deals based on a specified value. For instance, if you set a condition where the value is greater than a certain threshold, you can send emails or SMS to contacts whose birthdays fall on a specific date.
2. Value Less Than:
Similar to the “Value Greater Than” condition, this section enables you to filter contacts or deals based on a value that is less than a specified threshold. It’s a flexible tool for refining your target audience for various actions.
3. Value Equal:
The “Value Equal” condition filters contacts or deals based on equality to a specific value. This precise condition ensures that actions are triggered only for contacts or deals that match the specified criteria.
4. Value Not Equal:
In contrast to the “Value Equal” condition, this section filters out contacts or deals that do not match a specified value. It provides a way to exclude certain entities from triggering specific actions.
5. Delay:
The “Delay” section introduces a temporal element to your workflow. When you add a delay card, you can postpone the execution of triggers. For example, if your time-based trigger executes every day, adding a delay card can shift the trigger to activate every other day.
Understanding how to use these conditions effectively allows you to fine-tune your workflow based on specific criteria, ensuring that actions are executed with precision. Whether you’re filtering contacts based on values, delaying triggers, or implementing equality conditions, NinjaPipe’s Conditions feature empowers you to create workflows that adapt to the dynamic needs of your projects.
Create Quote or Invoice
Effortlessly generate professional quotes and invoices with NinjaPipe’s intuitive “Create Quote or Invoice” feature. Tailored to simplify the quoting process, this tool allows users to seamlessly create, customize, and share quotes and invoices with clients. Here’s a step-by-step guide to help you navigate and utilize the Quote feature within the NinjaPipe platform:
1. Accessing the Quote Section:
Start by selecting the “Sales” section at the top of the dashboard. Under Sales, click on “Quote” to enter the Quote page.
2. Initiating Quote or Invoice Creation:
On the Quote page, locate and click the “+” button to begin creating a new quote or invoice. This action prompts the creation process.
3. Deal Details:
Associate the quote with a deal, customize the payee, and add line items. You can select an existing deal or create a new one. Click “Next” to proceed to the details page.
4. Quote Details:
Specify quote details, including type (Quote, Invoice, Receipt), quote name, domain, content slug, URL, comments to the buyer, and purchase terms. Click “Next” to proceed.
5. Branding & Buyer Information:
Update branding for the quote or invoice and fill in company information for both your company and the buyer. This includes company name, address, phone, logo, and buyer details. Click “Next” to proceed.
6. Line Items:
Add line items to your quote or invoice. Include product or service details such as name, SKU, billing start date, term, frequency, quantity, unit price, unit discount, and more. Click “Next” to proceed.
7. Signature & Review:
Enable signatures, add participant names, and generate the quote. Choose a signature option (No Signatures, Enable Signatures, Participant Names) and click “Generate Quote.”
8. View and Download:
Once generated, your quote is successfully created. View it on the Quote page, and also, your quote will be available for download as a PDF document on your desktop.
NinjaPipe’s “Create Quote or Invoice” feature provides a comprehensive and efficient solution for businesses to generate professional quotes and invoices. By guiding users through a step-by-step process, this tool ensures accuracy and customization, making the quoting process seamless and effective within the NinjaPipe platform.
Create Pipelines
Effortlessly organize and streamline your work processes with NinjaPipe’s versatile “Create Pipelines” feature. This tool empowers users to customize their pipelines, making them tailored to specific needs and enhancing project management efficiency. Here’s a step-by-step guide to help you create and manage pipelines within the NinjaPipe platform:
1. Accessing Pipelines:
Navigate to the dashboard and click on the “Sales” section. Select “Pipelines” or, alternatively, choose to create a pipeline directly from the “Get Started” section on your dashboard or through the “Quick Access” menu.
2. Creating a Pipeline:
Once on the pipeline page, click on “Create Pipeline.” Provide a name, description, and customize your pipeline with an icon and color for easy identification. NinjaPipe allows you to personalize your pipelines to suit your preferences.
3. Finishing Pipeline Creation:
After inputting the necessary pipeline information, click “Create.” Your pipeline is now successfully created and ready for customization.
4. Adding Columns:
Enhance your pipeline by adding columns. Click on “Add Column,” give it a name, and click “Create.” For instance, you can add a column named “Client Name” to track client-related information.
5. Exploring Templates:
NinjaPipe provides templates for various purposes. Click on “Explore Templates” to find ready-made pipelines for Sales, Project Management, Customer Onboarding, Recruitment, Customer Support, and Content Marketing. These templates offer pre-defined columns tailored to specific processes.
6. Additional Templates:
Explore the different templates available, such as:
Sales Pipeline: Manages the sales process from prospecting to deal closure.
Project Management: Efficiently handles projects and tasks.
Customer Onboarding: Streamlines the customer onboarding process.
Recruitment Pipeline: Manages the recruitment process from sourcing candidates to hiring decisions.
Customer Support Pipeline: Manages customer support tickets and resolutions.
Content Marketing Pipeline: Handles the content marketing process for effective campaigns.
NinjaPipe’s “Create Pipelines” feature offers a flexible and user-friendly solution for structuring and managing work processes. By allowing users to customize pipelines, add columns, and explore templates, NinjaPipe ensures that teams can efficiently organize their tasks, projects, and workflows according to their unique requirements within the platform.
Download NinjaPipe Mobile App – Android
Downloading NinjaPipe on your Android device is a simple and quick process, allowing you to stay connected and manage your tasks on the go. Here’s a step-by-step guide to help you download NinjaPipe from the Play Store:
1. Accessing the Play Store:
Open the Play Store on your Android device.
2. Searching for NinjaPipe:
Type “NinjaPipe” in the search bar and initiate the search.
3. Selecting NinjaPipe:
Once you find the NinjaPipe app, click on it to access the app’s page.
4. Installing the App:
On the NinjaPipe app page, click on the “Install” button to start the installation process.
5. Opening the App:
After the installation is complete, click on “Open” to launch the NinjaPipe app.
6. Creating an Account or Signing In:
If you are new to NinjaPipe, you can create an account by providing the necessary details. If you already have an account, simply sign in using your company ID and password.
7. Exploring the Mobile App:
Once signed in, you can explore the features of the NinjaPipe mobile app, allowing you to manage tasks, collaborate with your team, and stay updated on the go.
8. Video Guide:
For a visual guide on downloading, installing, and setting up the NinjaPipe mobile app, you can refer to the accompanying video tutorial.
The NinjaPipe Android app provides a convenient way to access and manage your tasks from your mobile device. By following these simple steps, you can quickly download the app, whether you’re new to NinjaPipe or an existing user looking to extend your workflow to your Android device.
Create An AI Appointment
NinjaPipe’s innovative AI Appointment feature introduces a seamless way to schedule appointments, integrating SMS and Emails within your workflow. This cutting-edge functionality streamlines the appointment booking process, enhancing communication and organization. Here’s a guide on creating an AI Appointment within NinjaPipe:
1. Access the Schedule Appointments Section:
Navigate to the workflow in the AI Tools and click on the “Schedule Appointments” of the Actions feature option. This feature offers advanced capabilities to schedule both SMS and Emails, providing a comprehensive solution for appointment management.
2. Select Staging:
Choose the staging option that best suits your needs. Staging allows you to plan and coordinate appointments effectively before making them live. This strategic feature ensures a smooth transition when the appointments are implemented.
3. Book Appointments:
Similar to scheduling SMS and Emails, you can book appointments seamlessly. Specify essential details such as the appointment link, and text describing the appointment, and provide sample text to guide the communication process.
4. Link Products:
Enhance the appointment by linking relevant products that are intended for discussion. This integration ensures that the appointment is well-prepared, with products easily accessible for reference and discussion during the scheduled interaction.
Creating an AI Appointment with NinjaPipe’s advanced features not only simplifies the scheduling process but also adds a layer of intelligence to your appointments. The ability to link products and provide detailed information contributes to a more organized and efficient workflow. Embrace this forward-thinking approach to appointment management, allowing NinjaPipe to optimize your scheduling processes.
Features- NinjaPipe Mobile App
Navigating and managing your tasks on the go has never been easier with the NinjaPipe Mobile App. This user-friendly application mirrors the functionality of the website, ensuring a seamless experience whether you’re in the office or on the move. Let’s explore the key features of the NinjaPipe Mobile App:
1.Sign-In or Account Creation: Upon completing the installation, users can effortlessly sign in using their company ID and password. Alternatively, new users have the option to create an account directly from the mobile app.
2. Dashboard Overview: The Dashboard on the mobile app provides a quick overview of essential information, allowing users to stay informed about key metrics and updates at a glance.
3. Contact Management: Users can easily access and manage their contacts through the Contact feature. This functionality ensures that your important connections are just a tap away.
4. Real-time Chats: The Chats feature enables real-time communication, allowing team members to collaborate seamlessly through instant messaging.
5.Instant Notifications: Stay on top of your tasks and updates with the Notifications feature. Receive instant alerts and keep track of important changes within your projects.
6.More Options:
Explore additional features under the “More” section, including:
Deals: Manage and track your deals efficiently.
Tasks: Access and manage your tasks on the go.
Settings: Customize your app preferences.
Forms: Utilize forms for specific data collection.
Data Policy: Review and manage data policies.
Manage Profile: Update and customize your user profile.
Privacy Policy: Access and review the privacy policy.
The NinjaPipe Mobile App brings the power of project management and collaboration to your fingertips. With a focus on simplicity and functionality, this app ensures that users can seamlessly access, update, and manage their tasks and projects while on the move. Whether you’re checking notifications, engaging in real-time chats, or managing contacts, the NinjaPipe Mobile App is designed to enhance your mobile project management experience.
Troubleshooting
Troubleshoot your NinjaPipe Account
Create An Email Automation
NinjaPipe’s Email Automation feature, particularly the AI-generated option, provides a powerful tool for streamlining your communication processes. Here’s a step-by-step guide to creating Email Automation with AI-generated content within NinjaPipe:
1. Access Email Automation:
Navigate to the Email Automation section within NinjaPipe. This can usually be found in the workflow under Action in the work platform.
2. Select AI-Generated:
Choose the AI-generated option within the Email Automation interface. This selection enables the system to dynamically generate email content based on your instructions and predefined parameters.
3. Provide Instructions:
Input clear instructions for the AI to follow. Specify the structure, character count, and any other relevant guidelines for the generated email. This step helps train the AI to produce content that aligns with your communication style.
4. Sample Text with Line Breaks:
Include sample text in the provided space, incorporating line breaks as needed. The AI utilizes this information to understand your email’s formatting and style preferences.
5. Reply To Functionality:
The “Reply-To” field is automatically filled with the email associated with your NinjaPipe account. Clicking the “Reply” button will direct any replies to this email. You can change the reply-to name as desired, offering flexibility in how recipients perceive the sender.
6. Additional Text:
Add a courteous touch to your emails by including additional text, such as best regards or thank-you sentences. Utilize line breaks to format this content effectively, ensuring a professional and polished appearance.
Following these steps, you can leverage NinjaPipe’s AI-generated Email Automation to enhance your communication efficiency. The platform’s intuitive features and customizable options empower users to create dynamic, personalized email content while automating the sending process. Incorporate this tool into your workflow to experience streamlined and effective email communication within your projects.
Ninjapipe Overview
Here is how you can use the Overview feature to view a summary of your business using NinjaPipe. Once you create an account on NinjaPipe, you are greeted with a comprehensive NP Overview that empowers you to take control of your tasks and projects. Let’s looking into the features that make NinjaPipe a go-to solution for teams and individuals alike.
Total Contacts:
Keep your contacts organized effortlessly. The NP Overview provides a snapshot of your total contacts, ensuring you have quick access to essential information about your professional network.
New Deals:
Stay on top of your business opportunities with the “New Deals” feature. This section gives you real-time updates on potential collaborations, allowing you to make informed decisions promptly.
Active Pipelines:
Monitor the progress of your ongoing projects seamlessly. The “Active Pipelines” feature provides insights into the status of your pipelines, ensuring you are always in the loop.
New Leads:
Identify and capitalize on new business prospects efficiently. The NP Overview highlights “New Leads,” enabling you to expand your network and nurture promising connections.
All Tasks:
Keep your tasks organized and prioritized. The NP Overview consolidates all your tasks in one place, providing a centralized hub for efficient task management.
But the exploration doesn’t stop there. NinjaPipe goes beyond the basics, offering a range of features to supercharge your productivity:
Invite Your Team Members:
Collaborate seamlessly by inviting your team members to join NinjaPipe. Foster a culture of teamwork and communication within your organization.
Create a Pipeline:
Tailor your project workflows by creating pipelines that align with your business objectives. NinjaPipe allows you to customize pipelines to suit the unique needs of your projects.
Add Contacts:
Expand your professional network effortlessly. Add contacts directly within the platform, ensuring all your connections are easily accessible when you need them.
Create Tasks and Assign Them:
Efficient task management is at your fingertips. Create tasks, assign them to team members, and track progress seamlessly, all from the NP Overview.
Create Automation:
Upgrade your efficiency with automation. NinjaPipe allows you to create automation rules that streamline repetitive tasks, saving you time and reducing the risk of errors.
Download the Free Apps:
Stay connected on the go. Download the free NinjaPipe apps for mobile devices, ensuring that you can manage your tasks and projects from anywhere.
In conclusion, NinjaPipe offers more than just an overview; it provides a robust platform for individuals and teams to collaborate effectively, manage tasks effortlessly, and drive business growth. Explore the power of NinjaPipe today and experience a new level of productivity in your professional endeavors.
Navigate through your daily tasks, emails, and plans seamlessly with NinjaPipe’s dedicated “Notifications” feature. Situated conveniently at the top of the dashboard, represented by a bell icon, this functionality ensures that you stay informed and on top of your workflow without the need to scour different platforms. Here’s how you can make the most of the Notifications feature:
Spot the Bell Icon:
Look for the distinctive bell icon positioned at the top left side of the dashboard. This is your gateway to accessing all your daily notifications in one centralized location.
Click on Notifications:
With a simple click on the bell icon, you open up the Notifications panel. This area serves as a hub for all the updates, alerts, and reminders related to your tasks, projects, and communications.
Stay Informed in Real-Time:
NinjaPipe’s Notifications feature ensures that you receive real-time updates on essential activities, keeping you informed about new tasks, messages, or any other noteworthy events within the platform.
Efficient Task Management:
No need to sift through emails or various sections of the platform to find updates. The Notifications feature consolidates all relevant information, allowing for efficient task management and timely responses.
Instant Access to Important Alerts:
Whether it’s a deadline approaching, a new message in your inbox, or updates on ongoing projects, the Notifications feature provides instant access to important alerts, allowing you to prioritize your time effectively.
By incorporating the Notifications feature into the NinjaPipe dashboard, the platform enhances the user experience, ensuring that individuals and teams can manage their tasks and communications with agility. This streamlined approach not only saves time but also contributes to a more organized and productive workflow. So, the next time you’re on NinjaPipe, don’t forget to click on the bell icon – your gateway to staying informed and in control of your daily activities.
Zapier is a powerful automation tool designed to interface with thousands of the most well-known applications, such as Gmail, Slack, and Todoist, effectively streamlining your workflow. In a matter of minutes, you’re capable of configuring automated processes (which we refer to as ‘Zaps’), that can transform NinjaPipe into a central hub for managing your sales workflow. Zaps are incredibly versatile. They allow you to generate new leads, modify the status of a deal, attach files to an account, and perform a plethora of other tasks.
This means there’s no need for tedious manual labor. These automated actions not only save you precious time but also reduce the risk of human error and ensure a more consistent and efficient workflow. By creating a bridge between your favorite apps and services, Zapier offers a powerful way to create complex, automated workflows that can significantly enhance productivity and streamline your daily tasks.
As of now, we have a few zaps available for you to use along with some pre-designed recipes. We will continue to add new zaps as we go.
Triggers
You can use the following Zapier Triggers:
New Contact: Triggers when a new contact is created in your NinjaPipe Workspace New Deal: Triggers when a new deal is created in your NinjaPipe Workspace
Actions
You can use the following Zapier Triggers:
Create Contact: Automatically create a new contact when data is received Create Task: Automatically create a new task when data is received
Connecting your NinjaPipe to Zapier
To get started, select the NinjaPipe Zap from Zapier:
Once you select it, you will be prompted to sign in to your NinjaPipe account.
Sign in with the following details:
Email: Your NinjaPipe Email
Password: Your NinjaPipe Password
Tenant URL: Your NinjaPipe Organization URL. You can contact your administrator to get this.
New Contact Trigger
If you connect this trigger, your zap will execute as soon as a new contact is added at any given time on your NinjaPipe workspace. You can connect this with different other applications for varying purposes.
You can test the trigger by creating a new contact via your NinjaPipe Mobile app or your web app and Zapier will detect that new contact. You can skip the test if you want to.
New Deal Trigger
If you connect this trigger, your zap will execute as soon as a new deal is added at any given time on your NinjaPipe workspace. You can connect this with different other applications for varying purposes.
You can test the trigger by creating a new deal via your NinjaPipe Mobile app or your web app and Zapier will detect that new deal. You can skip the test if you want to.
Create Contact
If you connect this action to any of your other triggers, your zap will create a new contact entry in your NinjaPipe workspace. You can connect this with different other triggers on Zapier for creating contacts from different sources.
You can test the action by executing the connected Trigger. The following are the required fields to create a new contact:
1. First name
2. Last name
3. Email
Creating Contacts
Once you create an account, accessing and managing your contacts on NinjaPipe is a breeze. Follow these simple steps to make the most of the contact features:
Locate the Contact Section: After logging in, find the “Contact” section conveniently placed at the top of the NinjaPipe home page.
Navigate to the Contact Page: Click on the “Contact” section, and it will seamlessly transition you to the Contact Page, where you can efficiently manage your professional connections.
Add New Contact: To add a new contact individually, utilize the “Add New Contact” option. Click on it, and a form will appear, prompting you to fill in the contact details. Provide the necessary information such as name, email address, and any other relevant data to create a comprehensive contact profile.
Bulk Import Contacts: For a more efficient approach, NinjaPipe offers a “Bulk Import” option. If you have a list of contacts sorted in a CSV or Excel file, this feature allows you to import them seamlessly into NinjaPipe. Click on the “Bulk Import” section, follow the prompts, and watch as your contacts populate effortlessly.
With these straightforward steps, managing your contacts on NinjaPipe becomes a streamlined process. Whether you prefer adding contacts one by one or importing them in bulk, NinjaPipe provides the flexibility to adapt to your workflow, ensuring that you stay organized and connected with your professional network.
NinjaPipe’s user-friendly interface offers a quick and efficient way to access a myriad of features through the convenient “Quick Access” menu. Placed prominently on the left side of the dashboard, this tool allows users to navigate seamlessly and access essential functions with just a click. Let’s explore the diverse features available through the Quick Access menu:
Calendar:
Stay organized and on top of your schedule by clicking on the “Calendar” option. NinjaPipe’s calendar feature provides a visual overview of your upcoming events and tasks, ensuring that you never miss a deadline or important meeting.
Quotes and Invoices:
Manage your financial transactions effortlessly by navigating to “Quotes and Invoices” through Quick Access. This feature allows users to generate quotes, and invoices, and track payments with ease, streamlining the billing process.
Contacts:
Access your contacts swiftly by clicking on the “Contacts” option in Quick Access. Whether you need to add new contacts, import them in bulk, or simply view your existing network, NinjaPipe’s contact management is just a click away.
Forms:
Simplify data collection and streamline processes with the “Forms” feature. By utilizing Quick Access, users can effortlessly create, customize, and manage forms, facilitating efficient data gathering for various purposes.
Pipelines:
Tailor your project workflows by clicking on “Pipelines” through Quick Access. This feature enables users to create, customize, and manage pipelines, ensuring that projects progress seamlessly from start to finish.
Deals:
Monitor and track your business opportunities by accessing the “Deals” feature. With a single click through Quick Access, users can stay informed about new deals, manage ongoing negotiations, and make data-driven decisions.
NinjaPipe’s Quick Access lies in its simplicity and accessibility. Users can effortlessly navigate through various features without the need for extensive menu searches. This intuitive approach enhances the overall user experience, allowing individuals and teams to focus on their tasks and projects with efficiency and ease. As you explore the Quick Access menu, you’ll discover a wealth of tools at your fingertips, ready to elevate your productivity within the NinjaPipe platform.
NinjaPipe’s dedicated “Marketing” section is prominently featured at the top of the dashboard. This specialized area empowers users with tools designed to enhance marketing strategies and data management. Let’s explore the two key sections under Marketing:
Forms:
Under Marketing, the “Forms” section is a dynamic tool for efficient data collection and management. This feature allows users to create, customize, and manage forms tailored to their marketing needs. Whether you’re gathering customer feedback, conducting surveys, or collecting leads, Forms on NinjaPipe streamlines the data collection process, providing a user-friendly and organized approach to managing crucial marketing information.
Data Bins:
Another integral component of NinjaPipe’s Marketing section is the “Data Bins” feature. This functionality provides users with a structured and organized way to manage and store marketing-related data. Whether it’s customer information, campaign data, or other crucial marketing assets, Data Bins ensures that your marketing data is easily accessible, searchable, and well-organized.
By incorporating the Marketing section into the NinjaPipe dashboard, the platform extends its utility beyond project management and communication. It caters specifically to the needs of marketing professionals, offering a space for collaboration and efficient data management. The Forum encourages a sense of community, fostering discussions that can lead to valuable insights, while Data Bins provide a structured approach to managing marketing data, contributing to a more organized and streamlined marketing workflow. As you explore NinjaPipe’s Marketing section, you’ll find a suite of tools tailored to enhance your marketing efforts and support the success of your campaigns.
Create Forms
Creating customized forms has never been more straightforward with NinjaPipe’s user-friendly interface. Located under the Marketing section at the top of the dashboard, the “Create Form” feature empowers users to design and personalize forms according to their specific needs. Here’s a step-by-step guide to help you create and customize your form seamlessly:
1. Access the Create Form Page:
Navigate to the Marketing section on the top of the dashboard and select “Create Form.” This action will direct you to the Create Form page, where you can start building your form from scratch.
2. Create Form:
Click on the “Create Form” button to initiate the form-building process. Provide a name for your form and click on “Create.” Congratulations! You now have a form ready to be tailored to your requirements, named “Entry.”
3. Customize Using Various Options:
NinjaPipe offers a range of customization options to enhance your form:
Welcome Slide: Begin your form with a welcome or introductory message.
Ending/Thank You Slide: Conclude your form with a concluding message.
Multiple Choice: Choose one or more options from a list.
Dropdown: Select one option from a dropdown list.
Date Picker: Choose a date using a calendar interface.
Short Answer: Enter a single line of text.
Long Answer: Ideal for paragraphs and longer responses.
Number: Suitable for numeric answers.
4. Additional Form Actions:
Share Your Form: Distribute your form to the intended audience.
Preview Your Form: Review your form’s appearance before finalizing.
Edit Form Name: Modify your form’s name according to your preferences.
Delete Questions: Remove any unwanted questions for a streamlined form.
Publish or Save as Draft: Choose to publish your form or save it as a draft for later adjustments.
View Responses: Track and analyze the responses submitted through your form.
5. Settings for Further Customization:
Within the settings, you can:
Enable/Disable Questions: Tailor your form by enabling or disabling specific questions and choices.
NinjaPipe’s “Create Form” feature provides a versatile and intuitive platform for designing forms tailored to your unique requirements. With a myriad of customization options and user-friendly controls, you can effortlessly create, modify, and manage forms for various purposes. Whether for surveys, feedback collection, or data gathering, NinjaPipe’s Create Form feature empowers users to design effective forms with ease.
Create Data Bins
Creating and managing your Data Bins in NinjaPipe is a straightforward process that allows you to organize and store your marketing-related data efficiently. Located under the Marketing section at the top of the dashboard, the “Create Data Bins” feature provides users with a powerful tool for structured data management. Here’s a step-by-step guide to help you create your Data Bins seamlessly:
1. Access the Create Data Bins Page:
Navigate to the Marketing section on the top of the dashboard and select “Data Bins.” This action will direct you to the Create Data Bins page, where you can initiate the process of building your own Data Bin.
2. Create Data Bins:
Click on the “Create Data Bins” button to begin the creation process. Provide a name for your Data Bin and a brief description to help identify its purpose. Once filled, click on “Create.”
3. Confirmation and Initial Status:
After successfully creating your Data Bin, you’ll see a confirmation message, and the initial status will display: “Waiting for events. When NinjaPipe gets them, we’ll show them here.” This status indicates that your Data Bin is ready to capture and organize events once they occur.
4. Utilizing Data Bins:
Waiting for Events: As the initial status suggests, your Data Bin is actively waiting for events to occur. Once NinjaPipe receives these events, they will be displayed within your Data Bin.
NinjaPipe’s “Create Data Bins” feature offers a simple yet powerful solution for organizing and managing marketing-related data. By providing a user-friendly interface and a step-by-step creation process, users can efficiently set up Data Bins tailored to their specific needs. Whether you’re handling customer profiles, campaign data, or any other marketing assets, NinjaPipe’s Create Data Bins feature ensures that your data is organized, accessible, and ready for further analysis.
NinjaPipe’s dedicated “Sales” section is prominently featured at the top of the dashboard. Tailored to meet the needs of sales professionals, this section comprises four essential components designed to enhance your sales strategies and overall workflow. Let’s explore these key features:
Products:
The “Products” section serves as the foundation for your sales endeavors. Here, users can manage and organize product information efficiently. From product descriptions to pricing details, Products on NinjaPipe provide a centralized space to catalog and access crucial information for effective sales presentations and negotiations.
Pipelines:
A flexible tool within the Sales section is “Pipelines.” Beyond its sales-related applications, Pipelines in NinjaPipe can be utilized for various purposes, including recruitment, content creation, and marketing. By clicking on “Create Pipeline” and selecting “Browse Templates,” users can explore a range of templates showcasing the diverse capabilities of Pipelines. This feature allows for the customization of workflows to align with specific needs, making Pipelines a dynamic and adaptable tool for various business functions.
Deals:
The “Deals” section is a dynamic space where sales opportunities come to life. Users can track and manage ongoing deals, gaining insights into the progress of negotiations, potential revenue, and key deal-related details. This feature empowers sales professionals to make informed decisions and strategically advance their deals.
Quotes:
Streamline your quoting process with the “Quotes” feature. Here, users can generate and manage quotes effortlessly. Whether it’s creating quotes for potential clients or revising existing ones, NinjaPipe’s Quotes section provides a user-friendly interface for efficient quote management, contributing to a smoother sales experience.
By integrating the Sales section into the NinjaPipe dashboard, the platform caters specifically to the needs of sales teams and professionals. Whether you’re managing products, optimizing sales pipelines, tracking deals, or generating quotes, NinjaPipe offers a comprehensive suite of tools to enhance your sales strategies and drive success in the competitive world of sales. As you explore the Sales section, you’ll discover a powerful toolkit designed to support your sales efforts and elevate your overall sales management experience.
Create Deals
Effortlessly manage your sales opportunities with NinjaPipe’s straightforward “Create Deal” feature. Designed to streamline the process of adding and tracking deals, this tool ensures that users can efficiently organize their sales efforts. Here’s a step-by-step guide to help you create and manage deals within the NinjaPipe platform:
1. Accessing the Sales Section:
Upon logging in, locate the “Sales” section at the top of the dashboard. Click on it to reveal the subcategories, and select “Deals” to navigate to the Deals page.
2. Initiating Deal Creation:
On the Deals page, find and click on the “Create Deal” option. A form will promptly appear on the left side of the screen, ready for you to input the necessary information.
3. Filling in Deal Information:
Complete the form by adding essential details:
Deal Name:
Provide a descriptive name for your deal.
Deal Information:
Input relevant information about the deal, such as description, start date, end date, and any other pertinent details.
Contacts:
Associate contacts with the deal, linking it to the individuals involved.
4. Completing Deal Creation:
Once you’ve added all the required information, click on “Create Deal.” Your deal is now successfully created and integrated into the NinjaPipe system.
5. Viewing and Managing Deals:
Navigate to the Deals page to view a comprehensive list of your deals. Here, you can track the status, progress, and details of each deal.
6. Managing Deal Associations:
On the Deals page, you have the flexibility to add or edit contacts associated with a deal. This ensures that your deal information stays up-to-date and accurately reflects your sales interactions.
NinjaPipe’s “Create Deal” feature provides a seamless and user-friendly process for managing sales opportunities. Whether you’re initiating a new deal, updating deal information, or managing associated contacts, this tool streamlines the sales process, ensuring that users can efficiently organize and track their deals within the NinjaPipe platform.
Create Deals Mobile Version – Android
Create Products or Service
Effortlessly expand your sales catalog by utilizing NinjaPipe’s user-friendly “Create Product/Service” feature. This tool empowers users to add and manage products and services efficiently, providing a streamlined process for sales endeavors. Here’s a step-by-step guide to help you create and customize your products/services within the NinjaPipe platform:
1. Accessing the Sales Section:
Start by selecting the “Sales” section at the top of the dashboard. Under Sales, click on “Products.”
2. Initiating Product/Service Creation:
On the Products page, locate and click “Add Product/Service.” A form will appear on the right side of the screen, prompting you to input relevant information.
3. Filling Out the Form:
Complete the form with the necessary details:
a. Basic Details:
Name: Provide a descriptive name for your product or service.
SKU (Stock Keeping Unit): Assign a unique identifier for tracking purposes.
Description: Add a brief description of the product or service.
Product Type: Specify whether it’s an inventory item, a non-inventory item, or a service.
Upload Image: Optionally, upload an image for visual representation.
b. Price:
Unit Price: Set the price for your product or service.
Billing Frequency: Choose the billing frequency (Annually, Monthly, One-time, Quarterly, Semi-annually).
c. Cost and Profit:
Unit Cost: Specify the cost per unit.
Profit Margin: Calculate or set the profit margin for your product or service.
d. Billing Term:
Specify the billing term in months.
4. Saving Your Product/Service:
Once you’ve filled out the form with relevant information, click “Save.” Your product or service is now successfully created and integrated into the NinjaPipe system.
5. Viewing Your Products/Services:
Navigate back to the Products page to view a comprehensive list of your products and services. This allows you to track and manage your sales catalog efficiently.
NinjaPipe’s “Create Product/Service” feature offers a user-friendly and efficient way to expand and manage your sales offerings. Whether you’re adding inventory items, non-inventory items, or services, this tool ensures that users can easily input and customize product/service details, contributing to a more organized and effective sales management experience.
Create Quote or Invoice
Effortlessly generate professional quotes and invoices with NinjaPipe’s intuitive “Create Quote or Invoice” feature. Tailored to simplify the quoting process, this tool allows users to seamlessly create, customize, and share quotes and invoices with clients. Here’s a step-by-step guide to help you navigate and utilize the Quote feature within the NinjaPipe platform:
1. Accessing the Quote Section:
Start by selecting the “Sales” section at the top of the dashboard. Under Sales, click on “Quote” to enter the Quote page.
2. Initiating Quote or Invoice Creation:
On the Quote page, locate and click the “+” button to begin creating a new quote or invoice. This action prompts the creation process.
3. Deal Details:
Associate the quote with a deal, customize the payee, and add line items. You can select an existing deal or create a new one. Click “Next” to proceed to the details page.
4. Quote Details:
Specify quote details, including type (Quote, Invoice, Receipt), quote name, domain, content slug, URL, comments to the buyer, and purchase terms. Click “Next” to proceed.
5. Branding & Buyer Information:
Update branding for the quote or invoice and fill in company information for both your company and the buyer. This includes company name, address, phone, logo, and buyer details. Click “Next” to proceed.
6. Line Items:
Add line items to your quote or invoice. Include product or service details such as name, SKU, billing start date, term, frequency, quantity, unit price, unit discount, and more. Click “Next” to proceed.
7. Signature & Review:
Enable signatures, add participant names, and generate the quote. Choose a signature option (No Signatures, Enable Signatures, Participant Names) and click “Generate Quote.”
8. View and Download:
Once generated, your quote is successfully created. View it on the Quote page, and also, your quote will be available for download as a PDF document on your desktop.
NinjaPipe’s “Create Quote or Invoice” feature provides a comprehensive and efficient solution for businesses to generate professional quotes and invoices. By guiding users through a step-by-step process, this tool ensures accuracy and customization, making the quoting process seamless and effective within the NinjaPipe platform.
Create Pipelines
Effortlessly organize and streamline your work processes with NinjaPipe’s versatile “Create Pipelines” feature. This tool empowers users to customize their pipelines, making them tailored to specific needs and enhancing project management efficiency. Here’s a step-by-step guide to help you create and manage pipelines within the NinjaPipe platform:
1. Accessing Pipelines:
Navigate to the dashboard and click on the “Sales” section. Select “Pipelines” or, alternatively, choose to create a pipeline directly from the “Get Started” section on your dashboard or through the “Quick Access” menu.
2. Creating a Pipeline:
Once on the pipeline page, click on “Create Pipeline.” Provide a name, description, and customize your pipeline with an icon and color for easy identification. NinjaPipe allows you to personalize your pipelines to suit your preferences.
3. Finishing Pipeline Creation:
After inputting the necessary pipeline information, click “Create.” Your pipeline is now successfully created and ready for customization.
4. Adding Columns:
Enhance your pipeline by adding columns. Click on “Add Column,” give it a name, and click “Create.” For instance, you can add a column named “Client Name” to track client-related information.
5. Exploring Templates:
NinjaPipe provides templates for various purposes. Click on “Explore Templates” to find ready-made pipelines for Sales, Project Management, Customer Onboarding, Recruitment, Customer Support, and Content Marketing. These templates offer pre-defined columns tailored to specific processes.
6. Additional Templates:
Explore the different templates available, such as:
Sales Pipeline: Manages the sales process from prospecting to deal closure.
Project Management: Efficiently handles projects and tasks.
Customer Onboarding: Streamlines the customer onboarding process.
Recruitment Pipeline: Manages the recruitment process from sourcing candidates to hiring decisions.
Customer Support Pipeline: Manages customer support tickets and resolutions.
Content Marketing Pipeline: Handles the content marketing process for effective campaigns.
NinjaPipe’s “Create Pipelines” feature offers a flexible and user-friendly solution for structuring and managing work processes. By allowing users to customize pipelines, add columns, and explore templates, NinjaPipe ensures that teams can efficiently organize their tasks, projects, and workflows according to their unique requirements within the platform.
Navigating and optimizing your workflow is made simple with NinjaPipe’s AI Tools, specifically the Workflow feature. Here’s a step-by-step guide on how to create and manage your workflow efficiently:
1. Accessing AI Tools:
Once you log in, head to the dashboard and locate the AI Tools section. Click on it to reveal the available tools, and select “Workflow.“
2. Creating a Workflow:
Click on “Create Workflow” to initiate the workflow creation process. Provide a name and description for your workflow to give it context and clarity.
3. Workflow Initialization:
After naming and describing your workflow, click “Create.” The system will then generate your workflow, and a guide video will pop up to provide additional assistance during the loading process.
4. Workflow Sections:
Your workflow is divided into three key sections:
Triggers: Define when you want your workflow to run. For instance, you can set triggers for sending emails based on specific conditions.
Actions: Create various actions, such as classes, that will be executed as part of your workflow.
Conditions: Set conditions to guide the workflow’s decision-making process.
5. Credit Balance Monitoring:
Keep an eye on your credit balance, visible in the right-side bottom corner. This balance is crucial for actions like sending emails and SMS. Each tenant has a credit limit, and when your balance approaches zero, you won’t be able to send further SMS or emails.
6. Top-Up Credit Balance:
To ensure uninterrupted communication, you can top up your credit balance by clicking “Top Up.” This action initiates a payment process specifically for emails and SMS.
NinjaPipe’s Workflow feature empowers users to streamline and automate processes effectively. By providing a user-friendly interface for creating workflows, setting triggers, and monitoring credit balances, NinjaPipe ensures that users can enhance their project management experience with intelligent automation and seamless communication.
Triggers
Understanding and utilizing triggers in your NinjaPipe workflow adds a layer of automation to your project management processes. Triggers serve as the catalysts for actions and conditions, making your workflow more dynamic and responsive. Let’s delve into the various aspects of triggers within the NinjaPipe platform:
1. Trigger on Time:
In the “Triggers” section, you have the option to set triggers based on time. You can define the frequency, such as daily or on a specific date. When creating a workflow with a time trigger, it’s crucial to attach contacts or deals to enable actions and conditions.
2. When Contact Added:
This trigger activates actions when a new contact is added. For example, if you set an action to send an email, it will be triggered when a contact is created using the contact section.
3. New Deal Added:
Similar to the contact trigger, this activates actions when a new deal is added. The associated contact from the deal will determine which actions are triggered, such as sending emails or SMS.
4. New Task:
Actions under this trigger will be activated when a new task is created. For instance, creating a task may trigger an email notification to keep you informed.
5. Task Completed:
This trigger is linked to task completion. When a sub-task is marked as completed, actions associated with this trigger will be activated, providing notifications or triggering specific actions.
6. Data Bin:
Data Bins allow you to collect and manage customer details effectively. By creating a link to the Data Bin in your customer detail forms, you can seamlessly add customer details to the specified Data Bin.
7. On Pipeline Card Moved:
This new feature lets you trigger actions when a pipeline card is moved from one section to another. For example, moving a card from “In Progress” to “Pending Customer Report” can trigger specific actions associated with that card.
8. On Pipeline Card Updated:
This feature allows you to trigger actions when details on a pipeline card are updated. Whether it’s changing dates or modifying any details, associated contacts on the card will be triggered based on the updated information.
mastering triggers in NinjaPipe’s workflow ensures that your project management processes become more automated and responsive. By setting up triggers based on time, contact or deal-related activities, task management, and pipeline card movements, you can create workflows that adapt to your dynamic project requirements.
Actions
NinjaPipe’s Actions feature adds a dynamic layer to your workflow, allowing you to execute a variety of tasks seamlessly. Understanding the functionalities within the Actions section is crucial for optimizing your project management processes. Let’s explore the different sub-sections under Actions and how each enhances your automation capabilities:
1. Send Emails:
The “Send Emails” section offers two options: AI-generated emails and manual emails.
AI-Generated: You can input instructions and sample text, allowing the system to generate emails based on specified criteria. You can customize reply-to information and add additional text.
Manual emails: For more control, you can disable AI generation and compose emails manually. You can also select from email templates and preview them before sending them.
2. Send SMS:
Similar to sending emails, the “Send SMS” section generates AI-driven SMS based on provided instructions. This feature streamlines communication by automating the SMS creation process.
3. Schedule Appointments:
The “Schedule Appointments” section introduces new features, enabling the scheduling of both SMS and emails. You can book appointments, add relevant details, include sample text, and link products for discussion during the appointment.
4. Create Task:
In this section, you can create tasks to be triggered on a specific day. Additionally, you can add subtasks to break down larger tasks into manageable components, enhancing task management within your workflow.
5. Create Deals:
Similar to task creation, you can use this section to generate deals. Input the necessary details, and the created deal becomes part of your workflow, allowing for seamless deal management.
6. Generate Quote:
This section enables the selection of a quote and facilitates the sending of an email associated with that quote. While there is no AI-generated content for quotes, you can manually input all necessary details and attach the selected quote to the email.
7. New Contact:
The “New Contact” section allows you to create new contacts. However, this feature is specifically enabled for tasks related to data bins.
Understanding how to leverage these Actions effectively empowers you to automate and streamline various aspects of your project management. Whether it’s sending communications, scheduling appointments, or managing tasks and deals, NinjaPipe’s Actions feature offers a versatile toolkit for enhancing your workflow automation.
Conditions
Conditions in NinjaPipe’s workflow bring a nuanced layer to your project management, allowing you to tailor actions based on specific criteria. Understanding the intricacies of conditions is key to optimizing the functionality of your workflow. Let’s explore the five sections under Conditions and how they enhance your automation capabilities:
1. Value Greater Than:
This condition allows you to filter contacts or deals based on a specified value. For instance, if you set a condition where the value is greater than a certain threshold, you can send emails or SMS to contacts whose birthdays fall on a specific date.
2. Value Less Than:
Similar to the “Value Greater Than” condition, this section enables you to filter contacts or deals based on a value that is less than a specified threshold. It’s a flexible tool for refining your target audience for various actions.
3. Value Equal:
The “Value Equal” condition filters contacts or deals based on equality to a specific value. This precise condition ensures that actions are triggered only for contacts or deals that match the specified criteria.
4. Value Not Equal:
In contrast to the “Value Equal” condition, this section filters out contacts or deals that do not match a specified value. It provides a way to exclude certain entities from triggering specific actions.
5. Delay:
The “Delay” section introduces a temporal element to your workflow. When you add a delay card, you can postpone the execution of triggers. For example, if your time-based trigger executes every day, adding a delay card can shift the trigger to activate every other day.
Understanding how to use these conditions effectively allows you to fine-tune your workflow based on specific criteria, ensuring that actions are executed with precision. Whether you’re filtering contacts based on values, delaying triggers, or implementing equality conditions, NinjaPipe’s Conditions feature empowers you to create workflows that adapt to the dynamic needs of your projects.
Create An AI Appointment
NinjaPipe’s innovative AI Appointment feature introduces a seamless way to schedule appointments, integrating SMS and Emails within your workflow. This cutting-edge functionality streamlines the appointment booking process, enhancing communication and organization. Here’s a guide on creating an AI Appointment within NinjaPipe:
1. Access the Schedule Appointments Section:
Navigate to the workflow in the AI Tools and click on the “Schedule Appointments” of the Actions feature option. This feature offers advanced capabilities to schedule both SMS and Emails, providing a comprehensive solution for appointment management.
2. Select Staging:
Choose the staging option that best suits your needs. Staging allows you to plan and coordinate appointments effectively before making them live. This strategic feature ensures a smooth transition when the appointments are implemented.
3. Book Appointments:
Similar to scheduling SMS and Emails, you can book appointments seamlessly. Specify essential details such as the appointment link, and text describing the appointment, and provide sample text to guide the communication process.
4. Link Products:
Enhance the appointment by linking relevant products that are intended for discussion. This integration ensures that the appointment is well-prepared, with products easily accessible for reference and discussion during the scheduled interaction.
Creating an AI Appointment with NinjaPipe’s advanced features not only simplifies the scheduling process but also adds a layer of intelligence to your appointments. The ability to link products and provide detailed information contributes to a more organized and efficient workflow. Embrace this forward-thinking approach to appointment management, allowing NinjaPipe to optimize your scheduling processes.
Create An Email Automation
NinjaPipe’s Email Automation feature, particularly the AI-generated option, provides a powerful tool for streamlining your communication processes. Here’s a step-by-step guide to creating Email Automation with AI-generated content within NinjaPipe:
1. Access Email Automation:
Navigate to the Email Automation section within NinjaPipe. This can usually be found in the workflow under Action in the work platform.
2. Select AI-Generated:
Choose the AI-generated option within the Email Automation interface. This selection enables the system to dynamically generate email content based on your instructions and predefined parameters.
3. Provide Instructions:
Input clear instructions for the AI to follow. Specify the structure, character count, and any other relevant guidelines for the generated email. This step helps train the AI to produce content that aligns with your communication style.
4. Sample Text with Line Breaks:
Include sample text in the provided space, incorporating line breaks as needed. The AI utilizes this information to understand your email’s formatting and style preferences.
5. Reply To Functionality:
The “Reply-To” field is automatically filled with the email associated with your NinjaPipe account. Clicking the “Reply” button will direct any replies to this email. You can change the reply-to name as desired, offering flexibility in how recipients perceive the sender.
6. Additional Text:
Add a courteous touch to your emails by including additional text, such as best regards or thank-you sentences. Utilize line breaks to format this content effectively, ensuring a professional and polished appearance.
Following these steps, you can leverage NinjaPipe’s AI-generated Email Automation to enhance your communication efficiency. The platform’s intuitive features and customizable options empower users to create dynamic, personalized email content while automating the sending process. Incorporate this tool into your workflow to experience streamlined and effective email communication within your projects.
Creating an SMS Automation with NinjaPipe’s AI-generated content is a straightforward process streamlining your communication efforts. Here’s a simple guide on how to set up an SMS Automation within NinjaPipe:
Access SMS Automation:
Navigate to the SMS Automation section within NinjaPipe. This is typically located in the workflow or automation features of the platform.
Choose AI-Generated Option:
Select the AI-generated option within the SMS Automation interface. This choice enables the system to dynamically generate SMS content based on your provided instructions and predefined parameters.
Provide Clear Instructions:
Input precise instructions for the AI to follow. Clearly define the structure, character count, and other relevant guidelines for the generated SMS. This step trains the AI to produce content that aligns with your communication preferences.
No Manual Input for SMS:
Unlike manual input, the AI-generated SMS feature does not require you to compose the content personally. Instead, the AI utilizes the instructions you provide to generate SMS messages, automating the content creation process.
Additional Settings:
Depending on the capabilities of NinjaPipe, you may have additional settings to configure for your SMS Automation. Ensure that all relevant parameters, such as recipient selection and sending schedule, are appropriately set.
Review and Confirm:
Before activating the SMS Automation, review the instructions, settings, and any other details. Confirm that everything aligns with your communication goals and preferences.
Activate Automation:
Once satisfied with the setup, activate the SMS Automation. This triggers the AI to generate SMS messages based on the provided instructions and sends them to the selected recipients.
By following these steps, you can leverage NinjaPipe’s AI-generated SMS Automation to enhance the efficiency of your communication processes. This feature allows you to automate SMS content creation while ensuring that the messages align with your communication style and preferences. Integrate SMS Automation into your workflow for streamlined and effective communication within your projects.